Lexus RX (RX 350L, RX450h) 2016-2026 Repair Manual: Front Side Marker Light Bulb
Replacement
REPLACEMENT
CAUTION / NOTICE / HINT
HINT:
- Use the same procedure for the RH side and LH side.
- The following procedure is for the LH side.
PROCEDURE
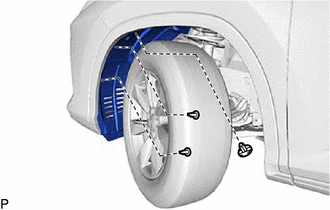
1. DISCONNECT FRONT FENDER MOULDING SUB-ASSEMBLY (for TMMC Made)
Click here .gif)
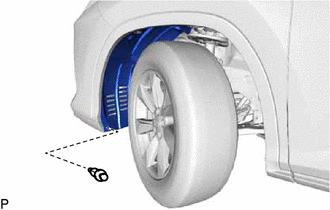
2. REMOVE FRONT SIDE MARKER LIGHT BULB
| (a) except TMMC Made: (1) Remove the 3 clips and separate the front fender splash shield sub-assembly. |
|
(b) for TMMC Made:
| (1) Remove the clip and separate the front fender splash shield sub-assembly. |
|
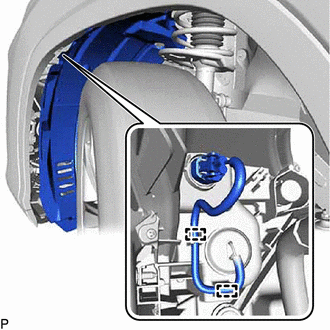
(c) w/o Automatic Headlight Beam Level Control System:
| (1) Disengage the 2 guides. |
|
(d) Turn the headlight cord with the front side marker light bulb as shown in the illustration to disconnect them as a unit.
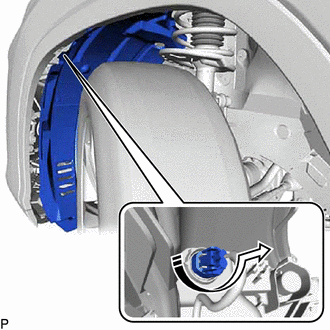
.png) | Disconnect in this Direction |
(e) Remove the front side marker light bulb from the headlight cord.
3. INSTALL FRONT SIDE MARKER LIGHT BULB
(a) Install the front side marker light bulb to the headlight cord.
(b) Turn the headlight cord with the front side marker light bulb as shown in the illustration to install them as a unit.
| | Install in this Direction |
(c) w/o Automatic Headlight Beam Level Control System:
(1) Engage the 2 guides.
(d) except TMMC Made:
(1) Install the front fender splash shield sub-assembly with the 3 clips.
(e) for TMMC Made:
(1) Install the front fender splash shield sub-assembly with the clip.
4. CONNECT FRONT FENDER MOULDING SUB-ASSEMBLY (for TMMC Made)
Click here
 Installation
INSTALLATION CAUTION / NOTICE / HINT HINT:
Use the same procedure for the RH side and LH side.
The following procedure is for the LH side.
PROCEDURE 1. INSTALL FOG LIGHT ASSEMBLY (a) Install t ...
 Front Turn Signal Light Bulb
ReplacementREPLACEMENT CAUTION / NOTICE / HINT HINT:
Use the same procedure for the RH side and LH side.
The following procedure is for the LH side.
PROCEDURE 1. REMOVE COOL AIR INTAKE DUCT SE ...
Other materials:
Lexus RX (RX 350L, RX450h) 2016-2026 Repair Manual > Vehicle Stability Control System: Brake System Control Module "A" System Voltage System Voltage Low (C137BA2)
DESCRIPTION If a malfunction is detected in the power supply circuit, the skid control ECU (brake actuator assembly) stores this DTC and the fail-safe function prohibits ABS operation. This DTC is stored when the +BS terminal voltage meets one of the DTC detection conditions due to a malfunction in ...
Lexus RX (RX 350L, RX450h) 2016-2026 Repair Manual > Front Console Box: Removal
REMOVAL PROCEDURE 1. REMOVE REAR CONSOLE UPPER PANEL (a) Disengage the 3 clips and 2 claws in the direction indicated by the arrow (1). Place Hand Here Remove in this Direction (1) Remove in this Direction (2) (b) Pull the rear console upper panel in the direction indicated b ...
Lexus RX (RX 350L, RX450h) 2016-{YEAR} Owners Manual
- For your information
- Pictorial index
- For safety and security
- Instrument cluster
- Operation of each component
- Driving
- Lexus Display Audio system
- Interior features
- Maintenance and care
- When trouble arises
- Vehicle specifications
- For owners
Lexus RX (RX 350L, RX450h) 2016-{YEAR} Repair Manual

0.0104