
Lexus RX (RX 350L, RX450h) 2016-2026 Repair Manual: Inspection
INSPECTION
PROCEDURE
1. INSPECT POWER WINDOW REGULATOR MOTOR ASSEMBLY LH
| (a) Connect a positive (+) battery lead to connector terminal 2 (B). NOTICE: Do not connect a positive (+) battery lead to any terminals other than terminal 2 (B) to avoid damaging the pulse sensor inside the motor. |
|
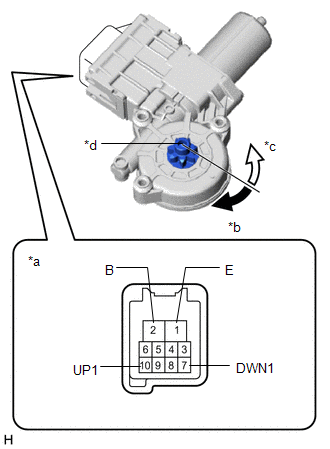
(b) Connect a negative (-) battery lead to connector terminals 1 (E) and 7 (DWN1) or 10 (UP1).
(c) Check that the motor gear rotates smoothly as follows:
OK:
| Measurement Condition | Specified Condition |
|---|---|
| Motor gear rotates clockwise |
| Motor gear rotates counterclockwise |
- If the result is not as specified, replace the power window regulator motor assembly LH.
CAUTION:
Initialize the power window control system after installing the power window regulator motor and regulator assembly.
2. INSPECT POWER WINDOW REGULATOR MOTOR ASSEMBLY RH
| (a) Connect a positive (+) battery lead to connector terminal 2 (B). NOTICE: Do not connect a positive (+) battery lead to any terminals other than terminal 2 (B) to avoid damaging the pulse sensor inside the motor. |
|
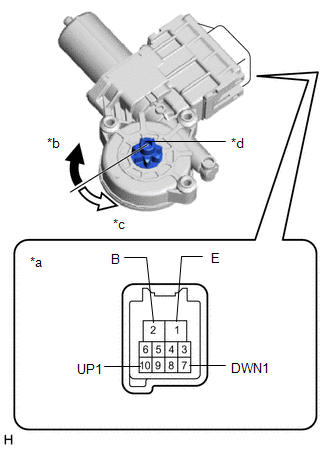
(b) Connect a negative (-) battery lead to connector terminals 1 (E) and 7 (DWN1) or 10 (UP1).
(c) Check that the motor gear rotates smoothly as follows:
OK:
| Measurement Condition | Specified Condition |
|---|---|
| Motor gear rotates counterclockwise |
| Motor gear rotates clockwise |
- If the result is not as specified, replace the power window regulator motor assembly RH.
CAUTION:
Initialize the power window control system after installing the power window regulator motor and regulator assembly.
 Removal
REMOVAL CAUTION / NOTICE / HINT The necessary procedures (adjustment, calibration, initialization or registration) that must be performed after parts are removed and installed, or replaced during powe ...
 Installation
INSTALLATION CAUTION / NOTICE / HINT HINT:
Use the same procedure for the RH side and LH side.
The following procedure is for the LH side.
PROCEDURE 1. PRECAUTION NOTICE: After turning the eng ...
Other materials:
Lexus RX (RX 350L, RX450h) 2016-2026 Repair Manual > Fuel Lid Opener Unit: Installation
INSTALLATION PROCEDURE 1. INSTALL FUEL FILLER OPENING LID SUB-ASSEMBLY (a) Temporarily install the fuel tank filler pipe shield with the drain hole and cutout facing downward as shown in the illustration. *a Rib *b Drain Hole *c Cutout (b) Install the fuel inle ...
Lexus RX (RX 350L, RX450h) 2016-2026 Repair Manual > Audio And Visual System (for 12.3 Inch Display): Microphone Circuit
DESCRIPTION
The radio receiver assembly and telephone microphone assembly are connected to each other using the microphone connection detection signal lines.
Using this circuit, the radio receiver assembly sends power to the telephone microphone assembly, and the telephone microphone assembly s ...
Lexus RX (RX 350L, RX450h) 2016-{YEAR} Owners Manual
- For your information
- Pictorial index
- For safety and security
- Instrument cluster
- Operation of each component
- Driving
- Lexus Display Audio system
- Interior features
- Maintenance and care
- When trouble arises
- Vehicle specifications
- For owners
Lexus RX (RX 350L, RX450h) 2016-{YEAR} Repair Manual

0.0106