Lexus RX (RX 350L, RX450h) 2016-2026 Repair Manual: Installation
INSTALLATION
PROCEDURE
1. INSTALL LEVEL WARNING SWITCH ASSEMBLY
(a) Install the level warning switch assembly as shown in the illustration.
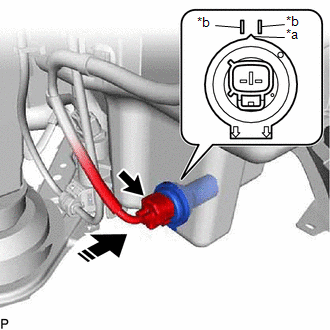
| *a | Protrusion |
| *b | Marking |
.png) | Install in this Direction |
NOTICE:
Make sure that the protrusion of the level warning switch assembly is between the 2 markings.
(b) Connect the connector.
2. ADD WASHER FLUID
Click here .gif)
3. INSTALL FRONT FENDER SPLASH SHIELD SUB-ASSEMBLY RH
Click here
4. INSTALL FRONT WHEEL OPENING EXTENSION PAD RH
Click here
5. INSTALL FRONT FENDER MOULDING SUB-ASSEMBLY RH
HINT:
Use the same procedure as for the LH side.
Click here
6. INSTALL FRONT WHEEL RH
Click here
 Inspection
INSPECTION PROCEDURE 1. INSPECT LEVEL WARNING SWITCH ASSEMBLY HINT: This check should be performed with the level warning switch assembly installed on the washer jar. (a) Fill the washer jar with w ...
 Washer Motor
...
Other materials:
Lexus RX (RX 350L, RX450h) 2016-2026 Repair Manual > Rear Brake: Removal
REMOVAL CAUTION / NOTICE / HINT HINT:
Use the same procedure for the RH side and LH side.
The following procedure is for the LH side.
PROCEDURE 1. PRECAUTION Click here 2. PERFORM REAR BRAKE PAD REPLACEMENT MODE Click here 3. REMOVE REAR WHEEL Click here 4. DRAIN BRAKE FLUID NOTICE: ...
Lexus RX (RX 350L, RX450h) 2016-2026 Repair Manual > Horn: Relay
On-vehicle InspectionON-VEHICLE INSPECTION PROCEDURE 1. INSPECT HORN RELAY ASSEMBLY (a) Remove the HORN relay. *a Component without harness connected (HORN Relay) (b) Measure the resistance according to the value(s) in the table below. Standard Resistance: Tester Conne ...
Lexus RX (RX 350L, RX450h) 2016-{YEAR} Owners Manual
- For your information
- Pictorial index
- For safety and security
- Instrument cluster
- Operation of each component
- Driving
- Lexus Display Audio system
- Interior features
- Maintenance and care
- When trouble arises
- Vehicle specifications
- For owners
Lexus RX (RX 350L, RX450h) 2016-{YEAR} Repair Manual

0.0097