Lexus RX (RX 350L, RX450h) 2016-2025 Repair Manual: Removal
REMOVAL
PROCEDURE
1. REMOVE REAR NO. 2 SEAT ASSEMBLY
Click here .gif)
2. REMOVE REAR FLOOR FINISH PLATE
Click here .gif)
.gif)
3. REMOVE REAR DOOR SCUFF PLATE RH
HINT:
Use the same procedure as for the LH side.
Click here .gif)
.gif)
4. REMOVE REAR DOOR INSIDE SCUFF PLATE RH
HINT:
Use the same procedure as for the LH side.
Click here .gif)
.gif)
5. REMOVE REAR SEAT OUTER TRACK BRACKET COVER RH
for 60/40 Split Seat Type:
Click here .gif)
.gif)
for Captain Seat Type:
HINT:
Use the same procedure as for the LH side.
Click here .gif)
.gif)
6. REMOVE FRONT DECK SIDE TRIM COVER RH
HINT:
Use the same procedure as for the LH side.
Click here .gif)
.gif)
7. REMOVE REAR SEAT SIDE GARNISH RH
HINT:
Use the same procedure as for the LH side.
Click here .gif)
.gif)
8. REMOVE NO. 1 LUGGAGE COMPARTMENT TRIM HOOK
Click here .gif)
.gif)
9. REMOVE ROPE HOOK ASSEMBLY
HINT:
Use the same procedure as for the LH side.
Click here .gif)
.gif)
10. REMOVE NO. 1 LUGGAGE COMPARTMENT LIGHT ASSEMBLY
Click here .gif)
.gif)
11. REMOVE DECK TRIM SIDE PANEL ASSEMBLY RH
Click here .gif)
.gif)
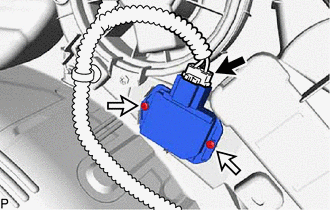
12. REMOVE BLOWER MOTOR CONTROL
| (a) Disconnect the connector. |
|
(b) Remove the 2 screws and blower motor control.
 Installation
INSTALLATION PROCEDURE 1. INSTALL BLOWER MOTOR CONTROL (a) Install the blower motor control with the 2 screws. (b) Connect the connector. 2. INSTALL DECK TRIM SIDE PANEL ASSEMBLY RH Click here 3. IN ...
 Blower Unit
...
Other materials:
Lexus RX (RX 350L, RX450h) 2016-2025 Repair Manual > Front Power Seat Control System (w/ Memory): Wireless-linked Return Function does not Operate
DESCRIPTION When a door is unlocked using the wireless unlock function, the certification ECU (smart key ECU assembly) sends a key ID signal to the main body ECU (multiplex network body ECU). When a door is unlocked using the entry unlock function, the certification ECU (smart key ECU assembly) send ...
Lexus RX (RX 350L, RX450h) 2016-2025 Repair Manual > Audio And Visual System (for 8 Inch Display): AV Signal Stoppage (Low Battery Voltage) (B158F)
DESCRIPTION This DTC is stored when a video or audio signal is interrupted due to battery voltage input to the radio receiver assembly dropping temporarily. DTC No. Detection Item DTC Detection Condition Trouble Area B158F AV Signal Stoppage (Low Battery Voltage) A video or audio si ...
Lexus RX (RX 350L, RX450h) 2016-{YEAR} Owners Manual
- For your information
- Pictorial index
- For safety and security
- Instrument cluster
- Operation of each component
- Driving
- Lexus Display Audio system
- Interior features
- Maintenance and care
- When trouble arises
- Vehicle specifications
- For owners
Lexus RX (RX 350L, RX450h) 2016-{YEAR} Repair Manual
0.0115

