Lexus RX (RX 350L, RX450h) 2016-2026 Repair Manual: Removal
REMOVAL
CAUTION / NOTICE / HINT
The necessary procedures (adjustment, calibration, initialization, or registration) that must be performed after parts are removed and installed, or replaced during condenser removal/installation are shown below.
Necessary Procedure After Parts Removed/Installed/Replaced| Replaced Part or Performed Procedure | Necessary Procedure | Effect/Inoperative Function when Necessary Procedure not Performed | Link |
|---|---|---|---|
| Front television camera view adjustment | Panoramic view monitor system | |
| Front bumper assembly (w/ Intelligent clearance sonar system) |
|
| |
PROCEDURE
1. RECOVER REFRIGERANT FROM REFRIGERATION SYSTEM
Click here .gif)
2. REMOVE FRONT BUMPER ASSEMBLY
Click here
3. REMOVE HOOD LOCK CONTROL CABLE COVER
Click here
4. REMOVE HOOD LOCK RELEASE LEVER PROTECTOR
Click here
5. REMOVE HOOD LOCK ASSEMBLY
Click here
6. REMOVE INLET AIR CLEANER ASSEMBLY
Click here
7. REMOVE UPPER RADIATOR SUPPORT SUB-ASSEMBLY
Click here
8. DISCONNECT DISCHARGE HOSE SUB-ASSEMBLY
| (a) Remove the bolt and disconnect the discharge hose sub-assembly from the cooler condenser assembly. |
|
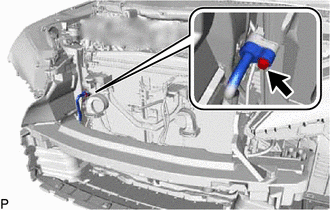
(b) Remove the O-ring from the discharge hose sub-assembly.
NOTICE:
Seal the openings of the disconnected parts using vinyl tape to prevent entry of moisture and foreign matter.
9. DISCONNECT AIR CONDITIONER TUBE AND ACCESSORY ASSEMBLY
| (a) Remove the bolt and disconnect the air conditioner tube and accessory assembly from the cooler condenser assembly. |
|

(b) Remove the O-ring from the air conditioner tube and accessory assembly.
NOTICE:
Seal the openings of the disconnected parts using vinyl tape to prevent entry of moisture and foreign matter.
10. REMOVE COOLER CONDENSER ASSEMBLY
(a) Disengage the 4 claws.
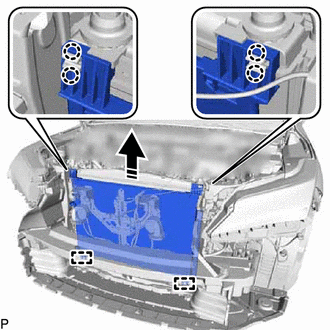
.png) | Remove in this Direction |
(b) Disengage the 2 guides and remove the cooler condenser assembly as shown in the illustration.
NOTICE:
Do not damage the cooler condenser assembly or radiator assembly when removing the cooler condenser assembly.
 On-vehicle Inspection
ON-VEHICLE INSPECTION PROCEDURE 1. INSPECT COOLER CONDENSER ASSEMBLY (a) If the cooler condenser assembly fins are dirty, clean them with water and dry them with compressed air. NOTICE: Do not damage ...
 Disassembly
DISASSEMBLY PROCEDURE 1. REMOVE COOLER DRYER (a) Using a 14 mm straight hexagon socket wrench, remove the cap from the modulator. *a Modulator (b) Using pliers, remove th ...
Other materials:
Lexus RX (RX 350L, RX450h) 2016-2026 Repair Manual > Audio And Visual System (for 8 Inch Display): AVC-LAN Circuit
DESCRIPTION Each unit of the audio and visual system connected to the AVC-LAN (communication bus) transmits signals via AVC-LAN communication. If a short to +B or short to ground occurs in an AVC-LAN communication line, the audio and visual system will not function normally because communication is ...
Lexus RX (RX 350L, RX450h) 2016-2026 Repair Manual > Audio And Visual System (for 8 Inch Display): Portable Player cannot be Connected Manually/Automatically
CAUTION / NOTICE / HINT HINT: Some versions of "Bluetooth" compatible audio players may not function properly, or the functions may be limited using the radio receiver assembly, even if the portable audio player itself can play files. Click here PROCEDURE 1. CHECK CONNECTED DEVICE SETTINGS ...
Lexus RX (RX 350L, RX450h) 2016-{YEAR} Owners Manual
- For your information
- Pictorial index
- For safety and security
- Instrument cluster
- Operation of each component
- Driving
- Lexus Display Audio system
- Interior features
- Maintenance and care
- When trouble arises
- Vehicle specifications
- For owners
Lexus RX (RX 350L, RX450h) 2016-{YEAR} Repair Manual

0.0121