Lexus RX (RX 350L, RX450h) 2016-2026 Repair Manual: Rear Air Conditioning Panel
Components
COMPONENTS
ILLUSTRATION

| *1 | NO. 2 AIR CONDITIONING CONTROL ASSEMBLY | - | - |
Removal
REMOVAL
PROCEDURE
1. REMOVE NO. 2 AIR CONDITIONING CONTROL ASSEMBLY
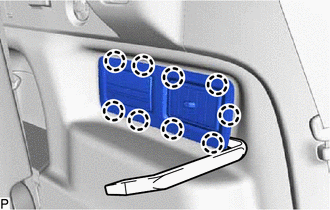
| (a) Using a moulding remover, disengage the 9 claws as shown in the illustration. |
|
(b) Disengage the guide as shown in the illustration.
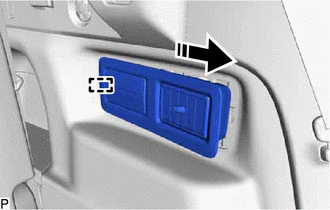
.png) | Remove in this Direction |
(c) Disconnect the connector to remove the No. 2 air conditioning control assembly.
Installation
INSTALLATION
PROCEDURE
1. INSTALL NO. 2 AIR CONDITIONING CONTROL ASSEMBLY
(a) Connect the connector.
(b) Engage the guide as shown in the illustration.
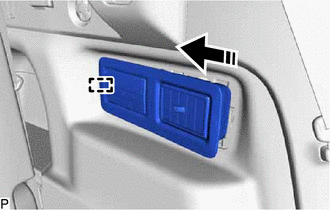
.png) | Install in this Direction |
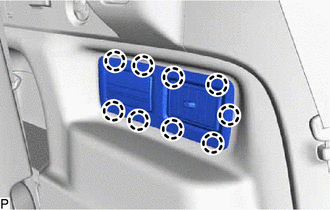
| (c) Engage the 9 claws to install the No. 2 air conditioning control assembly. |
|
 Installation
INSTALLATION PROCEDURE 1. INSTALL QUICK HEATER ASSEMBLY (a) Engage the guide to install the quick heater assembly as shown in the illustration. Install in this Direction (b) Connect the 2 co ...

Other materials:
Lexus RX (RX 350L, RX450h) 2016-2026 Repair Manual > Vehicle Stability Control System: Left Front Wheel Speed Sensor Circuit Short to Battery (C050012)
DESCRIPTION Refer to DTC C05001F. Click here DTC No. Detection Item DTC Detection Condition Trouble Area C050012 Left Front Wheel Speed Sensor Circuit Short to Battery The speed sensor short signal is ON continuously for 0.5 seconds or more.
Front speed sensor LH
Front skid ...
Lexus RX (RX 350L, RX450h) 2016-2026 Repair Manual > Steering Lock System: How To Proceed With Troubleshooting
CAUTION / NOTICE / HINT HINT:
Use the following procedures to troubleshoot the steering lock system.
*: Use the Techstream.
PROCEDURE 1. VEHICLE BROUGHT TO WORKSHOP
NEXT 2. CUSTOMER PROBLEM ANALYSIS (a) Interview the customer and confirm the problem. Click ...
Lexus RX (RX 350L, RX450h) 2016-{YEAR} Owners Manual
- For your information
- Pictorial index
- For safety and security
- Instrument cluster
- Operation of each component
- Driving
- Lexus Display Audio system
- Interior features
- Maintenance and care
- When trouble arises
- Vehicle specifications
- For owners
Lexus RX (RX 350L, RX450h) 2016-{YEAR} Repair Manual

0.0103