Lexus RX (RX 350L, RX450h) 2016-2026 Repair Manual: Removal
REMOVAL
PROCEDURE
1. RECOVER REFRIGERANT FROM REFRIGERATION SYSTEM
Click here .gif)
2. REMOVE PIPING CLAMP
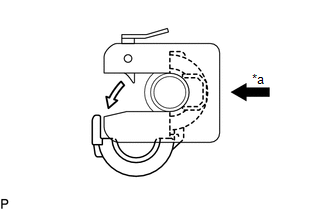
(a) for Low Pressure:
(1) While pressing the end of the suction hose sub-assembly into the end of the No. 2 air conditioner tube and accessory assembly, use pliers to squeeze together both sides of the piping clamp until it breaks apart.
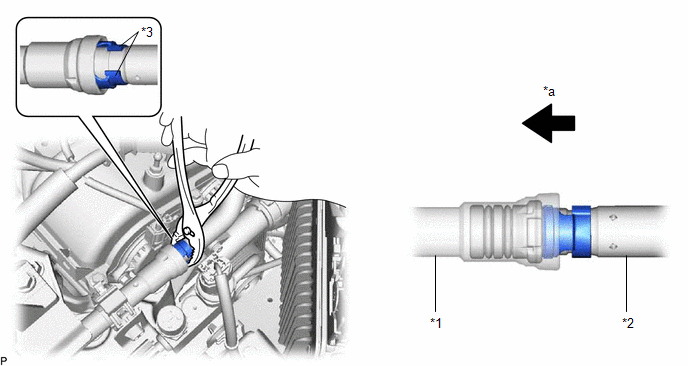
| *1 | No. 2 Air Conditioner Tube and Accessory Assembly | *2 | Suction Hose Sub-assembly |
| *3 | Piping Clamp | - | - |
| *a | Press In | - | - |
NOTICE:
- If any foreign matter is adhered to the connecting parts, brush it off or use compressed air to remove it.
- Make sure that fragments of the piping clamp do not enter the piping.
(2) Separate the suction hose sub-assembly.
NOTICE:
Clean off any foreign matter on and near the ends of the suction hose sub-assembly and No. 2 air conditioner tube and accessory assembly.
(3) Remove the 2 O-rings from the suction hose sub-assembly.
NOTICE:
Wrap the open ends of the separated No. 2 air conditioner tube and accessory assembly and suction hose sub-assembly with vinyl tape to prevent entry of moisture and foreign matter.
(4) Remove the piping clamp.
(b) for High Pressure:
| (1) Install SST to the piping clamp as shown in the illustration. SST: 09870-00025 |
|
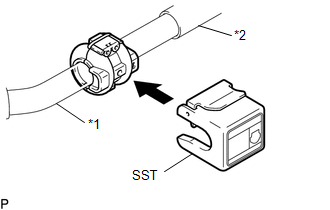
| (2) Hold the No. 2 air conditioner tube and accessory assembly and air conditioner tube and accessory assembly with each hand and push in SST with both thumbs. NOTICE: Do not apply excessive force to the No. 2 air conditioner tube and accessory assembly or air conditioner tube and accessory assembly as they may bend. |
|

| (3) Raise the stopper of SST and remove SST and the piping clamp together from the No. 2 air conditioner tube and accessory assembly. |
|
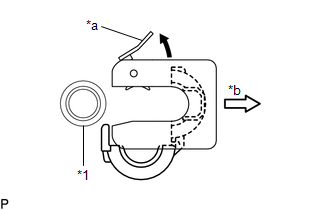
(4) Remove the piping clamp from SST.
(5) Remove the No. 2 air conditioner tube and accessory assembly from the air conditioner tube and accessory assembly.
(6) Remove the 2 O-rings from the air conditioner tube and accessory assembly.
NOTICE:
Seal the openings of the disconnected parts using vinyl tape to prevent entry of moisture and foreign matter.
3. REMOVE PIPING CLAMP (w/ Rear Air Conditioning System)
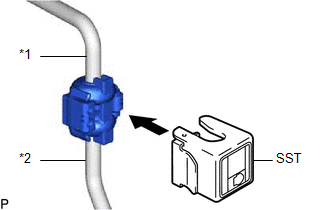
(a) for Low Pressure:
| (1) Install SST to the piping clamp as shown in the illustration. SST: 09870-00015 |
|
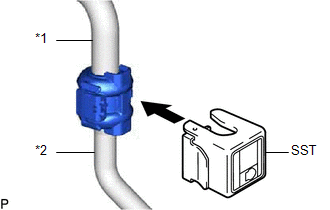
| (2) Hold the No. 2 air conditioning tube and accessory assembly and air conditioning hose and accessory with each hand and push in SST with both thumbs. NOTICE: Do not apply excessive force to the No. 2 air conditioning tube and accessory assembly or air conditioning hose and accessory as they may bend. |
|
| (3) Raise the stopper of SST and remove SST and the piping clamp together from the air conditioning hose and accessory. |
|

(4) Remove the piping clamp from SST.
(5) Disconnect the No. 2 air conditioning tube and accessory assembly from the air conditioning hose and accessory.
(6) Remove the 2 O-rings from the No. 2 air conditioning tube and accessory assembly.
NOTICE:
Seal the openings of the disconnected parts using vinyl tape to prevent entry of moisture and foreign matter.
(b) for High Pressure:
| (1) Install SST to the piping clamp as shown in the illustration. SST: 09870-00025 |
|
| (2) Hold the No. 2 air conditioning tube and accessory assembly and air conditioning hose and accessory with each hand and push in SST with both thumbs. NOTICE: Do not apply excessive force to the No. 2 air conditioning tube and accessory assembly or air conditioning hose and accessory as they may bend. |
|
| (3) Raise the stopper of SST and remove SST and the piping clamp together from the air conditioning hose and accessory. |
|
(4) Remove the piping clamp from SST.
(5) Disconnect the No. 2 air conditioning tube and accessory assembly from the air conditioning hose and accessory.
(6) Remove the 2 O-rings from the No. 2 air conditioning tube and accessory assembly.
NOTICE:
Seal the openings of the disconnected parts using vinyl tape to prevent entry of moisture and foreign matter.
 Components
COMPONENTS ILLUSTRATION *A w/o Rear Air Conditioning System *B for Low Pressure *C for High Pressure - - *1 PIPING CLAMP *2 NO. 2 AIR CONDITIONER TUBE AND ACCESSORY ASSEM ...
 Installation
INSTALLATION PROCEDURE 1. INSTALL PIPING CLAMP (a) for Low Pressure: (1) Remove the vinyl tape from the open ends of the No. 2 air conditioner tube and accessory assembly and suction hose sub-assembly ...
Other materials:
Lexus RX (RX 350L, RX450h) 2016-2026 Repair Manual > Audio And Visual System (for 12.3 Inch Display): GVIF Disconnected (from Extension Module to H/U) (B153A)
DESCRIPTION The radio receiver assembly and navigation ECU are connected via video signal (digital) lines. This DTC is stored when a video signal (digital) line is disconnected. DTC No. Detection Item DTC Detection Condition Trouble Area B153A GVIF Disconnected (from Extension Module ...
Lexus RX (RX 350L, RX450h) 2016-2026 Repair Manual > Air Conditioning System: Compressor Lock Sensor Circuit (B1422/22)
DESCRIPTION The ECM sends the engine speed signal to the air conditioning amplifier assembly via CAN communication. The air conditioning amplifier assembly reads the difference between compressor speed and engine speed. When the difference becomes too large, the air conditioning amplifier assembly d ...
Lexus RX (RX 350L, RX450h) 2016-{YEAR} Owners Manual
- For your information
- Pictorial index
- For safety and security
- Instrument cluster
- Operation of each component
- Driving
- Lexus Display Audio system
- Interior features
- Maintenance and care
- When trouble arises
- Vehicle specifications
- For owners
Lexus RX (RX 350L, RX450h) 2016-{YEAR} Repair Manual

0.0094