Lexus RX (RX 350L, RX450h) 2016-2026 Repair Manual: Installation
INSTALLATION
PROCEDURE
1. INSTALL PIPING CLAMP
(a) for Low Pressure:
(1) Remove the vinyl tape from the open ends of the No. 2 air conditioner tube and accessory assembly and suction hose sub-assembly.
| (2) Install a new piping clamp to the suction hose sub-assembly. NOTICE:
|
|

(3) Thoroughly coat 2 new O-rings and the contact surface of the suction hose sub-assembly with compressor oil.
Compressor Oil:
ND-OIL 12 or equivalent
(4) Install the 2 O-rings to the suction hose sub-assembly.
NOTICE:
Keep the O-rings and sealing surface of the No. 2 air conditioner tube and accessory assembly free from foreign matter.
| (5) Engage the No. 2 air conditioner tube and accessory assembly and suction hose sub-assembly by matching the alignment marks. NOTICE: Engage the parts by holding the pipe, not the piping clamp. |
|
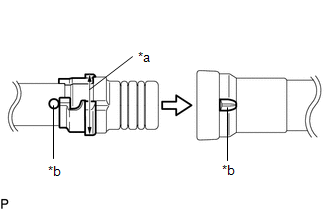
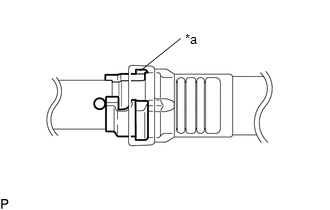
| (6) Securely insert the piping clamp to the point where the large diameter section of the piping clamp is covered by the No. 2 air conditioner tube and accessory assembly. HINT:
|
|
(b) for High Pressure:
(1) Remove the vinyl tape from the No. 2 air conditioner tube and accessory assembly and air conditioner tube and accessory assembly.
(2) Sufficiently apply compressor oil to 2 new O-rings and the fitting surfaces of the air conditioner tube and accessory assembly.
Compressor Oil:
ND-OIL 12 or equivalent
(3) Install the 2 O-rings to the air conditioner tube and accessory assembly.
NOTICE:
Keep the O-rings and sealing surface of the No. 2 air conditioner tube and accessory assembly free from foreign matter.
(4) Install the No. 2 air conditioner tube and accessory assembly to the air conditioner tube and accessory assembly.
| (5) Install the piping clamp to the No. 2 air conditioner tube and accessory assembly. NOTICE: Make sure that the piping clamp is engaged securely with no gap. |
|

2. INSTALL PIPING CLAMP (w/ Rear Air Conditioning System)
(a) for Low Pressure:
(1) Remove the vinyl tape from the No. 2 air conditioning tube and accessory assembly and air conditioning hose and accessory.
(2) Sufficiently apply compressor oil to 2 new O-rings and the fitting surfaces of the No. 2 air conditioning tube and accessory assembly.
Compressor Oil:
ND-OIL 12 or equivalent
(3) Install the 2 O-rings to the No. 2 air conditioning tube and accessory assembly.
(4) Install the No. 2 air conditioning tube and accessory assembly to the air conditioning hose and accessory.
| (5) Install the piping clamp to the air conditioning hose and accessory. NOTICE: Make sure that the piping clamp is engaged securely with no gap. |
|
(b) for High Pressure:
(1) Remove the vinyl tape from the No. 2 air conditioning tube and accessory assembly and air conditioning hose and accessory.
(2) Sufficiently apply compressor oil to 2 new O-rings and the fitting surfaces of the No. 2 air conditioning tube and accessory assembly.
Compressor Oil:
ND-OIL 12 or equivalent
(3) Install the 2 O-rings to the No. 2 air conditioning tube and accessory assembly.
(4) Install the No. 2 air conditioning tube and accessory assembly to the air conditioning hose and accessory.
| (5) Install the piping clamp to the No. 2 air conditioning tube and accessory assembly. NOTICE: Make sure that the piping clamp is engaged securely with no gap. |
|
3. CHARGE AIR CONDITIONING SYSTEM WITH REFRIGERANT
Click here .gif)
4. WARM UP ENGINE
Click here
5. INSPECT FOR REFRIGERANT LEAK
Click here
 Removal
REMOVAL PROCEDURE 1. RECOVER REFRIGERANT FROM REFRIGERATION SYSTEM Click here 2. REMOVE PIPING CLAMP (a) for Low Pressure: (1) While pressing the end of the suction hose sub-assembly into the end of ...
 Relay
Relay
On-vehicle InspectionON-VEHICLE INSPECTION PROCEDURE 1. INSPECT PTC HEATER RELAY (a) Measure the resistance according to the value(s) in the table below. *a Component without harness connected ( ...
Other materials:
Lexus RX (RX 350L, RX450h) 2016-2026 Repair Manual > Smart Access System With Push-button Start (for Entry Function): Precaution
PRECAUTION CAUTION REGARDING INTERFERENCE WITH ELECTRONIC DEVICES CAUTION:
People with implantable cardiac pacemakers, cardiac resynchronization therapy-pacemakers or implantable cardioverter defibrillators should keep away from the smart access system antennas. The radio waves may affect the ope ...
Lexus RX (RX 350L, RX450h) 2016-2026 Repair Manual > Headlight Cleaner Actuator: Removal
REMOVAL CAUTION / NOTICE / HINT The necessary procedures (adjustment, calibration, initialization or registration) that must be performed after parts are removed and installed, or replaced during headlight washer actuator sub-assembly removal/installation are shown below. Necessary Procedure After P ...
Lexus RX (RX 350L, RX450h) 2016-{YEAR} Owners Manual
- For your information
- Pictorial index
- For safety and security
- Instrument cluster
- Operation of each component
- Driving
- Lexus Display Audio system
- Interior features
- Maintenance and care
- When trouble arises
- Vehicle specifications
- For owners
Lexus RX (RX 350L, RX450h) 2016-{YEAR} Repair Manual

0.0096