Lexus RX (RX 350L, RX450h) 2016-2026 Repair Manual: Installation
INSTALLATION
PROCEDURE
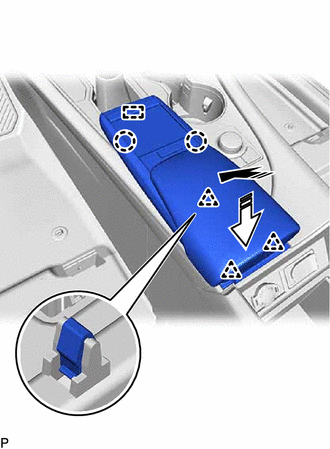
1. INSTALL CONSOLE BOX ASSEMBLY
(a) Engage the 6 guides as shown in the illustration.
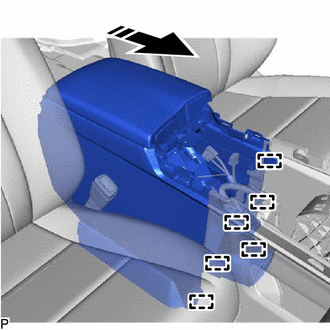
.png) | Install in this Direction |
(b) Connect each connector.
(c) Install the console box assembly with the 4 bolts and 2 screws.
(d) Connect the connector.
(e) Engage the clamp.
(f) Engage the clamp.
2. INSTALL CONSOLE REAR END PANEL SUB-ASSEMBLY
(a) Connect each connector.
(b) Engage the 6 clips and 4 claws to install the console rear end panel sub-assembly as shown in the illustration.
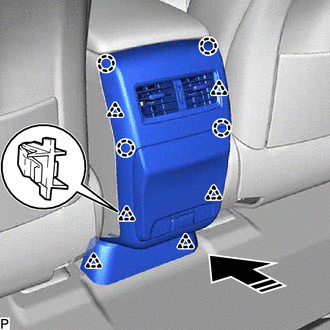
| | Install in this Direction |
3. INSTALL INSTRUMENT PANEL CUP HOLDER ASSEMBLY
(a) Install the instrument panel cup holder assembly with the 6 screws.
4. INSTALL CONSOLE PANEL SUB-ASSEMBLY
(a) Connect each connector.
(b) Engage the 5 guides and 4 clips to install the console panel sub-assembly as shown in the illustration.
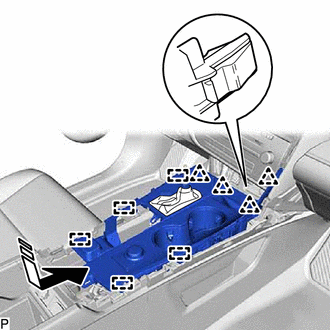
| | Install in this Direction |
(c) Install the 2 screws.
(d) Move the shift lever to P.
(e) Engage the clamp.
5. INSTALL INSTRUMENT CLUSTER FINISH PANEL ORNAMENT
(a) Engage the 7 clips and 4 claws to install the instrument cluster finish panel ornament as shown in the illustration.
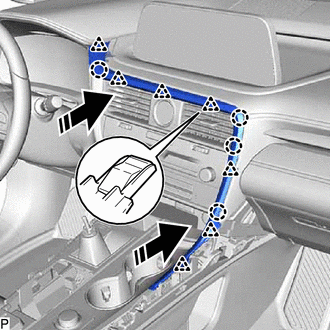
| | Install in this Direction |
6. INSTALL SHIFT LEVER KNOB SUB-ASSEMBLY
(a) Turn the shift lever knob sub-assembly clockwise to install it.
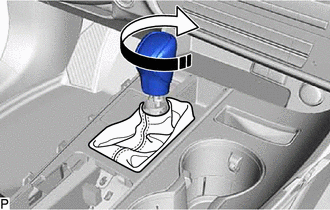
| | Install in this Direction |
(b) Engage the claw to connect the shift hole cover sub-assembly as shown in the illustration.
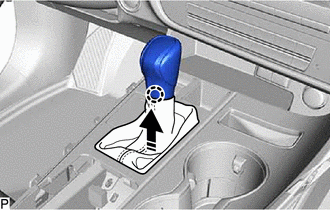
| | Install in this Direction |
7. INSTALL LOWER NO. 1 INSTRUMENT PANEL FINISH PANEL
(a) Engage the 8 clips to install the lower No. 1 instrument panel finish panel as shown in the illustration.
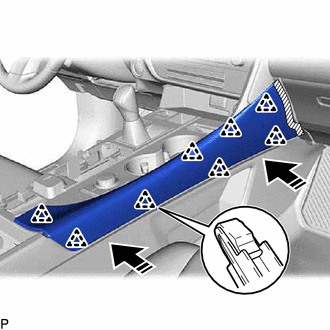
| | Install in this Direction |
8. INSTALL LOWER NO. 2 INSTRUMENT PANEL FINISH PANEL
(a) Engage the 7 clips to install the lower No. 2 instrument panel finish panel as shown in the illustration.
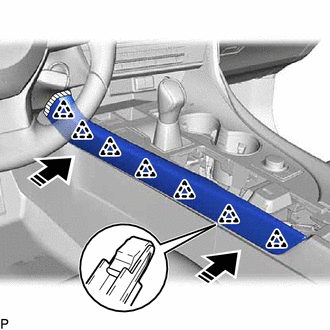
| | Install in this Direction |
9. INSTALL REAR CONSOLE UPPER PANEL
(a) Connect the connector.
(b) Push the rear console upper panel in the direction indicated by the arrow (1) shown in the illustration to engage the guide and then push it in the direction indicated by the arrow (2) shown in the illustration to engage the 2 claws and 3 clips and install the rear console upper panel.
| | Install in this Direction (1) |
.png) | Install in this Direction (2) |
 Disassembly
DISASSEMBLY PROCEDURE 1. REMOVE CONSOLE COIN BOX (w/ Console Coin Box) (a) Remove the console coin box. 2. REMOVE REAR CONSOLE BOX GARNISH (a) Disengage the 3 clips as shown in the illu ...
 Reassembly
REASSEMBLY PROCEDURE 1. INSTALL REAR CONSOLE BOX WIRE (a) Engage the 9 clamps to install the rear console box wire. 2. INSTALL NO. 1 INTERIOR ILLUMINATION LIGHT ASSEMBLY (for Rear Side) ...
Other materials:
Lexus RX (RX 350L, RX450h) 2016-2026 Repair Manual > Meter / Gauge / Display: Clock
ComponentsCOMPONENTS ILLUSTRATION *1 CLOCK ASSEMBLY *2 RADIO RECEIVER ASSEMBLY WITH REGISTER RemovalREMOVAL CAUTION / NOTICE / HINT The necessary procedures (adjustment, calibration, initialization or registration) that must be performed after parts are removed and installed, or replace ...
Lexus RX (RX 350L, RX450h) 2016-2026 Repair Manual > Steering Gear: Reassembly
REASSEMBLY PROCEDURE 1. INSTALL NO. 2 STEERING RACK BOOT (a) Apply lithium soap base glycol grease to the inside of the small opening of a new No. 2 steering rack boot. Lithium Soap Base Glycol Grease (b) Install the No. 2 steering rack boot to the groove on the rack housing. NOTICE:
Be ...
Lexus RX (RX 350L, RX450h) 2016-{YEAR} Owners Manual
- For your information
- Pictorial index
- For safety and security
- Instrument cluster
- Operation of each component
- Driving
- Lexus Display Audio system
- Interior features
- Maintenance and care
- When trouble arises
- Vehicle specifications
- For owners
Lexus RX (RX 350L, RX450h) 2016-{YEAR} Repair Manual

0.0107