Lexus RX (RX 350L, RX450h) 2016-2026 Repair Manual: Reassembly
REASSEMBLY
PROCEDURE
1. INSTALL NO. 2 ROOF SILENCER PAD (for TMC Made)
(a) Remove the release paper from 2 new No. 2 roof silencer pads.
HINT:
After removing the release paper, keep the exposed adhesive free from foreign matter.
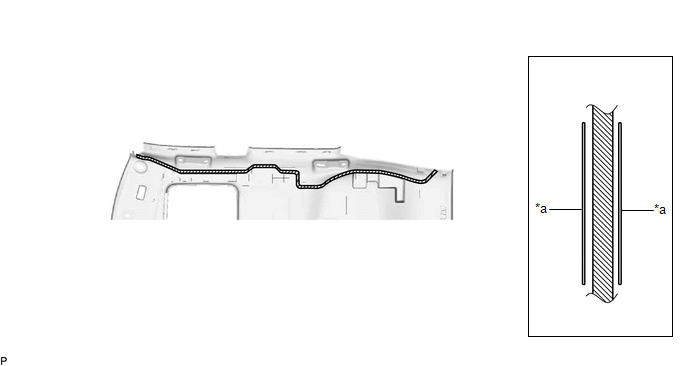
(b) Align the 2 No. 2 roof silencer pads with the markings on the roof headlining assembly and install them as shown in the illustration.
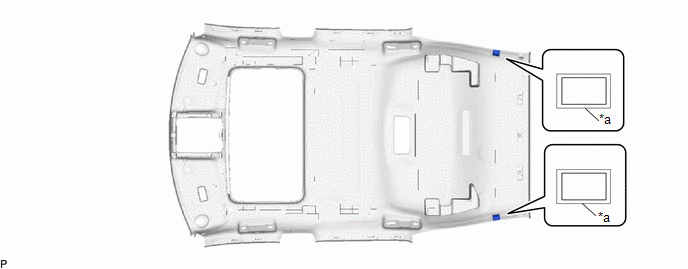
| *a | Marking | - | - |
2. INSTALL NO. 1 ROOF SILENCER PAD (for TMC Made)
(a) Remove the release paper from 2 new No. 1 roof silencer pads.
HINT:
After removing the release paper, keep the exposed adhesive free from foreign matter.
(b) Align the 2 No. 1 roof silencer pads with the markings on the roof headlining assembly and install them as shown in the illustration.
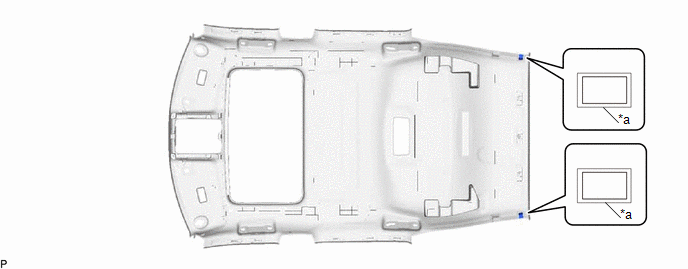
| *a | Marking | - | - |
3. INSTALL NO. 1 ROOF WIRE (for TMC Made)
(a) When replacing the roof headlining assembly:
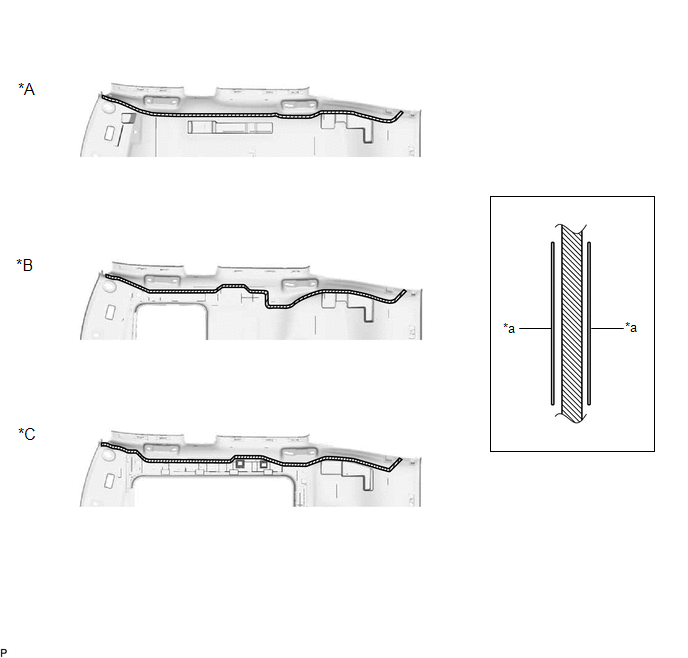
(1) Using a knife, cut the roof headlining assembly at the markings as shown in the illustration.
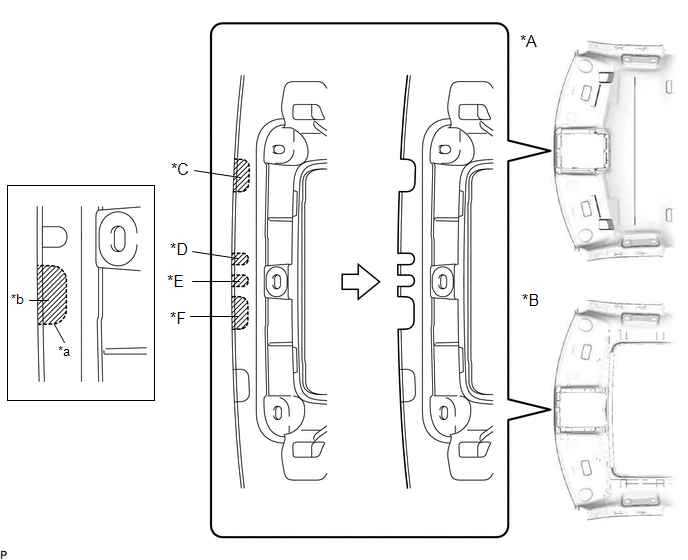
| *A | for Standard Roof | *B | except Standard Roof |
| *C | w/ Rain Sensor | *D | w/ EC Mirror with LEXUS Safety System+ |
| *E | w/ EC Mirror without LEXUS Safety System+ | *F | w/ LEXUS Safety System+ |
| *a | Marking | *b | Cut |
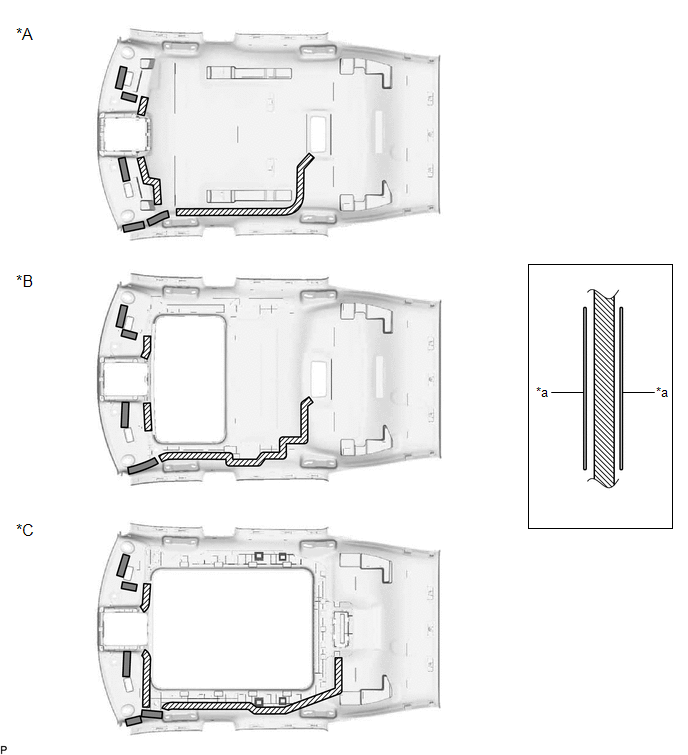
(b) Apply butyl tape as shown in the illustration.
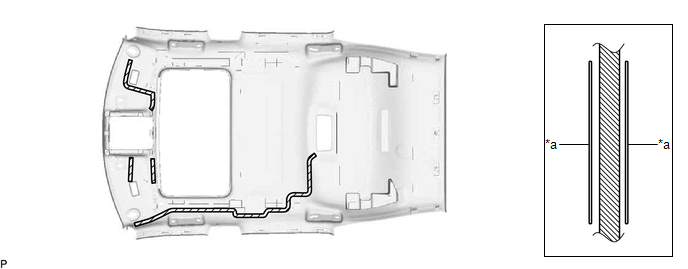
| *a | Marking | - | - |
.png) | Butyl Tape | - | - |
NOTICE:
Securely attach the butyl tape.
(c) Turn the 2 visor connectors clockwise approximately 90° to install them to the roof headlining assembly.
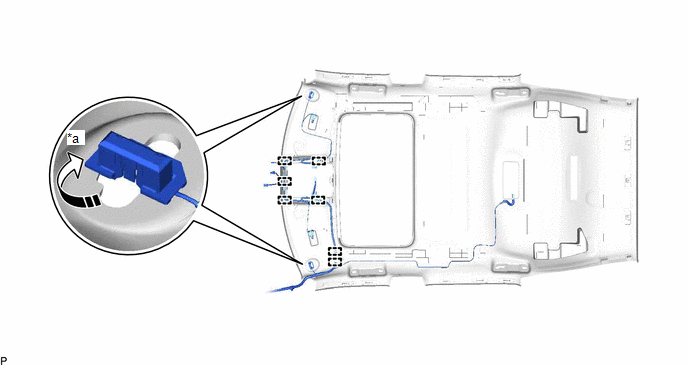
| *a | 90° | - | - |
.png) | Rotation Direction | - | - |
(d) Engage the 7 clamps.
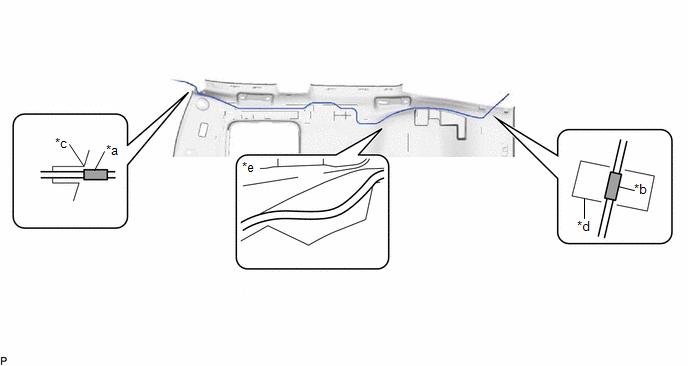
(e) Align the marking tape (A) on the No. 1 roof wire with the vehicle front side tab of the roof headlining assembly.
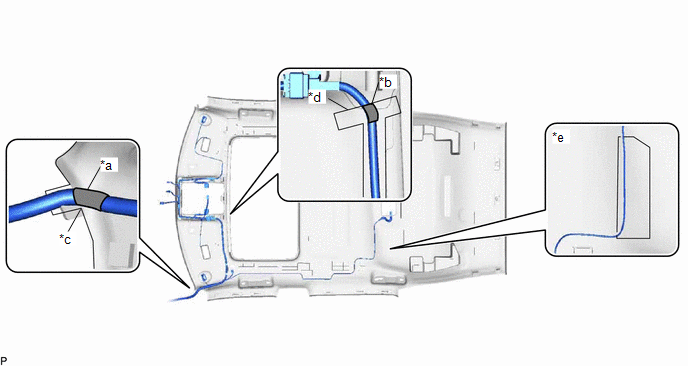
| *a | Marking Tape (A) | *b | Marking Tape (B) |
| *c | Vehicle Front Side Tab of the Roof Headlining Assembly | *d | Marking |
| *e | Adjustment Area | - | - |
(f) Align the edge of the marking tape (B) on the No. 1 roof wire with the markings on the roof headlining assembly.
(g) Attach the No. 1 roof wire with the butyl tape.
NOTICE:
- Securely attach the No. 1 roof wire.
- If any of the No. 1 roof wire is left loose, it will cause an abnormal noise.
- Make sure to attach the No. 1 roof wire without leaving any of it loose.
HINT:
Secure the extra length of the No. 1 roof wire in the adjustment area.
(h) Align the edge of the marking tape (C) on the No. 1 roof wire with the markings on the roof headlining assembly.
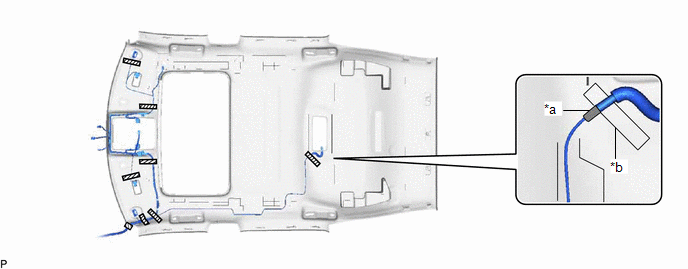
| *a | Marking Tape (C) | *b | Marking |
| | Adhesive Tape | - | - |
(i) Install the No. 1 roof wire to the roof headlining assembly with adhesive tape.
NOTICE:
- Apply the tape securely in place.
- Do not touch the adhesive surface when applying the tape to prevent adhesion failure.
4. INSTALL NO. 1 ROOF WIRE (for TMMC Made)
(a) When replacing the roof headlining assembly:
(1) Using a knife, cut the roof headlining assembly at the markings as shown in the illustration.
| *A | for Standard Roof | *B | except Standard Roof |
| *C | w/ Rain Sensor | *D | w/ EC Mirror with LEXUS Safety System+ |
| *E | w/ EC Mirror without LEXUS Safety System+ | *F | w/ LEXUS Safety System+ |
| *a | Marking | *b | Cut |
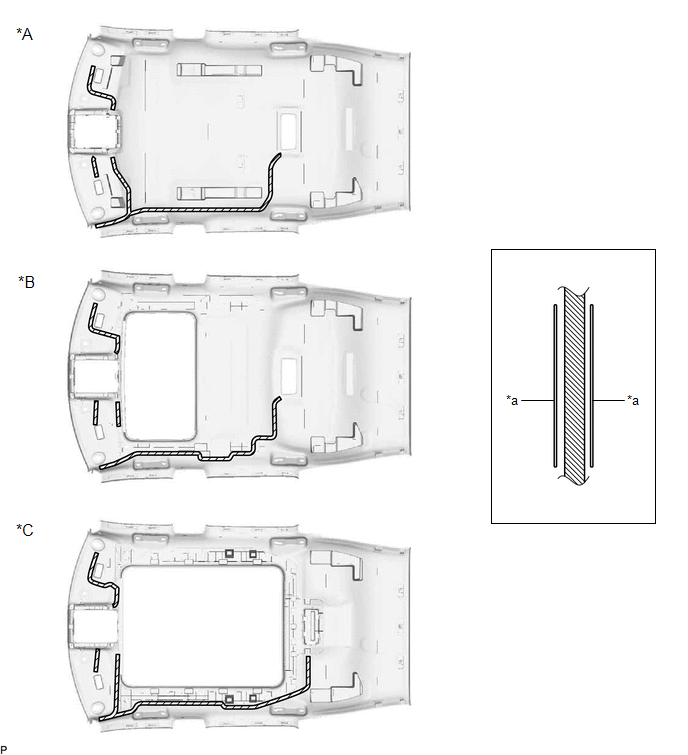
(2) Apply butyl tape as shown in the illustration.
| *A | for Standard Roof | *B | for Sliding Roof |
| *C | for Panoramic Moon Roof | - | - |
| *a | Marking | - | - |
| | Butyl Tape |  | Double-sided Tape |
NOTICE:
Securely attach the butyl tape.
(3) Remove the release paper from the double-sided tape.
HINT:
After removing the release paper, keep the exposed adhesive free from foreign matter.
(b) When reusing the roof headlining assembly:
| *A | for Standard Roof | *B | for Sliding Roof |
| *C | for Panoramic Moon Roof | - | - |
| *a | Marking | - | - |
| | Butyl Tape | - | - |
(1) Apply butyl tape as shown in the illustration.
NOTICE:
Securely attach the butyl tape.
(c) Turn the 2 visor connectors clockwise approximately 90° to install them to the roof headlining assembly.
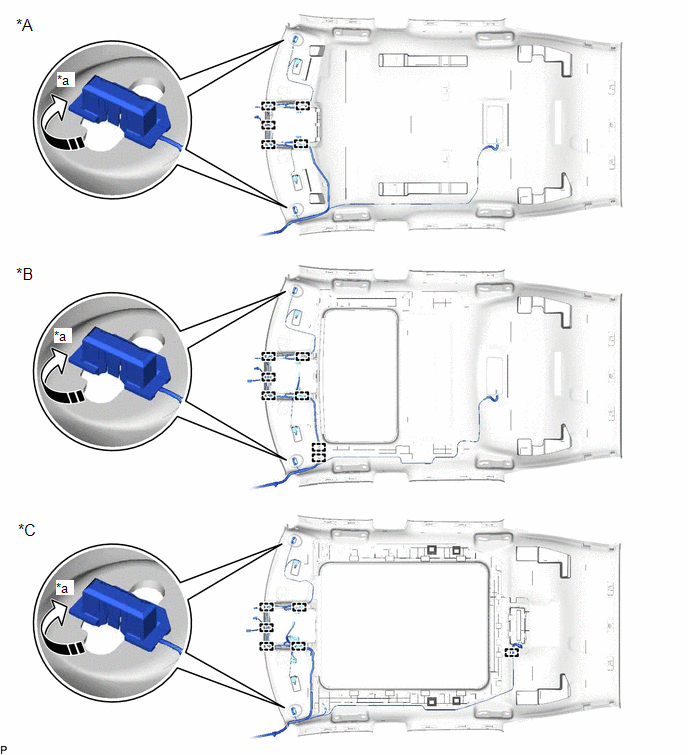
| *A | for Standard Roof | *B | for Sliding Roof |
| *C | for Panoramic Moon Roof | - | - |
| *a | 90° | - | - |
| | Rotation Direction | - | - |
(d) Engage each clamp.
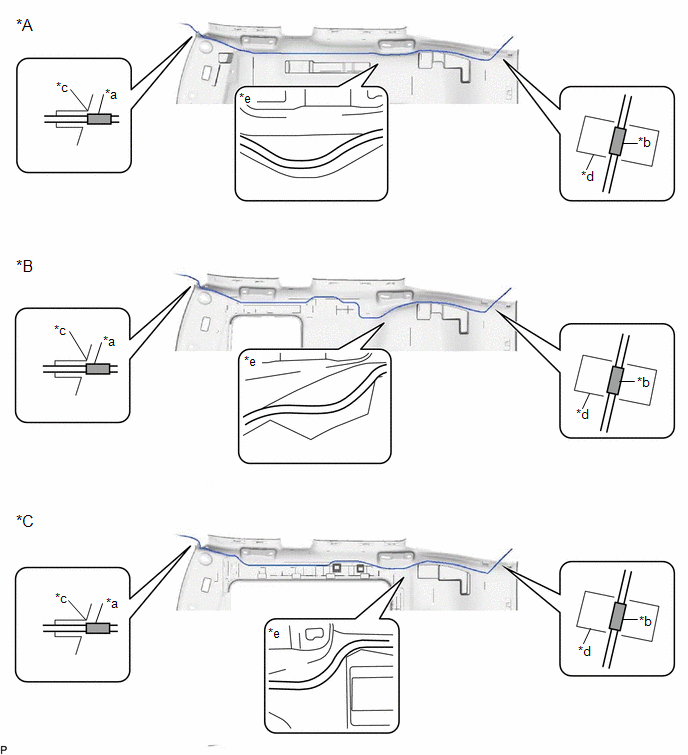
(e) Align the marking tape (A) on the No. 1 roof wire with the vehicle front side tab of the roof headlining assembly.
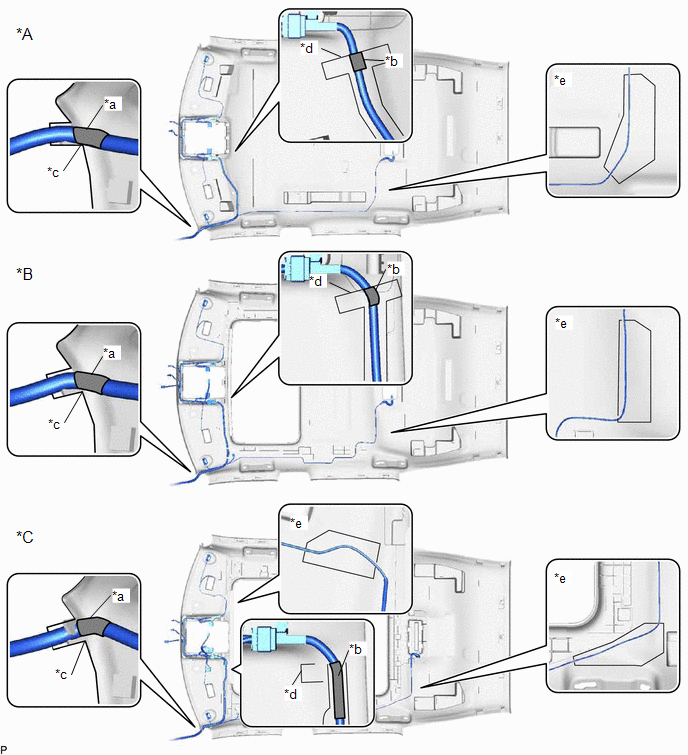
| *A | for Standard Roof | *B | for Sliding Roof |
| *C | for Panoramic Moon Roof | - | - |
| *a | Marking Tape (A) | *b | Marking Tape (B) |
| *c | Vehicle Front Side Tab of the Roof Headlining Assembly | *d | Marking |
| *e | Adjustment Area | - | - |
(f) Align the edge of the marking tape (B) on the No. 1 roof wire with the markings on the roof headlining assembly.
(g) When reusing the roof headlining assembly:
(1) Attach the No. 1 roof wire with the butyl tape.
NOTICE:
- Securely attach the No. 1 roof wire.
- If any of the No. 1 roof wire is left loose, it will cause an abnormal noise.
- Make sure to attach the No. 1 roof wire without leaving any of it loose.
HINT:
Secure the extra length of the No. 1 roof wire in the adjustment area.
(h) When replacing the roof headlining assembly:
(1) Attach the No. 1 roof wire with the butyl tape and double-sided tape.
NOTICE:
- Securely attach the No. 1 roof wire.
- If any of the No. 1 roof wire is left loose, it will cause an abnormal noise.
- Make sure to attach the No. 1 roof wire without leaving any of it loose.
HINT:
Secure the extra length of the No. 1 roof wire in the adjustment area.
(i) Align the edge of the marking tape (C) on the No. 1 roof wire with the markings on the roof headlining assembly.
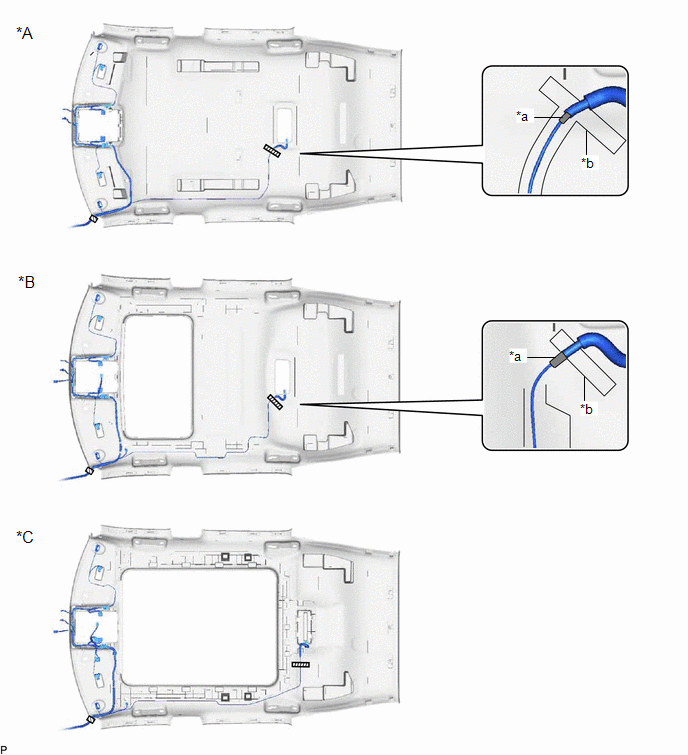
| *A | for Standard Roof | *B | for Sliding Roof |
| *C | for Panoramic Moon Roof | - | - |
| *a | Marking Tape (C) | *b | Marking |
| | Adhesive Tape | - | - |
(j) Install the No. 1 roof wire to the roof headlining assembly with adhesive tape.
NOTICE:
- Apply the tape securely in place.
- Do not touch the adhesive surface when applying the tape to prevent adhesion failure.
5. INSTALL TELEPHONE MICROPHONE ASSEMBLY
Click here .gif)
6. INSTALL VANITY LIGHT ASSEMBLY
HINT:
Use the same procedure for the RH side and LH side.
| (a) Engage the claw (B) to install the vanity light assembly. |
|
.png)
(b) Engage the 2 claws (A) to install the bulb holder to the vanity light assembly.
7. INSTALL WASHER HOSE ASSEMBLY (for TMC Made)
(a) Apply butyl tape as shown in the illustration.
| *a | Marking | - | - |
| | Butyl Tape | - | - |
NOTICE:
Securely attach the butyl tape.
(b) Align the marking tape (A) on the washer hose assembly with the vehicle front side tab of the roof headlining assembly.
| *a | Marking Tape (A) | *b | Marking Tape (B) |
| *c | Vehicle Front Side Tab of the Roof Headlining Assembly | *d | Marking |
| *e | Adjustment Area | - | - |
(c) Align the edge of the marking tape (B) on the washer hose assembly with the marking on the roof headlining assembly.
(d) Attach the washer hose assembly with the butyl tape.
NOTICE:
- Securely attach the washer hose assembly.
- If any of the washer hose assembly is left loose, it will cause an abnormal noise.
- Make sure to attach the washer hose assembly without leaving any of it loose.
HINT:
Secure the extra length of the washer hose assembly in the adjustment area.
8. INSTALL WASHER HOSE ASSEMBLY (for TMMC Made)
(a) When reusing the roof headlining assembly:
| *A | for Standard Roof | *B | for Sliding Roof |
| *C | for Panoramic Moon Roof | - | - |
| *a | Marking | - | - |
| | Butyl Tape | - | - |
(1) Apply butyl tape as shown in the illustration.
NOTICE:
Securely attach the butyl tape.
(b) When replacing the roof headlining assembly:

| *A | for Standard Roof | *B | for Sliding Roof |
| *C | for Panoramic Moon Roof | - | - |
| *a | Marking | - | - |
| | Butyl Tape | | Double-sided Tape |
(1) Apply butyl tape as shown in the illustration.
NOTICE:
Securely attach the butyl tape.
(2) Remove the release paper from the double-sided tape.
HINT:
After removing the release paper, keep the exposed adhesive free from foreign matter.
(c) Align the marking tape (A) on the washer hose assembly with the vehicle front side tab of the roof headlining assembly.
| *A | for Standard Roof | *B | for Sliding Roof |
| *C | for Panoramic Moon Roof | - | - |
| *a | Marking Tape (A) | *b | Marking Tape (B) |
| *c | Vehicle Front Side Tab of the Roof Headlining Assembly | *d | Marking |
| *e | Adjustment Area | - | - |
(d) Align the edge of the marking tape (B) on the washer hose assembly with the markings on the roof headlining assembly.
(e) When replacing the roof headlining assembly:
(1) Attach the washer hose assembly with the butyl tape.
NOTICE:
- Securely attach the washer hose assembly.
- If any of the washer hose assembly is left loose, it will cause an abnormal noise.
- Make sure to attach the washer hose assembly without leaving any of it loose.
HINT:
Secure the extra length of the washer hose assembly in the adjustment area.
(f) When replacing the roof headlining assembly:
(1) Attach the washer hose assembly with the butyl tape and double-sided tape.
NOTICE:
- Securely attach the washer hose assembly.
- If any of the washer hose assembly is left loose, it will cause an abnormal noise.
- Make sure to attach the washer hose assembly without leaving any of it loose.
HINT:
Secure the extra length of the washer hose assembly in the adjustment area.
9. INSTALL NO. 2 ANTENNA CORD SUB-ASSEMBLY (for TMC Made)
Click here
10. INSTALL NO. 2 ANTENNA CORD SUB-ASSEMBLY (for TMMC Made)
Click here
 Disassembly
DISASSEMBLY PROCEDURE 1. REMOVE NO. 2 ANTENNA CORD SUB-ASSEMBLY Click here 2. REMOVE WASHER HOSE ASSEMBLY (a) Remove the washer hose assembly. *A for Standard Roof *B for Sliding Roof ...
 Removal
REMOVAL CAUTION / NOTICE / HINT The necessary procedures (adjustment, calibration, initialization or registration) that must be performed after parts are removed and installed, or replaced during roof ...
Other materials:
Lexus RX (RX 350L, RX450h) 2016-2026 Repair Manual > Front Power Seat Control System (w/ Memory): Precaution
PRECAUTION PRECAUTION FOR DISCONNECTING CABLE FROM NEGATIVE BATTERY TERMINAL NOTICE: When disconnecting the cable from the negative (-) battery terminal, initialize the following systems after the cable is reconnected. System Name See Procedure Lane Control System Pre-collision Sys ...
Lexus RX (RX 350L, RX450h) 2016-2026 Repair Manual > Rear Power Outlet Socket (w/o Rear No. 2 Seat): Components
COMPONENTS ILLUSTRATION *A except TMMC Made *B for TMMC Made *1 DECK BOARD ASSEMBLY *2 DECK SIDE TRIM BOX RH *3 FRONT DECK FLOOR BOX *4 REAR DECK FLOOR BOX *5 REAR FLOOR FINISH PLATE *6 REAR NO. 3 FLOOR BOARD *7 REAR NO. 4 FLOOR BOARD *8 TONNEAU COVE ...
Lexus RX (RX 350L, RX450h) 2016-{YEAR} Owners Manual
- For your information
- Pictorial index
- For safety and security
- Instrument cluster
- Operation of each component
- Driving
- Lexus Display Audio system
- Interior features
- Maintenance and care
- When trouble arises
- Vehicle specifications
- For owners
Lexus RX (RX 350L, RX450h) 2016-{YEAR} Repair Manual

0.0107