Lexus RX (RX 350L, RX450h) 2016-2026 Repair Manual: Inspection
INSPECTION
PROCEDURE
1. INSPECT MAP LIGHT ASSEMBLY
(a) Measure the resistance according to the value(s) in the table below.
Standard Resistance:
| Tester Connection | Condition | Specified Condition |
|---|---|---|
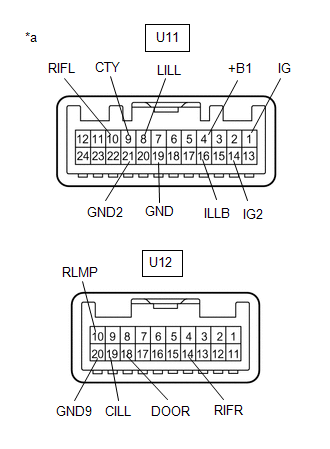
| U11-4 (+B1) - U12-14 (RIFR) | Always | Below 1 Ω |
| U12-10 (RLMP) - U12-20 (GND9) | Always | Below 1 Ω |
| U11-1 (IG) - U11-14 (IG2) | Always | Below 1 Ω |
| U11-19 (GND) - U11-21 (GND2) | Always | Below 1 Ω |
If the result is not as specified, replace the map light assembly.
| (b) Inspect the front map light. (1) Apply battery voltage to the connector and check that the front map light comes on. OK:
If the result is not as specified, replace the map light assembly. |
|
(c) Inspect the front dome light.
(1) Apply battery voltage to the connector and check that the front dome light comes on.
OK:
| Measurement Condition | Condition | Specified Condition |
|---|---|---|
| Battery positive (+) → U11-4 (+B1) Battery negative (-) → U11-9 (CTY) | Always | Front dome light comes on |
| Battery positive (+) → U11-4 (+B1) Battery negative (-) → U11-10 (RIFL) |
If the result is not as specified, replace the bulb or map light assembly.
(d) Inspect the front dome light switch and door switch.
(1) Measure the resistance according to the value(s) in the table below.
Standard Resistance:
| Tester Connection | Condition | Specified Condition |
|---|---|---|
| U12-18 (DOOR) - U12-20 (GND9) | Door switch on | Below 1 Ω |
| U12-18 (DOOR) - U12-20 (GND9) | Door switch off | 10 kΩ or higher |
If the result is not as specified, replace the map light assembly.
(e) Inspect the switch illumination.
(1) Apply battery voltage to the connector and check that the switch illumination comes on.
OK:
| Measurement Condition | Condition | Specified Condition |
|---|---|---|
| Battery positive (+) → U11-16 (ILLB) Battery negative (-) → U11-8 (LILL) | Always | Switch illumination comes on |
If the result is not as specified, replace the map light assembly.
 Disassembly
DISASSEMBLY PROCEDURE 1. REMOVE NO. 1 ROOF CONSOLE BOX COVER (a) Using a screwdriver with its tip wrapped with protective tape, disengage the 20 claws to remove the No. 1 roof console box cover. ...
 Reassembly
REASSEMBLY PROCEDURE 1. INSTALL NO. 1 ROOF CONSOLE BOX COVER (a) Engage the 20 claws to install the No. 1 roof console box cover. ...
Other materials:
Lexus RX (RX 350L, RX450h) 2016-2026 Repair Manual > Sfi System: High Pressure Fuel Pump Circuit Open (P123513)
DESCRIPTION The high-pressure direct injection fuel system consists of a spill control valve, check valve, fuel relief valve, fuel pressure sensor, fuel pump assembly (for high pressure side) and fuel injector assemblies (for direct injection). The spill control valve adjusts the return volume of th ...
Lexus RX (RX 350L, RX450h) 2016-2026 Repair Manual > Roof Headlining (w/ Rear No. 2 Seat): Reassembly
REASSEMBLY PROCEDURE 1. INSTALL NO. 1 ROOF WIRE (a) When using a new roof headlining assembly: (1) Using a knife, cut the roof headlining assembly at the markings as shown in the illustration. *A for Standard Roof *B for Sliding Roof *a Marking *b Cut (b) Apply butyl tape as s ...
Lexus RX (RX 350L, RX450h) 2016-{YEAR} Owners Manual
- For your information
- Pictorial index
- For safety and security
- Instrument cluster
- Operation of each component
- Driving
- Lexus Display Audio system
- Interior features
- Maintenance and care
- When trouble arises
- Vehicle specifications
- For owners
Lexus RX (RX 350L, RX450h) 2016-{YEAR} Repair Manual

0.0127