Lexus RX (RX 350L, RX450h) 2016-2026 Repair Manual: Removal
REMOVAL
CAUTION / NOTICE / HINT
The necessary procedures (adjustment, calibration, initialization, or registration) that must be performed after parts are removed and installed, or replaced during inner rear view mirror assembly removal/installation are shown below.
Necessary Procedure After Parts Removed/Installed/Replaced| Replaced Part or Performed Procedure | Necessary Procedure | Effect/Inoperative Function when Necessary Procedure not Performed | Link |
|---|---|---|---|
| Re-registration of codes in the garage door opener system
| Garage door opener system | |
PROCEDURE
1. REMOVE NO. 2 FORWARD RECOGNITION COVER
Click here .gif)
2. REMOVE NO. 1 FORWARD RECOGNITION COVER
Click here
3. REMOVE INNER REAR VIEW MIRROR ASSEMBLY
| (a) Disconnect the connector. |
|
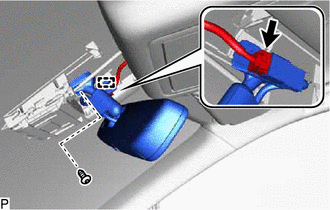
(b) Disengage the clamp.
(c) Using a T20 "TORX" socket wrench, remove the screw.
(d) Slide and remove the inner rear view mirror assembly as shown in the illustration.
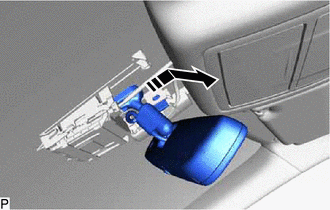
.png) | Remove in this Direction |
 Problem Symptoms Table
PROBLEM SYMPTOMS TABLE HINT: Use the table below to help determine the cause of problem symptoms. If multiple suspected areas are listed, the potential causes of the symptoms are listed in order of pr ...
 Inspection
INSPECTION PROCEDURE 1. INSPECT INNER REAR VIEW MIRROR ASSEMBLY (a) Inspect the operation of the electrochromic inner rear view mirror assembly. *a Black Colored Tape *b Forward Sensor * ...
Other materials:
Lexus RX (RX 350L, RX450h) 2016-2026 Repair Manual > Lighting System (w/o Automatic Headlight Beam Level Control System): Turn Signal Light Circuit
DESCRIPTION The combination meter assembly controls the illumination and turning off of the rear turn signal lights. WIRING DIAGRAM PROCEDURE 1. CHECK OPERATION (REAR TURN SIGNAL LIGHTS) (a) Check the operation of the rear turn signal lights. Result Proceed to LH side rear turn si ...
Lexus RX (RX 350L, RX450h) 2016-2026 Repair Manual > Audio And Visual System (for 12.3 Inch Display): System Diagram
SYSTEM DIAGRAM w/ Parking Assist Monitor System w/ Panoramic View Monitor System for 9 Speakers for 12 Speakers for 15 Speakers ...
Lexus RX (RX 350L, RX450h) 2016-{YEAR} Owners Manual
- For your information
- Pictorial index
- For safety and security
- Instrument cluster
- Operation of each component
- Driving
- Lexus Display Audio system
- Interior features
- Maintenance and care
- When trouble arises
- Vehicle specifications
- For owners
Lexus RX (RX 350L, RX450h) 2016-{YEAR} Repair Manual

0.0144