Lexus RX (RX 350L, RX450h) 2016-2026 Repair Manual: Installation
INSTALLATION
CAUTION / NOTICE / HINT
CAUTION:
Wear protective gloves. Sharp areas on the parts may injure your hands.
HINT:
- Use the same procedure for the RH side and LH side.
- The following procedure is for the LH side.
PROCEDURE
1. INSTALL FRONT SEAT CUSHION HEATER ASSEMBLY (for Standard Seat Type)
| (a) Install the front seat cushion heater assembly to the separate type front seat cushion cover with 44 new tag pins. |
|
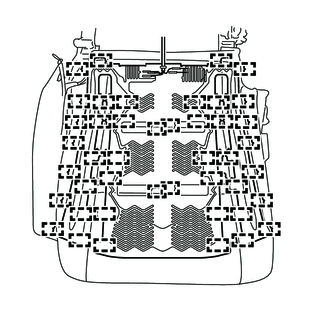
2. INSTALL SEPARATE TYPE FRONT SEAT CUSHION COVER (for Standard Seat Type)
HINT:
When installing a separate type front seat cushion cover, refer to Precaution in order to prevent wrinkles from forming.
Click here .gif)
| (a) Using hog ring pliers, install the separate type front seat cushion cover to the separate type front seat cushion pad with 18 new hog rings in the order indicated in the illustration. NOTICE:
|
|
.png)
| (b) w/o Variable Seat Cushion System: (1) Using hog ring pliers, install 6 new hog rings in the order indicated in the illustration. NOTICE:
|
|
.png)
| (c) w/ Variable Seat Cushion System: (1) Using hog ring pliers, install 2 new hog rings in the order indicated in the illustration. NOTICE:
|
|
.png)
3. INSTALL SEPARATE TYPE FRONT SEAT CUSHION COVER WITH PAD (for Standard Seat Type)
(a) w/o Variable Seat Cushion System:
(1) Engage the 10 hooks to install the separate type front seat cushion cover with pad.
.png)
(b) w/ Variable Seat Cushion System:
(1) Engage the 7 hooks to install the separate type front seat cushion cover with pad.
.png)
| (2) Using hog ring pliers, install 4 new hog rings in the order indicated in the illustration. NOTICE:
|
|
.png)
| (3) Engage the 4 hooks. |
|
.png)
(4) Engage the 2 fasteners.
.png)
.png) | Fastener |
| (c) Engage the 4 clamps. |
|
(d) Connect the 2 connectors.
4. INSTALL FRONT SEAT CUSHION HEATER (FRONT SEAT CUSHION PAD WITH COVER) (for Sports Seat Type)
HINT:
The front seat cushion heater cannot be removed from the front seat cushion pad with cover as they are a unit.
(a) Engage the 10 hooks to install the front seat cushion heater (front seat cushion pad with cover).
| (b) Engage the 4 clamps. |
|
(c) Connect the 2 connectors.
5. INSTALL SEPARATE TYPE FRONT SEATBACK ASSEMBLY
Click here
6. INSTALL FRONT SEAT INNER CUSHION SHIELD
Click here
7. INSTALL INNER NO. 1 FRONT SEAT CUSHION SHIELD (for Standard Seat Type)
Click here
8. INSTALL FRONT SEAT CUSHION SHIELD (for Standard Seat Type)
Click here
9. INSTALL FRONT SEAT CUSHION SHIELD (for Sports Seat Type)
Click here
10. INSTALL INNER NO. 1 FRONT SEAT CUSHION SHIELD (for Sports Seat Type)
Click here
11. CONNECT FRONT SEATBACK BOARD SUB-ASSEMBLY
Click here
12. INSTALL FRONT SEAT ASSEMBLY
Click here
 Inspection
INSPECTION PROCEDURE 1. INSPECT FRONT SEAT CUSHION HEATER ASSEMBLY (for LH Side) (a) Measure the resistance according to the value(s) in the table below. Standard Resistance: Tester Connection ...
 Removal
REMOVAL CAUTION / NOTICE / HINT The necessary procedures (adjustment, calibration, initialization or registration) that must be performed after parts are removed and installed, or replaced during fron ...
Other materials:
Lexus RX (RX 350L, RX450h) 2016-2026 Repair Manual > Automatic Transaxle Unit: Inspection
INSPECTION PROCEDURE 1. INSPECT TRANSMISSION OIL CLEANER MAGNET (a) Use the removed transmission oil cleaner magnets to collect any steel chips. Examine the chips and particles in the transaxle housing and on the transmission oil cleaner magnets to determine what type of wear might be found in th ...
Lexus RX (RX 350L, RX450h) 2016-2026 Repair Manual > Vehicle Stability Control System: Multi-axis Acceleration Sensor Module "A" Missing Calibration (C051D54,C121054)
DESCRIPTION for Optitron Meter Type:
The airbag sensor assembly has a built-in yaw rate and acceleration sensor and detects the vehicle condition.
The skid control ECU (brake actuator assembly) receives signals from the yaw rate and acceleration sensor (airbag sensor assembly) via CAN communicati ...
Lexus RX (RX 350L, RX450h) 2016-{YEAR} Owners Manual
- For your information
- Pictorial index
- For safety and security
- Instrument cluster
- Operation of each component
- Driving
- Lexus Display Audio system
- Interior features
- Maintenance and care
- When trouble arises
- Vehicle specifications
- For owners
Lexus RX (RX 350L, RX450h) 2016-{YEAR} Repair Manual

0.0107