Lexus RX (RX 350L, RX450h) 2016-2026 Repair Manual: Installation
INSTALLATION
CAUTION / NOTICE / HINT
CAUTION:
Wear protective gloves. Sharp areas on the seat frame may injure your hands.
PROCEDURE
1. INSTALL REAR NO. 1 SEAT ASSEMBLY LH
(a) Place the rear No. 1 seat assembly LH in the cabin.
NOTICE:
Be careful not to damage the rear No. 1 seat assembly LH, vehicle body or vehicle interior.
(b) Engage the 2 pins to temporarily install the rear No. 1 seat assembly LH.
(c) Operate the seat track adjusting handle and move the rear No. 1 seat assembly LH to the rearmost position.
(d) Temporarily install the 2 bolts on the front side of the rear No. 1 seat assembly LH.
(e) Operate the seat track adjusting handle and move the rear No. 1 seat assembly LH to the foremost position.
(f) Temporarily install the 3 bolts on the rear side of the rear No. 1 seat assembly LH.
(g) Connect the connector.
(h) Connect the rear seat airbag assembly connector.
(1) Before connecting the connector, check that the position of the housing lock is correct as shown in the illustration.
.png)
| *a | Correct | *b | Incorrect |
| *c | Yellow CPA | - | - |
(2) Be sure to engage the connectors until they are locked (when locking, make sure that a click sound can be heard).
NOTICE:
- When connecting any airbag connector, take care not to damage the airbag wire harness.
- When engaged, the white housing lock will slide. Be sure not to hold the white housing lock and upper part of the yellow CPA, as it may result in an insecure fit.
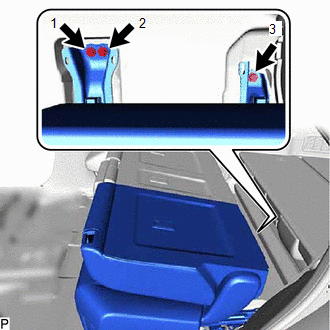
| (i) Tighten the 3 bolts on the rear side of the rear No. 1 seat assembly LH to install it. HINT: Tighten the bolts in the order shown in the illustration. Torque: 36.7 N·m {374 kgf·cm, 27 ft·lbf} |
|
(j) Operate the seat track adjusting handle and move the rear No. 1 seat assembly LH to the rearmost position.
| (k) Tighten the 2 bolts on the front side of the rear No. 1 seat assembly LH. HINT: Tighten the bolts in the order shown in the illustration. Torque: 36.7 N·m {374 kgf·cm, 27 ft·lbf} |
|
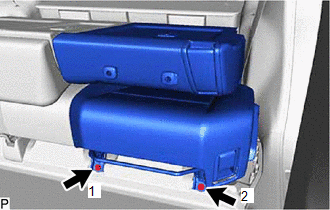
2. INSTALL REAR SEAT OUTER TRACK BRACKET COVER LH
(a) Engage the 2 guides and 2 claws to install the rear seat outer track bracket cover LH as shown in the illustration.
.png) | Install in this Direction |
3. INSTALL REAR SEAT INNER TRACK BRACKET COVER LH
HINT:
Use the same procedure as for the rear seat outer track bracket cover LH.
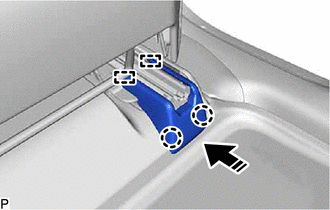
4. INSTALL SEAT INNER TRACK BRACKET COVER LH
(a) Operate the seat track adjusting handle and move the rear No. 1 seat assembly LH to the foremost position.
(b) Engage the 2 guides and 8 clips to install the seat inner track bracket cover LH.
5. INSTALL REAR SEAT OUTER TRACK BRACKET COVER LH
(a) Engage the guide and 4 clips to install the rear seat outer track bracket cover LH.
6. INSTALL REAR DOOR SCUFF PLATE LH
Click here .gif)
7. INSTALL REAR SEAT HEADREST ASSEMBLY
(a) Install the rear seat headrest assembly.
8. CONNECT CABLE TO NEGATIVE BATTERY TERMINAL
NOTICE:
When disconnecting the cable, some systems need to be initialized after the cable is reconnected.
Click here
9. CHECK SEAT HEATER (w/ Seat Heater System)
Click here
10. PERFORM DIAGNOSTIC SYSTEM CHECK
Click here
 Disassembly
DISASSEMBLY CAUTION / NOTICE / HINT CAUTION: Wear protective gloves. Sharp areas on the seat frame may injure your hands. PROCEDURE 1. REMOVE SEAT ADJUSTER COVER CAP (a) Remove the 2 seat adjuster ...
 Reassembly
REASSEMBLY CAUTION / NOTICE / HINT CAUTION: Wear protective gloves. Sharp areas on the seat frame may injure your hands. PROCEDURE 1. INSTALL REAR SEATBACK FRAME SUB-ASSEMBLY LH (a) Temporarily instal ...
Other materials:
Lexus RX (RX 350L, RX450h) 2016-2026 Repair Manual > Engine Unit: Disassembly
DISASSEMBLY PROCEDURE 1. REMOVE OIL FILLER CAP SUB-ASSEMBLY (a) Remove the oil filler cap sub-assembly from the cylinder head cover sub-assembly LH. (b) Remove the oil filler cap gasket from the oil filler cap sub-assembly. 2. REMOVE SPARK PLUG Click here 3. REMOVE P ...
Lexus RX (RX 350L, RX450h) 2016-2026 Repair Manual > Transmission Control Cable: Adjustment
ADJUSTMENT CAUTION / NOTICE / HINT NOTICE: Before installing the transmission control cable assembly, check that the park/neutral position switch assembly and the shift lever are in neutral. PROCEDURE 1. SECURE VEHICLE (a) Fully apply the parking brake and chock a wheel. CAUTION:
Make sure to app ...
Lexus RX (RX 350L, RX450h) 2016-{YEAR} Owners Manual
- For your information
- Pictorial index
- For safety and security
- Instrument cluster
- Operation of each component
- Driving
- Lexus Display Audio system
- Interior features
- Maintenance and care
- When trouble arises
- Vehicle specifications
- For owners
Lexus RX (RX 350L, RX450h) 2016-{YEAR} Repair Manual

0.0108