Lexus RX (RX 350L, RX450h) 2016-2026 Repair Manual: Installation
INSTALLATION
CAUTION / NOTICE / HINT
CAUTION:
Wear protective gloves. Sharp areas on the seat frame may injure your hands.
PROCEDURE
1. INSTALL REAR SEAT ASSEMBLY RH
(a) Place the rear seat assembly RH in the cabin.
NOTICE:
Be careful not to damage the vehicle body.
(b) Lift the seat track adjusting handle and move the rear seat assembly RH to the rearmost position.
(c) Temporarily install the 2 bolts on the front side of the rear seat assembly RH.
(d) Lift the seat track adjusting handle and move the rear seat assembly RH to the foremost position.
(e) Temporarily install the 3 bolts on the rear side of the rear seat assembly RH.
(f) Connect the rear seat airbag assembly connector under the rear seat assembly RH.
(1) Before connecting the connector, check that the position of the housing lock is correct as shown in the illustration.
.png)
| *a | Correct | *b | Incorrect |
| *c | Yellow CPA | - | - |
(2) Be sure to engage the connectors until they are locked (when locking, make sure that a click sound can be heard).
NOTICE:
- When connecting any airbag connector, take care not to damage the airbag wire harness.
- When engaged, the white housing lock will slide. Be sure not to hold the white housing lock and upper part of the yellow CPA, as it may result in an insecure fit.
(g) Connect the connector.
(h) Check that the cable is disconnected from the negative (-) battery terminal.
CAUTION:
Wait at least 90 seconds after disconnecting the cable from the negative (-) battery terminal to disable the SRS system.
.png)
(i) Connect the cable to the negative (-) battery terminal.
NOTICE:
When disconnecting the cable from the negative (-) battery terminal, some systems need to be initialized after the cable is reconnected.
Click here .gif)
| (j) Pass the rear seat center inner belt assembly through the rubber band of the rear seat cushion assembly RH as shown in the illustration. |
|
.png)
| (k) Tighten the 2 bolts on the front side of the rear seat assembly RH. HINT: Tighten the bolts in the order shown in the illustration. Torque: 36.7 N·m {374 kgf·cm, 27 ft·lbf} |
|
| (l) Tighten the 3 bolts on the rear side of the rear seat assembly RH to install it. HINT: Tighten the bolts in the order shown in the illustration. Torque: 36.7 N·m {374 kgf·cm, 27 ft·lbf} |
|
2. CONNECT REAR SEAT RECLINING CONTROL CABLE (for Manual Seat)
(a) When replacing the rear seat reclining control cable with a new one:
| (1) Cut the joint piece at the location (A) shown in the illustration and remove it from the reclining remote control lever sub-assembly RH. |
|
.png)
| (2) Install a new joint piece to the reclining remote control lever sub-assembly RH as shown in the illustration. |
|
.png)
(b) When replacing the reclining remote control lever sub-assembly RH with a new one:
| (1) Install a new reclining remote control lever sub-assembly RH to the joint piece as shown in the illustration. |
|
.png)
(c) Connect the reclining remote control lever sub-assembly RH to the joint case as shown in the illustration.
.png)
(d) Move the joint piece to the location shown in the illustration and pull up the lock pin to secure it.
.png)
| *a | Lock Pin | - | - |
(e) Connect the rear seat reclining control cable as shown in the illustration.
.png)
.png) | Install in this Direction |
(f) Install the joint case cover to the joint case as shown in the illustration.
.png)
| | Install in this Direction |
| (g) Connect the rear seat reclining control cable to the joint case as shown in the illustration. |
|
.png)
(h) Push in the lock lever of the adjuster spring to lock it as shown in the illustration.
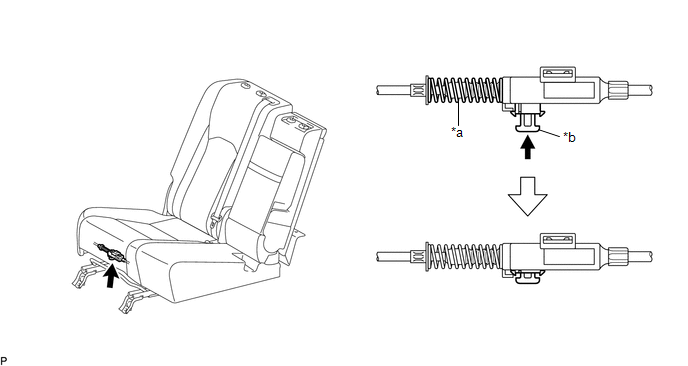
| *a | Adjuster Spring | *b | Lock Lever |
3. CONNECT REAR SEAT ASSEMBLY RH
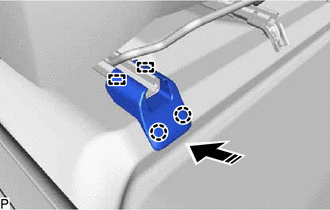
(a) Engage the fastener to connect the rear seat assembly RH.
(b) Install the bolt.
Torque:
9.0 N·m {92 kgf·cm, 80 in·lbf}
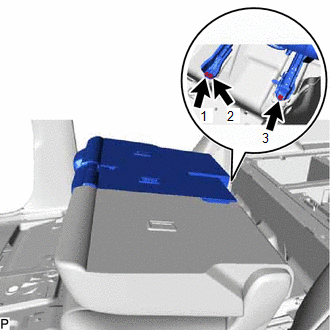
(c) Install the 4 clips.
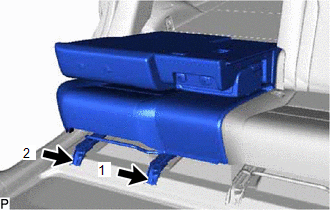
4. INSTALL REAR SEAT OUTER TRACK BRACKET COVER RH
(a) Engage the 2 guides and 2 claws to install the rear seat outer track bracket cover RH as shown in the illustration.
| | Install in this Direction |
5. INSTALL REAR SEAT INNER TRACK BRACKET COVER RH
HINT:
Use the same procedure as for the rear seat outer track bracket cover RH.
6. INSTALL REAR SEAT CENTER HEADREST ASSEMBLY
(a) Install the rear seat center headrest assembly.
7. INSTALL REAR SEAT HEADREST ASSEMBLY
(a) Install the rear seat headrest assembly.
8. INSTALL DECK BOARD ASSEMBLY
Click here
9. INSTALL TONNEAU COVER ASSEMBLY
Click here
10. INSPECT SRS WARNING LIGHT
Click here
 Inspection
INSPECTION PROCEDURE 1. PRECAUTION NOTICE: After performing the following check, initialize the fold seat control ECU (initial position reset and initial position memorization). Click here 2. INSPEC ...
 Disassembly
DISASSEMBLY CAUTION / NOTICE / HINT CAUTION: Wear protective gloves. Sharp areas on the seat frame may injure your hands. PROCEDURE 1. REMOVE REAR SEAT COVER CAP RH (for Manual Seat) (a) Using a screw ...
Other materials:
Lexus RX (RX 350L, RX450h) 2016-2026 Repair Manual > Headlight Cleaner Motor: Removal
REMOVAL CAUTION / NOTICE / HINT The necessary procedures (adjustment, calibration, initialization or registration) that must be performed after parts are removed and installed, or replaced during headlight cleaner motor and pump assembly removal/installation are shown below. Necessary Procedure Afte ...
Lexus RX (RX 350L, RX450h) 2016-2026 Repair Manual > Outer Rear View Mirror: Components
COMPONENTS ILLUSTRATION *A for Driver Side *B for Front Passenger Side *1 COURTESY LIGHT ASSEMBLY *2 DOOR ARMREST COVER *3 FRONT DOOR INSIDE HANDLE BEZEL PLUG *4 FRONT DOOR NO. 1 STIFFENER CUSHION *5 FRONT DOOR TRIM BOARD SUB-ASSEMBLY *6 MULTIPLEX NETWORK MAST ...
Lexus RX (RX 350L, RX450h) 2016-{YEAR} Owners Manual
- For your information
- Pictorial index
- For safety and security
- Instrument cluster
- Operation of each component
- Driving
- Lexus Display Audio system
- Interior features
- Maintenance and care
- When trouble arises
- Vehicle specifications
- For owners
Lexus RX (RX 350L, RX450h) 2016-{YEAR} Repair Manual

0.0103