Lexus RX (RX 350L, RX450h) 2016-2026 Repair Manual: Installation
INSTALLATION
CAUTION / NOTICE / HINT
HINT:
- Use the same procedure for the RH side and LH side.
- The following procedure is for the LH side.
PROCEDURE
1. INSPECT REAR NO. 1 SEAT OUTER BELT ASSEMBLY
Click here .gif)
2. INSTALL REAR NO. 1 SEAT OUTER BELT ASSEMBLY LH
(a) Engage the 2 guides.
(b) Install the rear No. 1 seat outer belt assembly LH to the outer belt anchor bracket sub-assembly LH with the nut.
Torque:
42 N·m {428 kgf·cm, 31 ft·lbf}
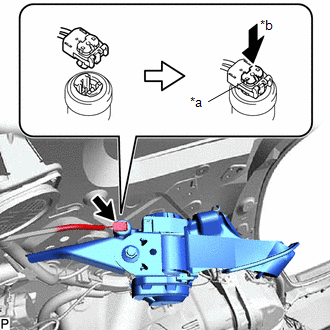
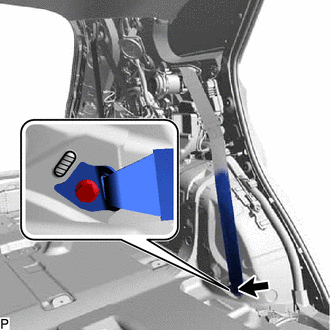
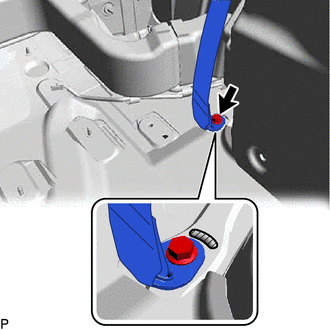
| (c) Connect the pretensioner connector and lock the locking button as shown in the illustration. NOTICE: Securely lock the locking button. |
|
| (d) Engage the 2 guides and temporarily install the rear No. 1 seat outer belt assembly LH with the 4 bolts. |
|
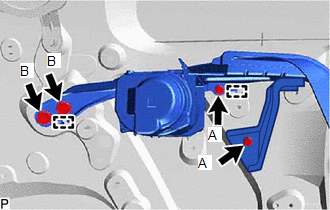
(e) Fully tighten the 2 bolts (A) and then the 2 bolts (B) to install the rear No. 1 seat outer belt assembly LH.
Torque:
Bolt (A) :
12.5 N·m {127 kgf·cm, 9 ft·lbf}
Bolt (B) :
42 N·m {428 kgf·cm, 31 ft·lbf}
(f) Check that the ELR locks.
NOTICE:
This check should be performed with the rear No. 1 seat outer belt assembly LH installed to the vehicle.
(1) With the rear No. 1 seat outer belt assembly LH installed to the vehicle, check that the belt locks when it is pulled out quickly.
3. INSTALL REAR NO. 1 SEAT OUTER BELT ASSEMBLY RH
(a) Engage the 2 guides.
(b) Install the rear No. 1 seat outer belt assembly RH to the outer belt anchor bracket sub-assembly RH with the nut.
Torque:
42 N·m {428 kgf·cm, 31 ft·lbf}
| (c) Engage the 2 guides and temporarily install the rear No. 1 seat outer belt assembly RH with the 4 bolts. |
|
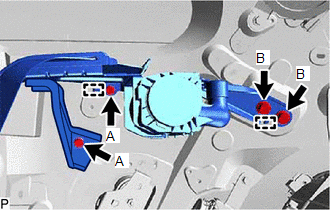
(d) Fully tighten the 2 bolts (A) and then the 2 bolts (B) to install the rear No. 1 seat outer belt assembly RH.
Torque:
Bolt (A) :
12.5 N·m {127 kgf·cm, 9 ft·lbf}
Bolt (B) :
42 N·m {428 kgf·cm, 31 ft·lbf}
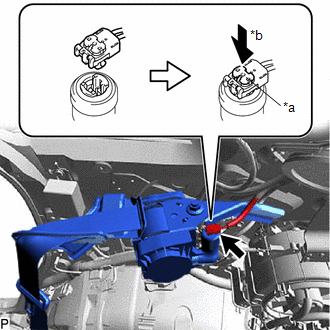
| (e) Connect the pretensioner connector and lock the locking button as shown in the illustration. NOTICE: Securely lock the locking button. |
|
(f) Check that the ELR locks.
NOTICE:
This check should be performed with the rear No. 1 seat outer belt assembly RH installed to the vehicle.
(1) With the rear No. 1 seat outer belt assembly RH installed to the vehicle, check that the belt locks when it is pulled out quickly.
4. CONNECT REAR NO. 1 SEAT OUTER BELT ASSEMBLY
(a) Connect the floor anchor of the rear No. 1 seat outer belt assembly with the bolt.
.png) | Protruding Part |
Torque:
42 N·m {428 kgf·cm, 31 ft·lbf}
NOTICE:
Do not allow the anchor part of the rear No. 1 seat outer belt assembly to overlap the protruding part of the floor panel.
5. INSTALL REAR NO. 6 AIR DUCT (for RH Side)
Click here
6. INSTALL REAR NO. 7 AIR DUCT (for RH Side)
Click here
7. INSTALL REAR NO. 2 SIDE AIR DUCT (for RH Side)
Click here
8. INSTALL ROOF SIDE INNER GARNISH ASSEMBLY
Click here
9. CONNECT REAR NO. 2 SEAT OUTER BELT ASSEMBLY
(a) Engage the 4 guides and 4 claws.
(b) Connect the floor anchor of the rear No. 2 seat outer belt assembly with the bolt.
| | Protruding Part |
Torque:
42 N·m {428 kgf·cm, 31 ft·lbf}
NOTICE:
Do not allow the anchor part of the rear No. 2 seat outer belt assembly to overlap the protruding part of the floor panel.
10. INSTALL DECK TRIM SIDE PANEL ASSEMBLY LH (for LH Side)
Click here
11. INSTALL DECK TRIM SIDE PANEL ASSEMBLY RH (for RH Side)
Click here
12. INSTALL COOLER (NO. 2 ROOM TEMP. SENSOR) THERMISTOR (for LH Side)
Click here
13. INSTALL NO. 2 AIR CONDITIONING CONTROL ASSEMBLY (for LH Side)
Click here
14. INSTALL NO. 1 LUGGAGE COMPARTMENT LIGHT ASSEMBLY (for LH Side)
Click here
15. INSTALL ROPE HOOK ASSEMBLY (for LH Side)
Click here
16. INSTALL NO. 1 LUGGAGE COMPARTMENT TRIM HOOK (for LH Side)
Click here
17. INSTALL NO. 1 LUGGAGE COMPARTMENT LIGHT ASSEMBLY (for RH Side)
Click here
18. INSTALL ROPE HOOK ASSEMBLY (for RH Side)
HINT:
Use the same procedure as for the LH side.
19. INSTALL NO. 1 LUGGAGE COMPARTMENT TRIM HOOK (for RH Side)
Click here
20. INSTALL REAR SEAT SIDE GARNISH
Click here
21. INSTALL FRONT DECK SIDE TRIM COVER
Click here
22. INSTALL REAR SEAT OUTER TRACK BRACKET COVER LH (for LH Side)
for 60/40 Split Seat Type:
Click here
for Captain Seat Type:
Click here
23. INSTALL REAR SEAT OUTER TRACK BRACKET COVER RH (for RH Side)
for 60/40 Split Seat Type:
Click here
for Captain Seat Type:
HINT:
Use the same procedure as for the LH side.
Click here
24. INSTALL REAR DOOR INSIDE SCUFF PLATE
Click here
25. INSTALL REAR DOOR SCUFF PLATE
Click here
26. INSTALL REAR NO. 2 SEAT ASSEMBLY
Click here
27. CONNECT CABLE TO NEGATIVE BATTERY TERMINAL
NOTICE:
When disconnecting the cable, some systems need to be initialized after the cable is reconnected.
Click here
28. INSPECT SRS WARNING LIGHT
Click here
 Disposal
DISPOSAL CAUTION / NOTICE / HINT CAUTION: Before performing pre-disposal deployment of any SRS part, review and closely follow all applicable environmental and hazardous material regulations. Pre-disp ...
 Rear No. 2 Seat Inner Belt Assembly
ComponentsCOMPONENTS ILLUSTRATION *1 REAR NO. 2 SEAT INNER BELT ASSEMBLY LH *2 REAR NO. 2 SEAT INNER BELT ASSEMBLY RH Tightening torque for "Major areas involving basic vehicle perfor ...
Other materials:
Lexus RX (RX 350L, RX450h) 2016-2026 Repair Manual > Air Fuel Ratio Sensor: Installation
INSTALLATION PROCEDURE 1. INSTALL AIR FUEL RATIO SENSOR (for Bank 1) HINT: Perform "Inspection After Repair" after replacing the air fuel ratio sensor. Click here (a) Using SST, install the air fuel ratio sensor to the exhaust manifold (TWC: Front Catalyst). SST: 09224-00011 Torque: Specified ...
Lexus RX (RX 350L, RX450h) 2016-2026 Repair Manual > Sfi System: Engine Stalls
DESCRIPTION Problem Symptom Suspected Area Trouble Area
Engine speed fluctuation due to abnormal combustion
Idle speed too low or high
Strong engine vibration due to above symptoms
Ignition malfunction
Deviation in air fuel ratio (Excessive or insufficient intake air volume ...
Lexus RX (RX 350L, RX450h) 2016-{YEAR} Owners Manual
- For your information
- Pictorial index
- For safety and security
- Instrument cluster
- Operation of each component
- Driving
- Lexus Display Audio system
- Interior features
- Maintenance and care
- When trouble arises
- Vehicle specifications
- For owners
Lexus RX (RX 350L, RX450h) 2016-{YEAR} Repair Manual

0.0136