Lexus RX (RX 350L, RX450h) 2016-2026 Repair Manual: Components
COMPONENTS
ILLUSTRATION
.png)
| *A | for RH Side | *B | for LH Side |
| *1 | FRONT DECK SIDE TRIM COVER | *2 | REAR DOOR INSIDE SCUFF PLATE |
| *3 | REAR DOOR SCUFF PLATE | *4 | REAR SEAT OUTER TRACK BRACKET COVER LH |
| *5 | REAR SEAT OUTER TRACK BRACKET COVER RH | *6 | REAR SEAT SIDE GARNISH |
ILLUSTRATION
.png)
| *A | for RH Side | *B | for LH Side |
| *1 | COOLER (NO. 2 ROOM TEMP. SENSOR) THERMISTOR | *2 | DECK TRIM SIDE PANEL ASSEMBLY LH |
| *3 | DECK TRIM SIDE PANEL ASSEMBLY RH | *4 | NO. 1 LUGGAGE COMPARTMENT LIGHT ASSEMBLY |
| *5 | NO. 1 LUGGAGE COMPARTMENT TRIM HOOK | *6 | NO. 2 AIR CONDITIONING CONTROL ASSEMBLY |
| *7 | REAR NO. 2 SEAT OUTER BELT ASSEMBLY | *8 | ROOF SIDE INNER GARNISH ASSEMBLY |
| *9 | ROPE HOOK ASSEMBLY | *10 | CLIP |
.png) | Tightening torque for "Major areas involving basic vehicle performance such as moving/turning/stopping" : N*m (kgf*cm, ft.*lbf) | ● | Non-reusable part |
ILLUSTRATION
.png)
| *A | for RH Side | - | - |
| *1 | REAR NO. 2 SIDE AIR DUCT | *2 | REAR NO. 6 AIR DUCT |
| *3 | REAR NO. 7 AIR DUCT | - | - |
ILLUSTRATION
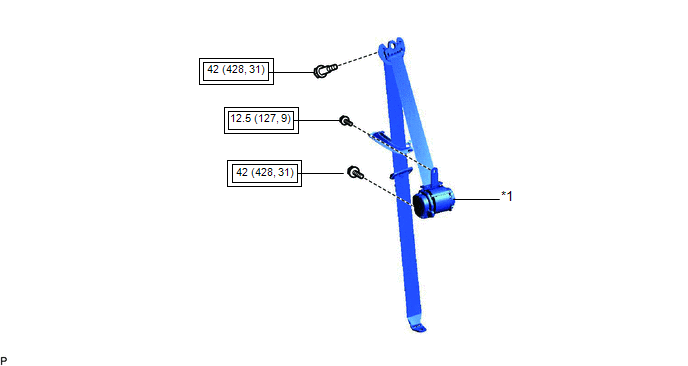
| *1 | REAR NO. 2 SEAT OUTER BELT ASSEMBLY | - | - |
| | Tightening torque for "Major areas involving basic vehicle performance such as moving/turning/stopping": N*m (kgf*cm, ft.*lbf) | .png) | N*m (kgf*cm, ft.*lbf): Specified torque |

 On-vehicle Inspection
ON-VEHICLE INSPECTION CAUTION / NOTICE / HINT CAUTION: Be sure to correctly follow the removal and installation procedures for the rear No. 2 seat outer belt assembly. PROCEDURE 1. INSPECT REAR NO. 2 ...
Other materials:
Lexus RX (RX 350L, RX450h) 2016-2026 Repair Manual > Power Tilt And Power Telescopic Steering Column System: Tilt and Telescopic Manual Switch Circuit
DESCRIPTION Different voltage values are sent to the multiplex tilt and telescopic ECU by operating the tilt and telescopic switch. The multiplex tilt and telescopic ECU then judges which motor and in which direction that motor should operate based on the voltage value. WIRING DIAGRAM PROCEDURE ...
Lexus RX (RX 350L, RX450h) 2016-2026 Repair Manual > Lane Control System: Internal Control Module Software Incompatibility Not Programmed (U030051)
DESCRIPTION The forward recognition camera receives the vehicle information from the ECM via CAN communication. If the forward recognition camera cannot store the vehicle information sent from the ECM, it stores DTC U030051. DTC No. Detection Item DTC Detection Condition Trouble Area U0 ...
Lexus RX (RX 350L, RX450h) 2016-{YEAR} Owners Manual
- For your information
- Pictorial index
- For safety and security
- Instrument cluster
- Operation of each component
- Driving
- Lexus Display Audio system
- Interior features
- Maintenance and care
- When trouble arises
- Vehicle specifications
- For owners
Lexus RX (RX 350L, RX450h) 2016-{YEAR} Repair Manual

0.0099