Lexus RX (RX 350L, RX450h) 2016-2026 Repair Manual: Removal
REMOVAL
PROCEDURE
1. REMOVE REAR NO. 2 SEAT ASSEMBLY
Click here .gif)
2. REMOVE REAR DOOR SCUFF PLATE LH
Click here .gif)
.gif)
3. REMOVE REAR DOOR INSIDE SCUFF PLATE LH
Click here .gif)
.gif)
4. REMOVE REAR SEAT OUTER TRACK BRACKET COVER LH
for 60/40 Split Seat Type:
Click here .gif)
.gif)
for Captain Seat Type:
Click here .gif)
.gif)
5. REMOVE FRONT DECK SIDE TRIM COVER LH
Click here .gif)
.gif)
6. REMOVE REAR SEAT SIDE GARNISH LH
Click here .gif)
.gif)
7. REMOVE NO. 1 LUGGAGE COMPARTMENT TRIM HOOK
Click here .gif)
.gif)
8. REMOVE ROPE HOOK ASSEMBLY
Click here .gif)
.gif)
9. REMOVE NO. 1 LUGGAGE COMPARTMENT LIGHT ASSEMBLY
Click here .gif)
.gif)
10. REMOVE NO. 2 AIR CONDITIONING CONTROL ASSEMBLY
Click here .gif)
11. REMOVE COOLER (NO. 2 ROOM TEMP. SENSOR) THERMISTOR
Click here .gif)
12. REMOVE DECK TRIM SIDE PANEL ASSEMBLY LH
Click here .gif)
.gif)
13. REMOVE RADIO SETTING CONDENSER
NOTICE:
When the terminal cover is removed, the radio setting condenser must be replaced because the terminal cover and condenser are supplied as a set.
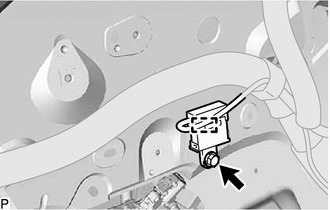
| (a) Remove the bolt. |
|
(b) Disengage the clamp and disconnect the radio setting condenser with wire harness from the vehicle body.
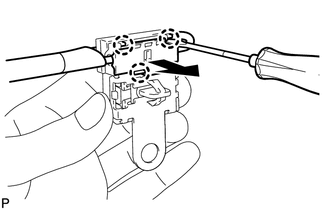
| (c) Using a screwdriver, disengage the 3 claws and remove the terminal cover with wire harness from the condenser. |
|
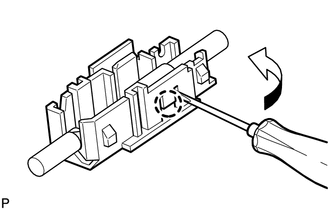
| (d) Using a screwdriver, bend back and break off the claw as shown in the illustration. |
|
(e) Remove the terminal cover from the wire harness.
NOTICE:
- Make sure to hold the crimping side of the terminal when disconnecting the wire harness from the terminal cover.
- Make sure not to bend the exposed wire when disconnecting the wire harness from the terminal cover.
- Check for deformation of the terminal after the wire harness has been removed from the terminal cover.
 On-vehicle Inspection
ON-VEHICLE INSPECTION PROCEDURE 1. INSPECT RADIO SETTING CONDENSER (a) With the radio setting condenser installed, check that there is no looseness or other abnormalities. (b) Measure the resistanc ...
 Installation
INSTALLATION PROCEDURE 1. INSTALL RADIO SETTING CONDENSER (a) Engage the claw to install a new terminal cover to the wire harness. NOTICE:
Make sure to hold the crimping side of the terminal w ...
Other materials:
Lexus RX (RX 350L, RX450h) 2016-2026 Repair Manual > Panoramic View Monitor System: How To Proceed With Troubleshooting
CAUTION / NOTICE / HINT HINT:
Use the following procedure to troubleshoot the panoramic view monitor system.
*: Use the Techstream.
PROCEDURE 1. VEHICLE BROUGHT TO WORKSHOP
NEXT 2. CUSTOMER PROBLEM ANALYSIS (a) Ask the customer about the problems and the co ...
Lexus RX (RX 350L, RX450h) 2016-2026 Repair Manual > Front Passenger Airbag Assembly: Installation
INSTALLATION PROCEDURE 1. INSTALL NO. 2 INSTRUMENT PANEL WIRE (a) Connect the 2 airbag connectors of the No. 2 instrument panel wire to the instrument panel passenger airbag assembly. *a Airbag Connector *b Airbag Connector Lock Wire Harness Clamp NOTICE:
When connecting any ...
Lexus RX (RX 350L, RX450h) 2016-{YEAR} Owners Manual
- For your information
- Pictorial index
- For safety and security
- Instrument cluster
- Operation of each component
- Driving
- Lexus Display Audio system
- Interior features
- Maintenance and care
- When trouble arises
- Vehicle specifications
- For owners
Lexus RX (RX 350L, RX450h) 2016-{YEAR} Repair Manual
0.0104


