Lexus RX (RX 350L, RX450h) 2016-2026 Repair Manual: Removal
REMOVAL
PROCEDURE
1. REMOVE REAR NO. 2 SEAT ASSEMBLY
Click here .gif)
2. REMOVE REAR DOOR SCUFF PLATE RH
HINT:
Use the same procedure as for the LH side.
Click here
3. REMOVE REAR DOOR INSIDE SCUFF PLATE RH
HINT:
Use the same procedure as for the LH side.
Click here
4. REMOVE REAR SEAT OUTER TRACK BRACKET COVER RH
for 60/40 Split Seat Type:
Click here
for Captain Seat Type:
HINT:
Use the same procedure as for the LH side.
Click here
5. REMOVE FRONT DECK SIDE TRIM COVER RH
HINT:
Use the same procedure as for the LH side.
Click here
6. REMOVE REAR SEAT SIDE GARNISH RH
Click here
7. REMOVE NO. 1 LUGGAGE COMPARTMENT TRIM HOOK
Click here
8. REMOVE ROPE HOOK ASSEMBLY
HINT:
Use the same procedure as for the LH side.
Click here
9. REMOVE NO. 1 LUGGAGE COMPARTMENT LIGHT ASSEMBLY
Click here
10. REMOVE DECK TRIM SIDE PANEL ASSEMBLY RH
Click here
11. REMOVE NO. 2 CLEARANCE WARNING BUZZER
| (a) Disengage the clamp. |
|
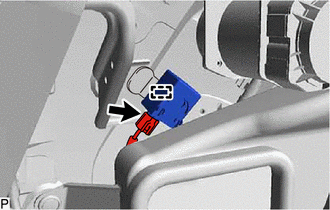
(b) Disconnect the connector to remove the No. 2 clearance warning buzzer.
 Components
COMPONENTS ILLUSTRATION *1 DECK TRIM SIDE PANEL ASSEMBLY RH *2 FRONT DECK SIDE TRIM COVER RH *3 NO. 1 LUGGAGE COMPARTMENT LIGHT ASSEMBLY *4 NO. 1 LUGGAGE COMPARTMENT TRIM HOOK ...
 Installation
INSTALLATION PROCEDURE 1. INSTALL NO. 2 CLEARANCE WARNING BUZZER (a) Connect the connector. (b) Engage the clamp to install the No. 2 clearance warning buzzer. 2. INSTALL DECK TRIM SIDE PANEL ASSEMBLY ...
Other materials:
Lexus RX (RX 350L, RX450h) 2016-2026 Repair Manual > U881f (automatic Transmission / Transaxle): Torque Converter And Drive Plate
InspectionINSPECTION PROCEDURE 1. INSPECT TORQUE CONVERTER ASSEMBLY (a) Inspect the one-way clutch. (1) Press on the splines of the stator with a finger and rotate the spline. Check that the spline rotates smoothly when turned clockwise and rotates with difficulty when turned counterclockwise. ...
Lexus RX (RX 350L, RX450h) 2016-2026 Repair Manual > Power Tilt And Power Telescopic Steering Column System: Telescopic Position Sensor or Telescopic Motor Circuit Malfunction (B2611)
DESCRIPTION The telescopic motor is operated by the power source voltage supplied from the multiplex tilt and telescopic ECU and slides the steering column forward and backward. The telescopic position sensor (Hall IC) in the telescopic motor detects the sliding position of the steering column in th ...
Lexus RX (RX 350L, RX450h) 2016-{YEAR} Owners Manual
- For your information
- Pictorial index
- For safety and security
- Instrument cluster
- Operation of each component
- Driving
- Lexus Display Audio system
- Interior features
- Maintenance and care
- When trouble arises
- Vehicle specifications
- For owners
Lexus RX (RX 350L, RX450h) 2016-{YEAR} Repair Manual

0.0122