Lexus RX (RX 350L, RX450h) 2016-2026 Repair Manual: Inspection
INSPECTION
PROCEDURE
1. INSPECT PANORAMIC VIEW MONITOR SWITCH (INTEGRATION CONTROL AND PANEL ASSEMBLY)
(a) Remove the panoramic view monitor switch (integration control and panel assembly).
Click here .gif)
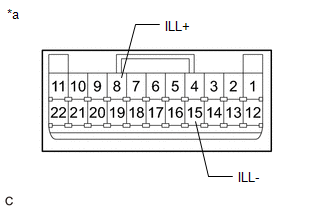
| (b) Measure the resistance according to the value(s) in the table below. Standard Resistance:
If the result is not as specified, replace the panoramic view monitor switch (integration control and panel assembly). |
|

(c) Check that the switch illumination illuminates.
| (1) Apply battery voltage to the panoramic view monitor switch and check that the switch illumination illuminates. OK:
If the result is not as specified, replace the panoramic view monitor switch (integration control and panel assembly). |
|
(d) Install the panoramic view monitor switch (integration control and panel assembly).
Click here
 Removal
REMOVAL PROCEDURE 1. REMOVE INSTRUMENT PANEL GARNISH LH Click here 2. REMOVE FRONT DOOR SCUFF PLATE LH Click here 3. REMOVE COWL SIDE TRIM BOARD LH Click here 4. REMOVE NO. 1 INSTRUMENT ...
 Installation
INSTALLATION PROCEDURE 1. INSTALL PANORAMIC VIEW MONITOR SWITCH (INTEGRATION CONTROL AND PANEL ASSEMBLY) (a) Engage the 4 claws to install the panoramic view monitor switch (integration control and pa ...
Other materials:
Lexus RX (RX 350L, RX450h) 2016-2026 Repair Manual > Smart Access System With Push-button Start (for Entry Function): All Door Entry Lock/Unlock Functions do not Operate, but Wireless Functions Operate
DESCRIPTION When the wireless operation can be used to lock and unlock the doors, communication between the door control receiver and certification ECU (smart key ECU assembly) is normal. If the entry lock and unlock functions do not operate, the entry cancel function may be set through the customiz ...
Lexus RX (RX 350L, RX450h) 2016-2026 Repair Manual > Panoramic View Monitor System: Initialization
INITIALIZATION INITIALIZE PANORAMIC VIEW MONITOR SYSTEM (a) When "!" is displayed on the multi-display assembly, correct the steering angle neutral point using the following method. (1) Fully turn the steering wheel to the left and right on level ground. NOTICE: Memorizing the steering angle neutral ...
Lexus RX (RX 350L, RX450h) 2016-{YEAR} Owners Manual
- For your information
- Pictorial index
- For safety and security
- Instrument cluster
- Operation of each component
- Driving
- Lexus Display Audio system
- Interior features
- Maintenance and care
- When trouble arises
- Vehicle specifications
- For owners
Lexus RX (RX 350L, RX450h) 2016-{YEAR} Repair Manual

0.0105