Lexus RX (RX 350L, RX450h) 2016-2026 Repair Manual: On-vehicle Inspection
ON-VEHICLE INSPECTION
PROCEDURE
1. REMOVE FRONT WIPER MOTOR AND LINK ASSEMBLY
Click here .gif)
2. REMOVE OUTER COWL TOP PANEL SUB-ASSEMBLY
Click here
3. OPERATION CHECK
(a) Slide the clip and disconnect the air tube from the vacuum pump assembly.
| (b) Connect the hose of the vacuum gauge to the vacuum pump assembly. |
|
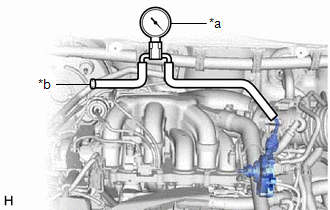
(c) Start the engine and warm it up for more than 2 minutes.
(d) With the engine idling, check the vacuum of the vacuum pump assembly.
Standard Pressure:
More than 86.7 kPa (650 mmHg, 25.6 in.Hg)
If the pressure is less than the standard, disassemble and inspect the vacuum pump. If necessary, replace the vacuum pump assembly.
Click here
HINT:
Always perform this operation check procedure after replacing or servicing the vacuum pump assembly.
(e) Remove the vacuum gauge from the vacuum pump assembly.
(f) Connect the air tube to the vacuum pump assembly, and slide the clip to secure it.
4. INSTALL OUTER COWL TOP PANEL SUB-ASSEMBLY
Click here
5. INSTALL FRONT WIPER MOTOR AND LINK ASSEMBLY
Click here
 Components
COMPONENTS ILLUSTRATION *1 AIR CLEANER BRACKET *2 AIR CLEANER CASE SUB-ASSEMBLY *3 AIR CLEANER FILTER ELEMENT SUB-ASSEMBLY *4 COOL AIR INTAKE DUCT SEAL *5 INLET AIR CLEANER A ...
 Disassembly
DISASSEMBLY PROCEDURE 1. REMOVE END COVER (for TMC Made) (a) Using a T30 "TORX" socket wrench, remove the 5 screws and end cover. NOTICE:
Hold the pump so that the pump installation surface, f ...
Other materials:
Lexus RX (RX 350L, RX450h) 2016-2026 Repair Manual > Millimeter Wave Radar Sensor: Components
COMPONENTS ILLUSTRATION *1 COOL AIR INTAKE DUCT SEAL *2 MILLIMETER WAVE RADAR SENSOR ASSEMBLY N*m (kgf*cm, ft.*lbf): Specified torque - - ...
Lexus RX (RX 350L, RX450h) 2016-2026 Repair Manual > Can Communication System: Center Airbag Sensor Communication Stop Mode
DESCRIPTION Detection Item Symptom Trouble Area Center Airbag Sensor Communication Stop Mode Either condition is met:
"Airbag" is not displayed on the CAN Bus Check screen of the Techstream.
Click here
Communication system DTCs (DTCs that start with U) that correspond to "Center ...
Lexus RX (RX 350L, RX450h) 2016-{YEAR} Owners Manual
- For your information
- Pictorial index
- For safety and security
- Instrument cluster
- Operation of each component
- Driving
- Lexus Display Audio system
- Interior features
- Maintenance and care
- When trouble arises
- Vehicle specifications
- For owners
Lexus RX (RX 350L, RX450h) 2016-{YEAR} Repair Manual

0.0118