Lexus RX (RX 350L, RX450h) 2016-2026 Repair Manual: Disassembly
DISASSEMBLY
PROCEDURE
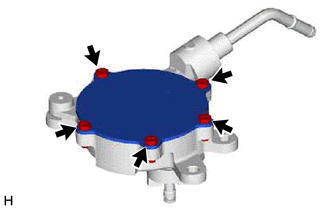
1. REMOVE END COVER (for TMC Made)
| (a) Using a T30 "TORX" socket wrench, remove the 5 screws and end cover. NOTICE:
|
|
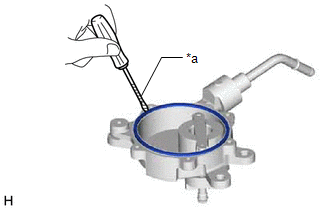
| (b) Using a screwdriver with its tip wrapped with protective tape, remove the No. 1 O-ring. NOTICE: Do not damage the groove. |
|
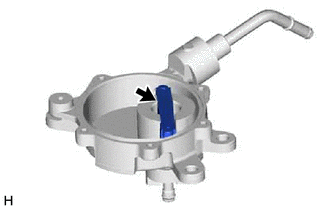
2. REMOVE VACUUM PUMP VANE (for TMC Made)
| (a) Remove the vacuum pump vane together with the 2 vacuum pump vane caps. NOTICE:
|
|
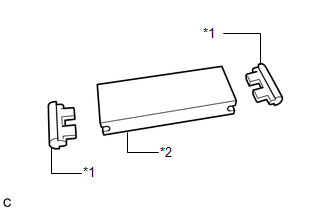
| (b) Remove the 2 vacuum pump vane caps from the vacuum pump vane. NOTICE:
|
|
 On-vehicle Inspection
ON-VEHICLE INSPECTION PROCEDURE 1. REMOVE FRONT WIPER MOTOR AND LINK ASSEMBLY Click here 2. REMOVE OUTER COWL TOP PANEL SUB-ASSEMBLY Click here 3. OPERATION CHECK (a) Slide the clip and disconne ...
 Inspection
INSPECTION PROCEDURE 1. INSPECT VACUUM PUMP VANE (for TMC Made) (a) Check that the vacuum pump vane or vacuum pump vane caps are not damaged or excessively worn out. HINT: If the vacuum pump vane o ...
Other materials:
Lexus RX (RX 350L, RX450h) 2016-2026 Repair Manual > Main Body Ecu: Installation
INSTALLATION CAUTION / NOTICE / HINT NOTICE:
Before replacing the main body ECU (multiplex network body ECU), refer to Registration.
Click here
After the main body ECU (multiplex network body ECU) has been replaced, the automatic light control system will not operate until the engine is sta ...
Lexus RX (RX 350L, RX450h) 2016-2026 Repair Manual > Front Brake: Installation
INSTALLATION CAUTION / NOTICE / HINT HINT:
Use the same procedure for the RH side and LH side.
The following procedure is for the LH side.
PROCEDURE 1. INSTALL FRONT DISC (a) Align the matchmarks of the front disc and front axle hub sub-assembly, and install the front disc. NOTICE: When r ...
Lexus RX (RX 350L, RX450h) 2016-{YEAR} Owners Manual
- For your information
- Pictorial index
- For safety and security
- Instrument cluster
- Operation of each component
- Driving
- Lexus Display Audio system
- Interior features
- Maintenance and care
- When trouble arises
- Vehicle specifications
- For owners
Lexus RX (RX 350L, RX450h) 2016-{YEAR} Repair Manual

0.0117