Lexus RX (RX 350L, RX450h) 2016-2026 Repair Manual: Installation
INSTALLATION
PROCEDURE
1. INSTALL OIL COOLER BRACKET
HINT:
Perform this procedure only when replacement of the oil cooler bracket is necessary.
| (a) Install the oil cooler bracket to the vehicle body with the bolt and nut. Torque: 5.5 N·m {56 kgf·cm, 49 in·lbf} NOTICE: Tightening order: Temporarily tighten bolt → Fully tighten nut → Fully tighten bolt |
|
.png)
2. INSTALL OIL COOLER ASSEMBLY
(a) Install the oil cooler assembly to the oil cooler bracket with the 2 nuts.
Torque:
7.5 N·m {76 kgf·cm, 66 in·lbf}
3. CONNECT OIL COOLER HOSE
(a) Connect the outlet No. 1 oil cooler hose to the oil cooler assembly and slide the clip to secure it.
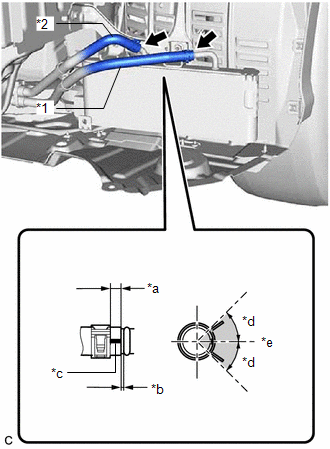
| *1 | Outlet No. 1 Oil Cooler Hose |
| *2 | Transmission Oil Cooler Hose |
| *a | Clip Position (2 to 7 mm (0.0787 to 0.276 in.)) |
| *b | Hose Position (0 to 3 mm (0 to 0.118 in.)) |
| *c | Paint Mark |
| *d | 45° |
| *e | Left Side of Vehicle |
 | Paint Mark Location |
NOTICE:
- Make sure to install the clip within the area shown in the illustration.
- Make sure that each paint mark is within the location shown in the illustration.
(b) Connect the transmission oil cooler hose to the oil cooler assembly and slide the clip to secure it.
NOTICE:
- Make sure to install clip within the area shown in the illustration.
- Make sure that each paint mark is within the location shown in the illustration.
4. INSTALL TRANSMISSION OIL COOLER AIR DUCT
(a) Engage the 3 claws to install the transmission oil cooler air duct to the oil cooler assembly.
5. INSTALL FRONT BUMPER ASSEMBLY
Click here .gif)
6. ADJUST AUTOMATIC TRANSAXLE FLUID
Click here
7. INSPECT FOR FLUID LEAK
 Removal
REMOVAL CAUTION / NOTICE / HINT The necessary procedures (adjustment, calibration, initialization, or registration) that must be performed after parts are removed and installed, or replaced during oil ...

Other materials:
Lexus RX (RX 350L, RX450h) 2016-2026 Repair Manual > Air Cooled Oil Cooler: Removal
REMOVAL CAUTION / NOTICE / HINT The necessary procedures (adjustment, calibration, initialization, or registration) that must be performed after parts are removed and installed, or replaced during oil cooler assembly removal/installation are shown below. Necessary Procedure After Parts Removed/Insta ...
Lexus RX (RX 350L, RX450h) 2016-2026 Repair Manual > Intelligent Clearance Sonar System: Outside Air Temperature Sensor (C1652)
DESCRIPTION When a malfunction signal sent from the air conditioning system via CAN communication is detected by the clearance warning ECU assembly, DTC C1652 is stored. DTC No. Detection Item DTC Detection Condition Trouble Area C1652 Outside Air Temperature Sensor Ambient temperat ...
Lexus RX (RX 350L, RX450h) 2016-{YEAR} Owners Manual
- For your information
- Pictorial index
- For safety and security
- Instrument cluster
- Operation of each component
- Driving
- Lexus Display Audio system
- Interior features
- Maintenance and care
- When trouble arises
- Vehicle specifications
- For owners
Lexus RX (RX 350L, RX450h) 2016-{YEAR} Repair Manual

0.0118