Lexus RX (RX 350L, RX450h) 2016-2026 Repair Manual: Removal
REMOVAL
CAUTION / NOTICE / HINT
The necessary procedures (adjustment, calibration, initialization, or registration) that must be performed after parts are removed and installed, or replaced during oil cooler assembly removal/installation are shown below.
Necessary Procedure After Parts Removed/Installed/Replaced| Replaced Part or Performed Procedure | Necessary Procedure | Effect/Inoperative Function when Necessary Procedure not Performed | Link |
|---|---|---|---|
| Replacement of front bumper assembly | Front television camera view adjustment | Panoramic View Monitor System | |
| Replacement of front bumper assembly (w/ Intelligent clearance sonar system) |
|
| |
PROCEDURE
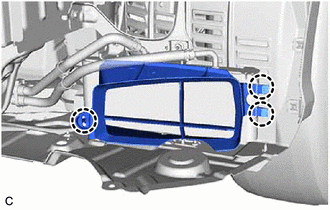
1. REMOVE FRONT BUMPER ASSEMBLY
Click here .gif)
2. REMOVE TRANSMISSION OIL COOLER AIR DUCT
| (a) Disengage the 3 claws to remove the transmission oil cooler air duct from the oil cooler assembly. |
|
3. DISCONNECT OIL COOLER HOSE
| (a) Slide the clip and disconnect the outlet No. 1 oil cooler hose from the oil cooler assembly. NOTICE: Use a container to catch any fluid which flows out of the outlet No. 1 oil cooler hose and oil cooler assembly. |
|
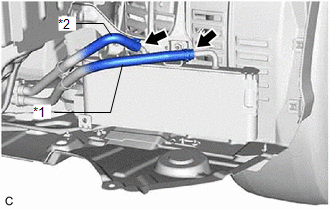
(b) Slide the clip and disconnect the transmission oil cooler hose from the oil cooler assembly.
NOTICE:
Use a container to catch any fluid which flows out of the transmission oil cooler hose and oil cooler assembly.
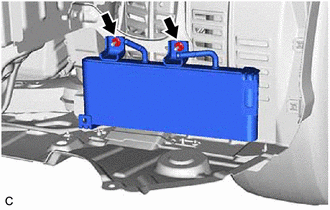
4. REMOVE OIL COOLER ASSEMBLY
| (a) Remove the 2 nuts and oil cooler assembly from the oil cooler bracket. NOTICE: Use a container to catch any fluid which flows out of the oil cooler assembly. |
|
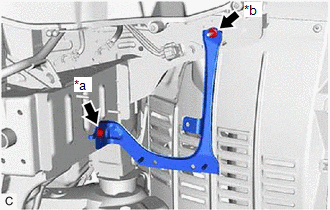
5. REMOVE OIL COOLER BRACKET
HINT:
Perform this procedure only when replacement of the oil cooler bracket is necessary.
| (a) Remove the bolt, nut and oil cooler bracket from the vehicle body. |
|
 Components
COMPONENTS ILLUSTRATION *1 OIL COOLER ASSEMBLY *2 TRANSMISSION OIL COOLER AIR DUCT *3 OIL COOLER BRACKET *4 OUTLET NO. 1 OIL COOLER HOSE *5 TRANSMISSION OIL COOLER HOSE - ...
 Installation
INSTALLATION PROCEDURE 1. INSTALL OIL COOLER BRACKET HINT: Perform this procedure only when replacement of the oil cooler bracket is necessary. (a) Install the oil cooler bracket to the vehicle bod ...
Other materials:
Lexus RX (RX 350L, RX450h) 2016-2026 Repair Manual > Fuel Main Valve: Removal
REMOVAL CAUTION / NOTICE / HINT The necessary procedures (adjustment, calibration, initialization or registration) that must be performed after parts are removed and installed, or replaced during fuel main valve assembly removal/installation are shown below. Necessary Procedures After Parts Removed/ ...
Lexus RX (RX 350L, RX450h) 2016-2026 Repair Manual > Front Radar Sensor System: Dtc Check / Clear
DTC CHECK / CLEAR CHECK FOR DTC (a) Connect the Techstream to the DLC3. (b) Turn the engine switch on (IG). (c) Turn the Techstream on. (d) Enter the following menus: Body Electrical / Front Radar Sensor / Trouble Codes. Body Electrical > Front Radar Sensor > Trouble Codes (e) Check for DTCs ( ...
Lexus RX (RX 350L, RX450h) 2016-{YEAR} Owners Manual
- For your information
- Pictorial index
- For safety and security
- Instrument cluster
- Operation of each component
- Driving
- Lexus Display Audio system
- Interior features
- Maintenance and care
- When trouble arises
- Vehicle specifications
- For owners
Lexus RX (RX 350L, RX450h) 2016-{YEAR} Repair Manual

0.0096