Lexus RX (RX 350L, RX450h) 2016-2026 Repair Manual: Reassembly
REASSEMBLY
PROCEDURE
1. INSTALL FRONT OIL PUMP OIL SEAL
| (a) Using SST and a hammer, install a new front oil pump oil seal to the front oil pump body sub-assembly. SST: 09350-32014 09351-32140 Standard Depth: -0.2 to 0.2 mm (-0.00787 to 0.00787 in.) |
|
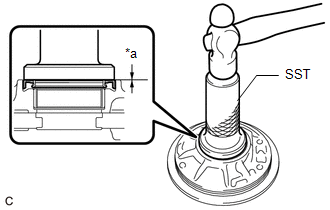
(b) Coat the lip of the front oil pump oil seal with MP grease.
2. INSTALL FRONT OIL PUMP BODY O-RING
| (a) Coat a new front oil pump body O-ring with ATF and install it to the front oil pump body sub-assembly. NOTICE: Ensure that the front oil pump body O-ring is not twisted. |
|
.png)
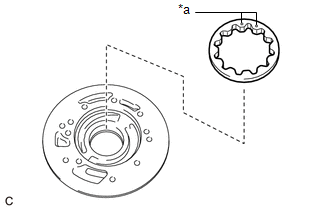
3. INSTALL FRONT OIL PUMP DRIVEN GEAR
| (a) Coat the front oil pump driven gear with ATF and install it to the front oil pump body sub-assembly with the marked side facing upward. |
|
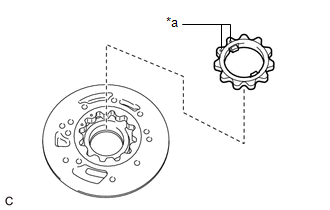
4. INSTALL FRONT OIL PUMP DRIVE GEAR
| (a) Coat the front oil pump drive gear with ATF and install it to the front oil pump body sub-assembly with the marked side facing upward. |
|
5. INSTALL STATOR SHAFT ASSEMBLY
| (a) Using a T30 "TORX" socket wrench, install the stator shaft assembly to the front oil pump body and gear sub-assembly with the 10 bolts. Torque: 9.8 N·m {100 kgf·cm, 87 in·lbf} |
|
.png)
6. INSTALL VALVE BODY OIL STRAINER ASSEMBLY
| (a) Using a T30 "TORX" socket wrench, install a new valve body oil strainer assembly to the stator shaft assembly with the 2 bolts. Torque: 5.4 N·m {55 kgf·cm, 48 in·lbf} |
|
.png)
7. INSTALL CLUTCH DRUM OIL SEAL RING
| (a) Coat 4 new clutch drum oil seal rings with ATF and install them to the stator shaft assembly. |
|
.png)
8. INSPECT FRONT OIL PUMP BODY SUB-ASSEMBLY
Click here .gif)
 Inspection
INSPECTION PROCEDURE 1. INSPECT FRONT OIL PUMP BODY SUB-ASSEMBLY (a) Turn the front oil pump drive gear with 2 screwdrivers and check that it rotates smoothly. NOTICE: Be careful not to damage the ...

Other materials:
Lexus RX (RX 350L, RX450h) 2016-2026 Repair Manual > Automatic Transaxle System: Shift Solenoid "B" Circuit Short to Battery or Open (P075515)
DESCRIPTION Changing gears is performed by the ECM turning the shift solenoid valves SL1, SL2, SL3, SL4, SL5, S1 and S2 on and off. If an open or short occurs in any of the shift solenoid valve circuits, the ECM controls the remaining normal shift solenoid valves to allow the vehicle to be driven. I ...
Lexus RX (RX 350L, RX450h) 2016-2026 Repair Manual > Oil And Oil Filter: Components
COMPONENTS ILLUSTRATION *1 OIL FILTER CAP ASSEMBLY *2 OIL FILTER ELEMENT *3 OIL FILLER CAP SUB-ASSEMBLY *4 O-RING *5 GASKET *6 OIL PAN DRAIN PLUG *7 OIL FILTER DRAIN PLUG - - Tightening torque for "Major areas involving basic vehicle performance such as ...
Lexus RX (RX 350L, RX450h) 2016-{YEAR} Owners Manual
- For your information
- Pictorial index
- For safety and security
- Instrument cluster
- Operation of each component
- Driving
- Lexus Display Audio system
- Interior features
- Maintenance and care
- When trouble arises
- Vehicle specifications
- For owners
Lexus RX (RX 350L, RX450h) 2016-{YEAR} Repair Manual

0.0097