Lexus RX (RX 350L, RX450h) 2016-2026 Repair Manual: Installation
INSTALLATION
PROCEDURE
1. INSTALL TRANSMISSION CONTROL CABLE ASSEMBLY
NOTICE:
Before installing the transmission control cable assembly, check that the park/neutral position switch assembly and the shift lever are in neutral.
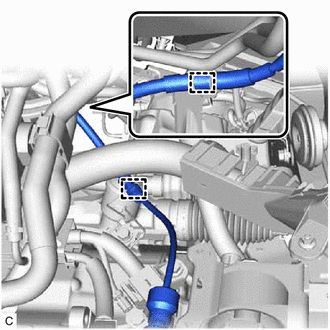
(a) Pass the transmission control cable assembly from the cabin to the engine compartment.
(b) Install the transmission control cable assembly with the 3 bolts.
Torque:
5.0 N·m {51 kgf·cm, 44 in·lbf}
(c) Return the floor carpet to its original position.
| (d) Engage the 2 clamps. |
|
(e) Install a new clip to the No. 1 transmission control cable bracket.
| (f) Connect the transmission control cable assembly to the No. 1 transmission control cable bracket. NOTICE:
|
|
| (g) Turn the control shaft lever clockwise until it stops, then turn it counterclockwise 2 notches. |
|
.png)
(h) Connect the transmission control cable assembly to the transmission control shaft lever with the nut.
Torque:
12 N·m {122 kgf·cm, 9 ft·lbf}
NOTICE:
Before connecting the transmission control cable assembly, check that the shift lever is in neutral.
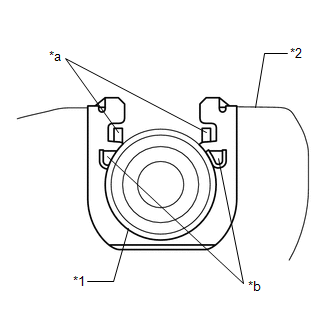
| (i) Slide the cover of the transmission control cable assembly and pull the lock piece outward as shown in the illustration. |
|
.png)
| (j) Engage the 2 claws to connect the transmission control cable assembly to the transmission floor shift assembly. NOTICE: Make sure that the transmission control cable assembly is securely connected. |
|
.png)
| (k) Connect the transmission control cable assembly to the transmission floor shift assembly. NOTICE:
|
|
.png)
(l) Using your fingers, gently pull the cable rod towards the rear of the vehicle to remove backlash.
| (m) Push the lock piece into the adjuster case. NOTICE: Make sure that the park/neutral position switch assembly and the shift lever are in neutral. |
|
.png)
| (n) Slide the cover of the transmission control cable assembly as shown in the illustration. NOTICE:
|
|
.png)
(o) After adjusting the shift lever position, check the position and operation of the shift lever. If there is a problem, adjust the shift lever position again.
2. INSTALL FRONT NO. 2 CONSOLE BOX INSERT
Click here .gif)
3. INSTALL FRONT NO. 1 CONSOLE BOX INSERT
Click here
4. INSTALL CONSOLE BOX ASSEMBLY
Click here
5. INSTALL AIR CLEANER CASE SUB-ASSEMBLY
Click here
6. INSTALL AIR CLEANER FILTER ELEMENT SUB-ASSEMBLY
Click here
7. INSTALL AIR CLEANER CAP WITH AIR CLEANER HOSE
Click here
8. INSTALL BATTERY
Click here
9. INSTALL INLET AIR CLEANER ASSEMBLY
Click here
10. INSTALL COOL AIR INTAKE DUCT SEAL
Click here
11. CONNECT CABLE TO NEGATIVE BATTERY TERMINAL
NOTICE:
When disconnecting the cable, some systems need to be initialized after the cable is reconnected.
Click here
12. INSPECT SHIFT LEVER POSITION
Click here
 Adjustment
ADJUSTMENT CAUTION / NOTICE / HINT NOTICE: Before installing the transmission control cable assembly, check that the park/neutral position switch assembly and the shift lever are in neutral. PROCEDURE ...
 Removal
REMOVAL CAUTION / NOTICE / HINT The necessary procedures (adjustment, calibration, initialization or registration) that must be performed after parts are removed and installed, or replaced during tran ...
Other materials:
Lexus RX (RX 350L, RX450h) 2016-2026 Repair Manual > Lighting System: Precaution
PRECAUTION PRECAUTION FOR DISCONNECTING CABLE FROM NEGATIVE BATTERY TERMINAL NOTICE: When disconnecting the cable from the negative (-) battery terminal, initialize the following systems after the cable is reconnected. System Name See Procedure Lane Control System Intelligent Clear ...
Lexus RX (RX 350L, RX450h) 2016-2026 Repair Manual > Smart Access System With Push-button Start (for Entry Function): Driver Side Door Entry Unlock Function does not Operate
DESCRIPTION If the entry unlock function does not operate for the driver door only, but the entry lock function operates, the request code is being transmitted properly from the driver door. In this case, there may be a problem related to the unlock sensor (connection between the certification ECU ( ...
Lexus RX (RX 350L, RX450h) 2016-{YEAR} Owners Manual
- For your information
- Pictorial index
- For safety and security
- Instrument cluster
- Operation of each component
- Driving
- Lexus Display Audio system
- Interior features
- Maintenance and care
- When trouble arises
- Vehicle specifications
- For owners
Lexus RX (RX 350L, RX450h) 2016-{YEAR} Repair Manual

0.0134