Lexus RX (RX 350L, RX450h) 2016-2026 Repair Manual: Inspection
INSPECTION
PROCEDURE
1. INSPECT SHIFT SOLENOID VALVE S1
| (a) Measure the resistance according to the value(s) in the table below. Standard Resistance:
If the result is not as specified, replace the shift solenoid valve S1. |
|
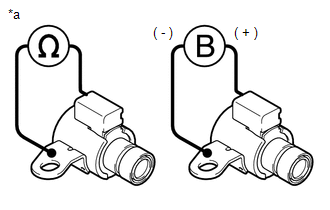
(b) Connect a positive (+) lead from the battery to the terminal of the shift solenoid valve S1 connector and a negative (-) lead to the shift solenoid valve S1 body, and check that the shift solenoid valve S1 moves and makes an operating sound.
NOTICE:
When using battery voltage during the inspection, do not bring the positive (+) and negative (-) tester probes too close to each other as a short circuit may occur.
OK:
The shift solenoid valve S1 moves and makes an operating sound.
If the result is not as specified, replace the shift solenoid valve S1.
2. INSPECT SHIFT SOLENOID VALVE S2
HINT:
Refer to Inspect Shift Solenoid Valve S1.
3. INSPECT SHIFT SOLENOID VALVE SLU
| (a) Measure the resistance according to the value(s) in the table below. Standard Resistance:
If the result is not as specified, replace the shift solenoid valve SLU. |
|

(b) Connect a positive (+) lead from the battery with a 21 W bulb to terminal 2 and a negative (-) lead to terminal 1 of the shift solenoid valve SLU connector, and check that the shift solenoid valve SLU moves and makes an operating sound.
NOTICE:
When using battery voltage during the inspection, do not bring the positive (+) and negative (-) tester probes too close to each other as a short circuit may occur.
OK:
The shift solenoid valve SLU moves and makes an operating sound.
If the result is not as specified, replace the shift solenoid valve SLU.
4. INSPECT SHIFT SOLENOID VALVE SL1
HINT:
Refer to Inspect Shift Solenoid Valve SLU.
5. INSPECT SHIFT SOLENOID VALVE SL2
HINT:
Refer to Inspect Shift Solenoid Valve SLU.
6. INSPECT SHIFT SOLENOID VALVE SL3
HINT:
Refer to Inspect Shift Solenoid Valve SLU.
7. INSPECT SHIFT SOLENOID VALVE SL4
HINT:
Refer to Inspect Shift Solenoid Valve SLU.
8. INSPECT SHIFT SOLENOID VALVE SL5
HINT:
Refer to Inspect Shift Solenoid Valve SLU.
9. INSPECT SHIFT SOLENOID VALVE SLT
HINT:
Refer to Inspect Shift Solenoid Valve SLU.
 Disassembly
DISASSEMBLY PROCEDURE 1. REMOVE MANUAL VALVE (a) Remove the manual valve from the transmission valve body assembly. (b) Remove the E-ring and separate the manual valve connecting rod ...
 Installation
INSTALLATION PROCEDURE 1. INSTALL TRANSMISSION VALVE BODY ASSEMBLY (a) Connect the manual valve connecting rod to the manual valve lever sub-assembly. (b) Install the transmission va ...
Other materials:
Lexus RX (RX 350L, RX450h) 2016-2026 Repair Manual > Inner Rear View Mirror: Installation
INSTALLATION PROCEDURE 1. INSTALL INNER REAR VIEW MIRROR ASSEMBLY (a) Slide and temporarily install the inner rear view mirror assembly as shown in the illustration. Install in this Direction (b) Using a T20 "TORX" socket wrench, install the inner rear view mirror assembly with the screw. ...
Lexus RX (RX 350L, RX450h) 2016-2026 Repair Manual > Dynamic Radar Cruise Control System: Road Test
ROAD TEST HINT:
The dynamic radar cruise control system has 2 cruise control modes: constant speed control mode and vehicle-to-vehicle distance control mode.
Vehicle-to-vehicle distance control mode is selected by default when the dynamic radar cruise control system is turned on using the cruis ...
Lexus RX (RX 350L, RX450h) 2016-{YEAR} Owners Manual
- For your information
- Pictorial index
- For safety and security
- Instrument cluster
- Operation of each component
- Driving
- Lexus Display Audio system
- Interior features
- Maintenance and care
- When trouble arises
- Vehicle specifications
- For owners
Lexus RX (RX 350L, RX450h) 2016-{YEAR} Repair Manual

0.0109