Lexus RX (RX 350L, RX450h) 2016-2026 Repair Manual: Inspection
INSPECTION
PROCEDURE
1. INSPECT WATER INLET WITH THERMOSTAT SUB-ASSEMBLY
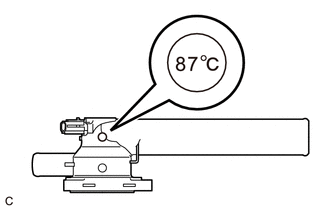
(a) Check the valve opening.
HINT:
The valve opening temperature is inscribed on the water inlet with thermostat sub-assembly.
| (1) Add 15 cc (0.9 cu. in.) of water to the water inlet with thermostat sub-assembly from the inlet pipe side. |
|
(2) Confirm that water does not flow out from the valve side of the water inlet with thermostat sub-assembly.
If water flows out from the valve side of the water inlet with thermostat sub-assembly, replace the water inlet with thermostat sub-assembly with a new one.
(3) Immerse the water inlet with thermostat sub-assembly in water that is between 92°C (198°F) and 96°C (205°F) for 5 minutes or more.
NOTICE:
- Do not allow any water to come into contact with the connector of the water inlet with thermostat sub-assembly.
- Make sure that the end of the inlet pipe of the water inlet with thermostat sub-assembly is not facing downward.
- Make sure to immerse the water inlet with thermostat sub-assembly in the water as shown in the illustration.
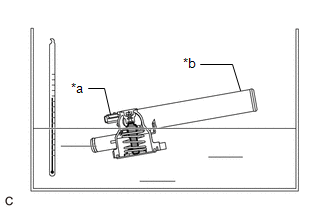
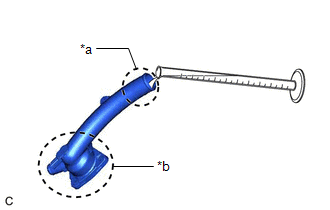
| *a | Connector |
| *b | Inlet Pipe |
 | Temperature Sensor |
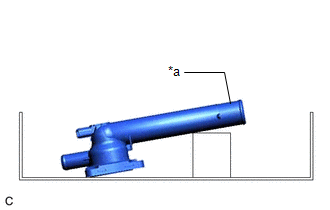
| (4) Leave the water inlet with thermostat sub-assembly at ambient temperature for 5 minutes so that the valve closes. NOTICE: Make sure that the end of the inlet pipe of the water inlet with thermostat sub-assembly is not facing downward. |
|
(5) Check that the water that was added to the water inlet with thermostat sub-assembly has completely flowed out.
If the water that was added to the water inlet with thermostat sub-assembly has not completely flowed out, replace the thermostat sub-assembly with a new one.
(b) Check the resistance of the temperature sensor.
(1) Measure the resistance according to the value(s) in the table below.
Standard Resistance:
| Tester Connection | Condition | Specified Condition |
|---|---|---|
| 1 - 2 | Always | 10.6 to 14.2 Ω |
If the result is not as specified, replace the water inlet with thermostat sub-assembly.
 Components
COMPONENTS ILLUSTRATION *1 OUTER COWL TOP PANEL SUB-ASSEMBLY - - N*m (kgf*cm, ft.*lbf): Specified torque - - ILLUSTRATION *A for TMC Made *B for TMMC Made *1 NO ...
 Installation
INSTALLATION PROCEDURE 1. INSTALL WATER INLET WITH THERMOSTAT SUB-ASSEMBLY (a) Install a new gasket to the water inlet with thermostat sub-assembly. (b) Install the water inlet with thermostat sub-ass ...
Other materials:
Lexus RX (RX 350L, RX450h) 2016-2026 Repair Manual > Intelligent Clearance Sonar System: ICS Detection Area Adjustment Incomplete (C1AF0)
DESCRIPTION When ICS detection area adjustment is incomplete, the clearance warning ECU assembly stores DTC C1AF0. DTC No. Detection Item DTC Detection Condition Trouble Area C1AF0 ICS Detection Area Adjustment Incomplete ICS detection area adjustment incomplete
Intelligent cle ...
Lexus RX (RX 350L, RX450h) 2016-2026 Repair Manual > Back Door Glass: Installation
INSTALLATION PROCEDURE 1. INSTALL BACK DOOR GLASS SPACER (w/o Rear No. 2 Seat) (a) Using a brush or sponge, coat the installation area of 4 new back door glass spacers with primer G. NOTICE:
Do not apply too much primer G.
Allow the primer G to dry for 3 minutes or more.
Throw away any leftov ...
Lexus RX (RX 350L, RX450h) 2016-{YEAR} Owners Manual
- For your information
- Pictorial index
- For safety and security
- Instrument cluster
- Operation of each component
- Driving
- Lexus Display Audio system
- Interior features
- Maintenance and care
- When trouble arises
- Vehicle specifications
- For owners
Lexus RX (RX 350L, RX450h) 2016-{YEAR} Repair Manual

0.0103