Lexus RX (RX 350L, RX450h) 2016-2026 Repair Manual: Reassembly
REASSEMBLY
PROCEDURE
1. INSTALL FUEL PUMP
HINT:
Perform "Inspection After Repair" after replacing the fuel pump.
Click here .gif)
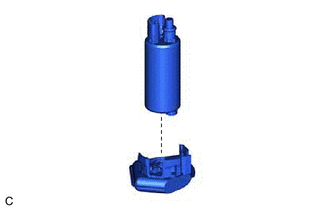
| (a) Apply a light coat of gasoline to a new O-ring. Then install the O-ring and fuel pump spacer to the fuel pump. |
|

| (b) Install the fuel pump to the fuel pump filter. |
|
2. INSTALL FUEL PUMP FILTER
(a) Engage the 3 claws and install the fuel pump filter with the fuel pump to the fuel filter.
NOTICE:
- Make sure that the O-ring is not cut or pinched during the installation.
- Do not damage the fuel filter.
- Securely engage the claws.
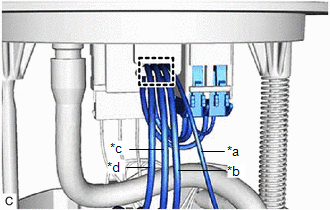
| (b) Connect the fuel pump harness connector to install the fuel pump harness to the fuel pump. |
|
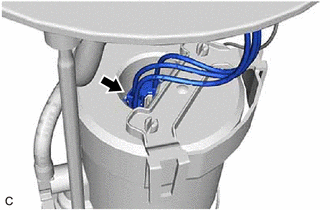
| (c) Engage the claw to connect the fuel pump harness to the fuel pump filter. NOTICE:
|
|
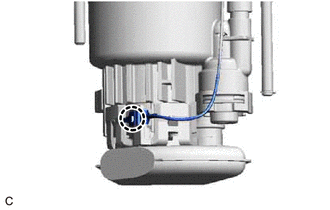
(d) Check the connection state of the fuel pump harness.
(1) Measure the resistance according to the value(s) in the table below.
Standard Resistance:
| Tester Connection | Condition | Specified Condition |
|---|---|---|
| Fuel pump body - Ground terminal of the fuel pump harness | Always | Below 1 Ω |
If the result is not as specified, reconnect the fuel pump harness to the fuel pump filter so that the ground terminal of the fuel pump harness is securely connected to the fuel pump body.
3. INSTALL FUEL SUCTION PLATE SUB-ASSEMBLY
(a) Engage the 2 claws to install the fuel filter to the No. 1 fuel sub-tank.
NOTICE:
- Do not apply excessive force to the tube or No. 1 fuel suction support.
- Securely engage the claws.
(b) Install the spring to the fuel suction plate shaft and then install the fuel suction plate sub-assembly to the No. 1 fuel sub-tank.
(c) Install a new E-ring to the fuel suction plate shaft.
| (d) Engage the clamp and claw, and connect the fuel pump filter hose while aligning it with the installation position of the No. 1 fuel sub-tank. NOTICE: Securely engage the claw. |
|
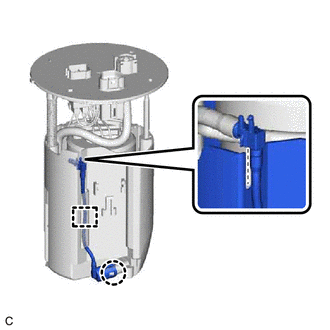
(e) Connect the 2 fuel pump harness connectors.
NOTICE:
Make sure that the fuel pump harness connector is connected securely.
| (f) Engage the clamp to connect the fuel pump harness to the fuel suction plate sub-assembly as shown in the illustration. NOTICE: Make sure that the fuel pump harness has a moderate amount of slack. |
|
4. INSTALL FUEL SENDER GAUGE ASSEMBLY
Click here
 Inspection
INSPECTION PROCEDURE 1. INSPECT FUEL PUMP (a) Measure the resistance according to the value(s) in the table below. Standard Resistance: Tester Connection Specified Condition U - V 0.05 ...
 Removal
REMOVAL CAUTION / NOTICE / HINT The necessary procedures (adjustment, calibration, initialization or registration) that must be performed after parts are removed and installed, or replaced during fuel ...
Other materials:
Lexus RX (RX 350L, RX450h) 2016-2026 Repair Manual > Dynamic Radar Cruise Control System: Internal Control Module Software Incompatibility Invalid/Incompatible Software Component (U030057)
DESCRIPTION If the vehicle information stored in the forward recognition camera does not match the vehicle information sent from the ECM, the forward recognition camera stores DTC U030057. DTC No. Detection Item DTC Detection Condition Trouble Area MIL DTC Output from U030057 Inte ...
Lexus RX (RX 350L, RX450h) 2016-2026 Repair Manual > Security Horn Assembly (for Built-in Battery Type): Removal
REMOVAL CAUTION / NOTICE / HINT The necessary procedures (adjustment, calibration, initialization or registration) that must be performed after parts are removed and installed, or replaced during theft warning siren assembly removal/installation are shown below. Necessary Procedures after parts remo ...
Lexus RX (RX 350L, RX450h) 2016-{YEAR} Owners Manual
- For your information
- Pictorial index
- For safety and security
- Instrument cluster
- Operation of each component
- Driving
- Lexus Display Audio system
- Interior features
- Maintenance and care
- When trouble arises
- Vehicle specifications
- For owners
Lexus RX (RX 350L, RX450h) 2016-{YEAR} Repair Manual

0.0104