Lexus RX (RX 350L, RX450h) 2016-2026 Repair Manual: Installation
INSTALLATION
PROCEDURE
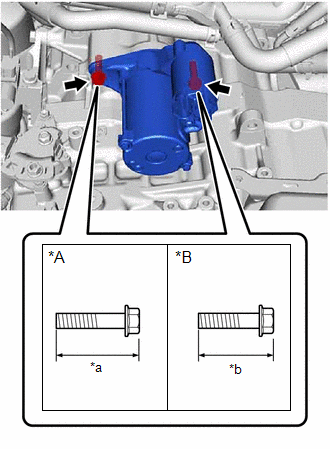
1. INSTALL STARTER ASSEMBLY
| (a) Install the starter assembly with the 2 bolts. Torque: Type A : 46 N·m {469 kgf·cm, 34 ft·lbf} Type B : 37 N·m {377 kgf·cm, 27 ft·lbf} |
|
(b) Install the wire harness with the 2 bolts.
Torque:
19.1 N·m {195 kgf·cm, 14 ft·lbf}
(c) Connect the starter assembly connector.
(d) Connect terminal 30 with the nut.
Torque:
9.8 N·m {100 kgf·cm, 87 in·lbf}
(e) Install the terminal cap.
2. INSTALL NO. 1 TRANSMISSION CONTROL CABLE BRACKET
(a) Install the No. 1 transmission control cable bracket with the 2 bolts.
Torque:
12 N·m {122 kgf·cm, 9 ft·lbf}
3. CONNECT TRANSMISSION CONTROL CABLE ASSEMBLY
(a) Install a new clip to the No. 1 transmission control cable bracket.
| (b) Connect the transmission control cable assembly to the No. 1 transmission control cable bracket. NOTICE:
|
|
(c) Using a screwdriver, engage the 4 claws.
4. INSTALL AIR CLEANER CASE SUB-ASSEMBLY
Click here .gif)
5. INSTALL AIR CLEANER FILTER ELEMENT SUB-ASSEMBLY
Click here
6. INSTALL AIR CLEANER CAP WITH AIR CLEANER HOSE
Click here
7. INSTALL INLET AIR CLEANER ASSEMBLY
Click here
8. INSTALL COOL AIR INTAKE DUCT SEAL
Click here
9. CONNECT CABLE TO NEGATIVE BATTERY TERMINAL
NOTICE:
When disconnecting the cable, some systems need to be initialized after the cable is reconnected.
Click here
 Inspection
INSPECTION PROCEDURE 1. INSPECT STARTER ASSEMBLY CAUTION: As a large electric current passes through the cable during this inspection, a thick cable must be used. If not, the cable may become hot and ...
 Reassembly
REASSEMBLY PROCEDURE 1. INSTALL PLANETARY GEAR (a) Apply high-temperature grease to the 3 planetary gears, 3 planetary gear shafts and starter drive housing assembly. High-temperature Grease ...
Other materials:
Lexus RX (RX 350L, RX450h) 2016-2026 Repair Manual > Navigation System: MOST Communication Malfunction (B15D0)
DESCRIPTION Navigation system components communicate with each other via MOST communication. If a line short or short to ground occurs in a MOST communication line, communication will not be possible and the navigation system will not operate normally. After the engine switch is turned on (ACC), if ...
Lexus RX (RX 350L, RX450h) 2016-2026 Repair Manual > Occupant Classification System: Precaution
PRECAUTION PRECAUTION FOR DISCONNECTING CABLE FROM NEGATIVE BATTERY TERMINAL NOTICE: When disconnecting the cable from the negative (-) battery terminal, initialize the following systems after the cable is reconnected: System See Procedure Lane Control System Pre-collision System ...
Lexus RX (RX 350L, RX450h) 2016-{YEAR} Owners Manual
- For your information
- Pictorial index
- For safety and security
- Instrument cluster
- Operation of each component
- Driving
- Lexus Display Audio system
- Interior features
- Maintenance and care
- When trouble arises
- Vehicle specifications
- For owners
Lexus RX (RX 350L, RX450h) 2016-{YEAR} Repair Manual

0.0107