Lexus RX (RX 350L, RX450h) 2016-2026 Repair Manual: Inspection
INSPECTION
PROCEDURE
1. INSPECT TIE ROD ASSEMBLY LH
| (a) Secure the tie rod assembly LH in a vise between aluminum plates. NOTICE: Do not overtighten the vise. |
|
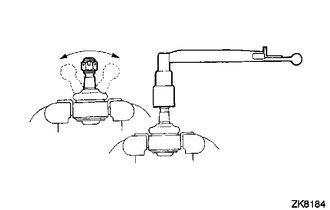
(b) Install the nut to the stud bolt.
(c) Flip the ball joint back and forth 5 times.
(d) Using a torque wrench and the nut, turn the stud bolt continuously at a rate of 2 to 4 seconds per turn, and check the turning torque on the 5th turn.
Standard Turning Torque:
0.49 to 3.43 N*m (5 to 34 kgf*cm, 5 to 30 in.*lbf)
If the turning torque is not within the specified range, replace the tie rod assembly LH with a new one.
(e) Check that the ball joint dust cover is not cracked and that there is no grease on it.
If the ball joint dust cover is cracked or there is grease on it, replace the tie rod assembly LH with a new one.
2. INSPECT TIE ROD ASSEMBLY RH
HINT:
Perform the same procedure as for the LH side.
3. INSPECT TOTAL PRELOAD
NOTICE:
Inspect the total preload in a no-load condition by removing the tie rod assemblies RH and LH, and steering rack boots.
| (a) Install SST to the pinion shaft and turn it left and right 5 times or more. SST: 09616-00020 |
|

(b) Using a torque wrench and SST, turn the pinion shaft continuously at a rate of 4 to 6 seconds per turn to inspect the total preload of the steering gear assembly.
Standard Preload:
1.5 to 2.2 N*m (16 to 22 kgf*cm, 14 to 19 in.*lbf)
NOTICE:
Inspect the total preload around the steering rack center position.
If the total preload is not within the specified range, replace the steering gear assembly with a new one.
 Disassembly
DISASSEMBLY PROCEDURE 1. REMOVE STEERING RACK BOOT CLIP (for LH Side) (a) Using pliers, remove the steering rack boot clip. 2. REMOVE STEERING RACK BOOT CLIP (for RH Side) HINT: Perform the same proce ...
 Installation
INSTALLATION PROCEDURE 1. INSTALL TIE ROD ASSEMBLY LH (a) Install the lock nut and tie rod assembly LH to the steering gear assembly until the matchmarks are aligned. HINT: After adjusting the toe- ...
Other materials:
Lexus RX (RX 350L, RX450h) 2016-2026 Repair Manual > Camshaft Oil Control Valve (for Bank 2): Installation
INSTALLATION PROCEDURE 1. INSTALL CAMSHAFT TIMING GEAR BOLT (for Intake Side of Bank 2) NOTICE: There are different types of camshaft timing gear bolts. Make sure to check the identification mark to determine the tightening torque. *a Identification Mark Stamp Identification Mark Item ...
Lexus RX (RX 350L, RX450h) 2016-2026 Repair Manual > Pre-collision System: Invalid Data Received from Brake System Control Module Invalid Serial Data Received (U041881)
DESCRIPTION The skid control ECU (brake actuator assembly) sends signals indicating the status of the vehicle stability control system to the forward recognition camera via CAN communication. If the forward recognition camera receives a vehicle stability control system malfunction signal from the sk ...
Lexus RX (RX 350L, RX450h) 2016-{YEAR} Owners Manual
- For your information
- Pictorial index
- For safety and security
- Instrument cluster
- Operation of each component
- Driving
- Lexus Display Audio system
- Interior features
- Maintenance and care
- When trouble arises
- Vehicle specifications
- For owners
Lexus RX (RX 350L, RX450h) 2016-{YEAR} Repair Manual

0.0099