
Lexus RX (RX 350L, RX450h) 2016-2026 Repair Manual: Voice Guidance does not Function
WIRING DIAGRAM
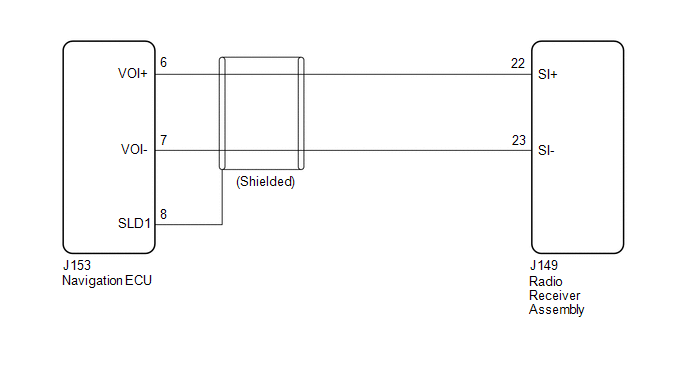
CAUTION / NOTICE / HINT
NOTICE:
Depending on the parts that are replaced during vehicle inspection or maintenance, performing initialization, registration or calibration may be needed. Refer to Precaution for Audio and Visual System.
Click here 
PROCEDURE
| 1. | CHECK VOICE GUIDANCE SETTING |
(a) Check that the voice guidance settings are not off.
OK:
Voice guidance settings are not off.
| NG |  | CHANGE THE VOICE GUIDANCE SETTINGS TO ON |
|

| 2. | CHECK HARNESS AND CONNECTOR (RADIO RECEIVER ASSEMBLY - NAVIGATION ECU) |
(a) Disconnect the J149 radio receiver assembly connector.
(b) Disconnect the J153 navigation ECU connector.
(c) Measure the resistance according to the value(s) in the table below.
Standard Resistance:
| Tester Connection | Condition | Specified Condition |
|---|---|---|
| J149-22 (SI+) - J153-6 (VOI+) | Always | Below 1 Ω |
| J149-23 (SI-) - J153-7 (VOI-) | Always | Below 1 Ω |
| J149-22 (SI+) or J153-6 (VOI+) - Body ground | Always | 10 kΩ or higher |
| J149-23 (SI-) or J153-7 (VOI-) - Body ground | Always | 10 kΩ or higher |
| J153-8 (SLD1) - Body ground | Always | 10 kΩ or higher |
| NG | | REPAIR OR REPLACE HARNESS OR CONNECTOR |
|
| 3. | CHECK AUDIO FUNCTION |
(a) Check that sound can be heard from a front speaker.
OK:
Sound can be heard.
| OK | | REPLACE NAVIGATION ECU |
| NG | | PROCEED TO NEXT SUSPECTED AREA SHOWN IN PROBLEM SYMPTOMS TABLE |
 "No GPS signal" mark is displayed
CAUTION / NOTICE / HINT NOTICE: Depending on the parts that are replaced during vehicle inspection or maintenance, performing initialization, registration or calibration may be needed. Refer to Precau ...
 Voice is not Recognized
PROCEDURE 1. CHECK CONDITION (a) While paying attention to the condition of the spoken voice command, perform a voice recognition operation. OK: Voice command is recognized normally. HINT: ...
Other materials:
Lexus RX (RX 350L, RX450h) 2016-2026 Repair Manual > Heating / Air Conditioning: Rear Air Conditioning Panel
ComponentsCOMPONENTS ILLUSTRATION *1 NO. 2 AIR CONDITIONING CONTROL ASSEMBLY - - RemovalREMOVAL PROCEDURE 1. REMOVE NO. 2 AIR CONDITIONING CONTROL ASSEMBLY (a) Using a moulding remover, disengage the 9 claws as shown in the illustration. (b) Disengage the guide as shown i ...
Lexus RX (RX 350L, RX450h) 2016-2026 Repair Manual > Hood Support: Removal
REMOVAL CAUTION / NOTICE / HINT HINT:
Use the same procedure for the RH side and LH side.
The following procedure is for the LH side.
PROCEDURE 1. REMOVE FRONT WIPER MOTOR AND LINK ASSEMBLY Click here 2. REMOVE OUTER COWL TOP PANEL SUB-ASSEMBLY Click here 3. REMOVE HOOD SUPPORT ASSEMBL ...
Lexus RX (RX 350L, RX450h) 2016-{YEAR} Owners Manual
- For your information
- Pictorial index
- For safety and security
- Instrument cluster
- Operation of each component
- Driving
- Lexus Display Audio system
- Interior features
- Maintenance and care
- When trouble arises
- Vehicle specifications
- For owners
Lexus RX (RX 350L, RX450h) 2016-{YEAR} Repair Manual

0.0115