Lexus RX (RX 350L, RX450h) 2016-2026 Repair Manual: Installation
INSTALLATION
PROCEDURE
1. INSTALL REAR BUMPER ASSEMBLY
(a) w/ Intuitive Parking Assist System or Kick Sensor:
(1) Connect the connector.
(b) Engage the 2 claws as shown in the illustration.
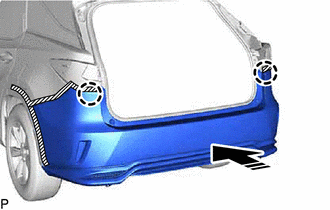
.png) | Install in this Direction |
(c) Engage the 6 claws as shown in the illustration.
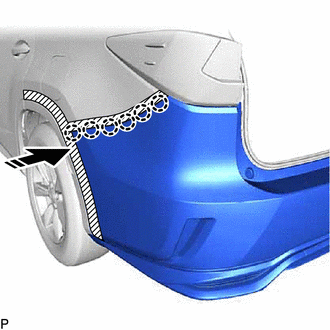
| | Install in this Direction |
HINT:
Use the same procedure for the RH side and LH side.
(d) Install the 8 clips.
(e) Install the rear bumper assembly with the 4 screws.
2. INSTALL LUGGAGE COMPARTMENT SIDE COVER LH (w/o Spare Tire)
(a) Engage the 2 luggage compartment side cover protector clips as shown in the illustration.
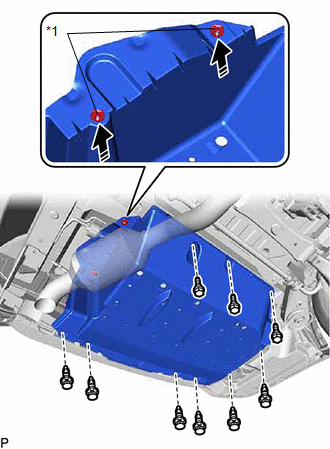
| *1 | Luggage Compartment Side Cover Protector Clip |
| | Install in this Direction |
(b) Install the 6 clips.
(c) Install the luggage compartment side cover LH with the 3 bolts.
3. CONNECT QUARTER OUTSIDE MOULDING SUB-ASSEMBLY LH
(a) Engage the clip and 4 claws as shown in the illustration.
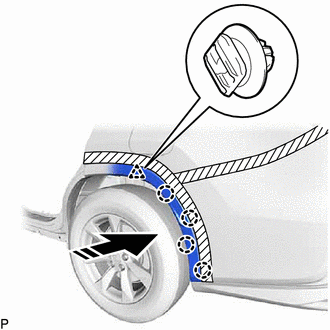
| | Install in this Direction |
(b) Using a 4 mm hexagon socket wrench, install the screw.
(c) Install the quarter outside moulding sub-assembly LH with the clip.
4. CONNECT QUARTER OUTSIDE MOULDING SUB-ASSEMBLY RH
HINT:
Use the same procedure as for the LH side.
5. INSTALL REAR LIGHT COVER LH
for Bulb Type Turn Signal Light:
Click here .gif)
for LED Type Turn Signal Light:
Click here
6. INSTALL REAR LIGHT COVER RH
HINT:
Use the same procedure as for the LH side.
7. CONNECT CABLE TO NEGATIVE BATTERY TERMINAL (w/ Kick Sensor)
NOTICE:
When disconnecting the cable, some systems need to be initialized after the cable is reconnected.
Click here
8. PERFORM CALIBRATION (w/ Intelligent Clearance Sonar System)
Click here
9. INSPECT KICK DOOR CONTROL SENSOR (w/ Kick Sensor)
Click here
 Removal
REMOVAL CAUTION / NOTICE / HINT The necessary procedures (adjustment, calibration, initialization, or registration) that must be performed after parts are removed and installed, or replaced during rea ...
 Disassembly
DISASSEMBLY PROCEDURE 1. REMOVE REAR CENTER ULTRASONIC SENSOR (w/ Intuitive Parking Assist System) Click here 2. REMOVE REAR CORNER ULTRASONIC SENSOR (w/ Intuitive Parking Assist System) Click here ...
Other materials:
Lexus RX (RX 350L, RX450h) 2016-2026 Repair Manual > Power Mirror Control System (w/o Memory): Customize Parameters
CUSTOMIZE PARAMETERS CUSTOMIZE POWER MIRROR CONTROL SYSTEM (w/o Memory) HINT: The following items can be customized. NOTICE:
When the customer requests a change in a function, first make sure that the function can be customized.
Record the current settings before customizing.
(a) Customizing ...
Lexus RX (RX 350L, RX450h) 2016-2026 Repair Manual > Rear Seat Inner Belt Assembly(for Rh Side): Installation
INSTALLATION PROCEDURE 1. INSTALL REAR SEAT 3 POINT TYPE BELT ASSEMBLY RH (a) Install the rear seat 3 point type belt assembly RH with the bolt. Torque: 42 N·m {428 kgf·cm, 31 ft·lbf} (b) Connect the connector. (c) Engage each clamp. 2. INSTALL SEPARATE TYPE REAR SEAT CUSHION COVER WITH PAD Clic ...
Lexus RX (RX 350L, RX450h) 2016-{YEAR} Owners Manual
- For your information
- Pictorial index
- For safety and security
- Instrument cluster
- Operation of each component
- Driving
- Lexus Display Audio system
- Interior features
- Maintenance and care
- When trouble arises
- Vehicle specifications
- For owners
Lexus RX (RX 350L, RX450h) 2016-{YEAR} Repair Manual

0.0184