Lexus RX (RX 350L, RX450h) 2016-2026 Repair Manual: Pointer not Displayed on Screen or Pointer does not Move
CAUTION / NOTICE / HINT
NOTICE:
Depending on the parts that are replaced during vehicle inspection or maintenance, performing initialization, registration or calibration may be needed. Refer to Precaution for Audio and Visual System.
Click here .gif)
PROCEDURE
| 1. | CHECK FOR FOREIGN MATTER |
(a) Check if there is water or foreign matter on the remote touch screen.
OK:
There is no water or foreign matter on the remote touch screen.
| NG |  | GO TO STEP 4 |
|

| 2. | REMOTE TOUCH (REMOTE OPERATION CONTROLLER ASSEMBLY) SELF CHECK (CHECK REMOTE TOUCH SCREEN OPERATION POSITION RECOGNITION CONDITION) |
(a) Enter self-diagnostic mode.
Click here
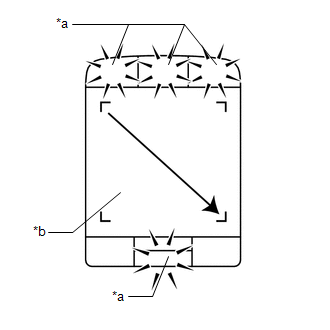
| (b) Operate the remote touch screen diagonally from the upper left to the lower right and check that the brightness of the switch illumination changes. NOTICE: Since the remote touch screen may recognize a pinch in/out operation if operated with 2 fingers, always use 1 finger to operate the remote touch screen in self-diagnostic mode. OK: Brightness changes according to remote touch screen operation.
HINT: When the switch illumination blinks, the remote touch (remote operation controller assembly) has stored a DTC. |
|
| A | | REPLACE RADIO RECEIVER ASSEMBLY |
|
| 3. | CHECK REMOTE TOUCH (REMOTE OPERATION CONTROLLER ASSEMBLY) |
(a) Replace the remote touch (remote operation controller assembly) with a new or known good one.
Click here
(b) Check that the pointer is displayed and moves normally.
OK:
The pointer is displayed and moves normally.
| OK | | END (REMOTE TOUCH (REMOTE OPERATION CONTROLLER ASSEMBLY) IS DEFECTIVE) |
| NG | | REPLACE RADIO RECEIVER ASSEMBLY |
| 4. | REMOVE FOREIGN MATTER |
(a) Remove any water and foreign matter, and then wait approximately 30 seconds.
(b) Check that the pointer is displayed and moves normally.
OK:
The pointer is displayed and moves normally.
| OK | | END |
| NG | | GO TO STEP 2 |
 Pointer Displayed/not Displayed Repeatedly
WIRING DIAGRAM CAUTION / NOTICE / HINT NOTICE:
Depending on the parts that are replaced during vehicle inspection or maintenance, performing initialization, registration or calibration may be need ...
 Steering Pad Switch Circuit
DESCRIPTION This circuit sends an operation signal from the steering pad switch assembly to the radio receiver assembly. If there is an open in the circuit, the audio and visual system cannot be opera ...
Other materials:
Lexus RX (RX 350L, RX450h) 2016-2026 Repair Manual > Vacuum Pump: Reassembly
REASSEMBLY PROCEDURE 1. INSTALL VACUUM PUMP VANE (for TMC Made) (a) Apply engine oil to the vacuum pump vane and vacuum pump vane caps and install the vacuum pump vane caps to the vacuum pump vane. (b) Apply engine oil to the vacuum pump vane with vacuum pump vane caps and install it to the vacuum p ...
Lexus RX (RX 350L, RX450h) 2016-2026 Repair Manual > Rear Door Window Frame Moulding: Installation
INSTALLATION CAUTION / NOTICE / HINT HINT:
Use the same procedure for the RH side and LH side.
The following procedure is for the LH side.
PROCEDURE 1. INSTALL REAR DOOR REAR WINDOW FRAME MOULDING (a) Using an air riveter or hand riveter with a nose piece, install the rear door rear wind ...
Lexus RX (RX 350L, RX450h) 2016-{YEAR} Owners Manual
- For your information
- Pictorial index
- For safety and security
- Instrument cluster
- Operation of each component
- Driving
- Lexus Display Audio system
- Interior features
- Maintenance and care
- When trouble arises
- Vehicle specifications
- For owners
Lexus RX (RX 350L, RX450h) 2016-{YEAR} Repair Manual

0.0109