Lexus RX (RX 350L, RX450h) 2016-2026 Repair Manual: Operation Check
OPERATION CHECK
CHECK POWER SEAT FUNCTION
(a) Check the basic functions.
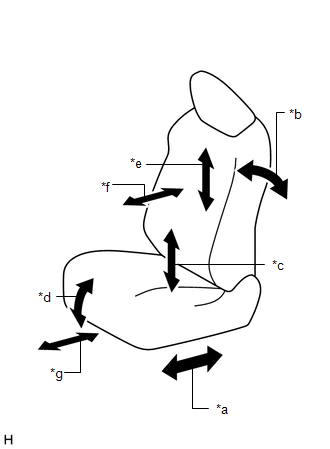
| *a | Slide Function |
| *b | Reclining Function |
| *c | Lifter Function |
| *d | Front Vertical Function |
| *e | Lumbar Support Adjustment Function (up - down) (w/ Seat Variable Cushion Switch) |
| *f | Lumbar Support Adjustment Function (forward - back) |
| *g | Cushion Length Function (w/ Seat Variable Cushion Switch) |
(1) Operate the power seat switches and check that the following seat functions operate properly:
- Slide function
- Reclining function
- Lifter function
- Front vertical function
- Lumbar support adjustment function
- Cushion length function*
- *: w/ Seat Variable Cushion Switch
CHECK POWER SEAT MOTOR (SLIDING, FRONT VERTICAL, LIFTER AND RECLINING FUNCTIONS)
(a) Check the PTC operation inside the power seat motor.
NOTICE:
- The inspection should be performed with the seat installed to the vehicle.
- Perform the 4 steps below to check the full range of motion for each power seat function.
HINT:
The resistance of the PTC thermistor increases when a switch of the position control ECU and switch assembly LH is held down even after the seat has been moved to the farthest possible position in one direction. If the resistance increases beyond a specified level, the current is shut off to prevent a short circuit.
(1) Choose a power seat function. Operate a switch of the position control ECU and switch assembly LH and move the seat to the farthest possible position in one direction. Keep the seat in that position for approximately 60 seconds.
(2) Operate the switch of the position control ECU and switch assembly LH again and continue to try to move the seat in the same direction as in the previous step. Measure the time until the current is shut off (motor operation sound stops).
Standard:
4 to 90 seconds
(3) After the current is shut off, release the switch of the position control ECU and switch assembly LH and wait for approximately 60 seconds.
(4) Operate a switch of the position control ECU and switch assembly LH and move the seat in the opposite direction. Check that the motor operates.
CHECK SEAT LENGTH MOTOR (w/ Seat Variable Cushion Switch)
(a) Check the PTC operation inside the seat length motor.
NOTICE:
The inspection should be performed with the seat installed in the vehicle.
(1) Operate the seat variable cushion switch and move the seat cushion to either the foremost or rearmost position. Keep the seat in that position for approximately 60 seconds.
(2) Operate the seat variable cushion switch again and continue to try to move the seat cushion in the same direction as in the previous step. Measure the time until the current is shut off (motor operation sound will stop).
Standard:
4 to 90 seconds
(3) After the current is shut off, release the seat variable cushion switch and wait for approximately 60 seconds.
(4) Operate the seat variable cushion switch and move the seat cushion in the opposite direction. Check that the motor operates.
CHECK LUMBAR SUPPORT ADJUSTMENT MOTOR
(a) Check the PTC operation inside the lumbar support adjustment motor (forward - back).
NOTICE:
The inspection should be performed with the seat installed to the vehicle.
(1) Operate the front lumbar power seat switch and move the lumbar support to either the foremost or rearmost position. Keep the seat in that position for approximately 60 seconds.
(2) Operate the front lumbar power seat switch again and continue to try to move the lumbar support in the same direction as in the previous step. Measure the time until the current is shut off (motor operation sound stops).
Standard:
4 to 90 seconds
(3) After the current is shut off, release the front lumbar power seat switch and wait for approximately 60 seconds.
(4) Operate the front lumbar power seat switch and move the lumbar support in the opposite direction. Check that the motor operates.
(b) Check the PTC operation inside the lumbar support adjustment motor (up - down) (w/ Seat Variable Cushion Switch).
NOTICE:
The inspection should be performed with the seat installed to the vehicle.
(1) Operate the front lumbar power seat switch and move the lumbar support to either the foremost or rearmost position. Keep the seat in that position for approximately 60 seconds.
(2) Operate the front lumbar power seat switch again and continue to try to move the lumbar support in the same direction as in the previous step. Measure the time until the current is shut off (motor operation sound stops).
Standard:
4 to 90 seconds
(3) After the current is shut off, release the front lumbar power seat switch and wait for approximately 60 seconds.
(4) Operate the front lumbar power seat switch and move the lumbar support in the opposite direction. Check that the motor operates.
CHECK POWER SEAT POWER EASY ACCESS SYSTEM
HINT:
When troubleshooting a function, first make sure that the function is set to the default setting.
Click here .gif)
(a) Check that the seat slides backward when either of the following conditions is met:
- The driver seat belt is unfastened with the engine switch off and the shift lever in P.
- The engine switch is turned from on (IG) or on (ACC) to off with the shift lever in P or N and the driver seat belt unfastened.
(b) Check that the seat slides forward when either of the following conditions is met:
- The driver seat belt is fastened with the engine switch on (IG) or on (ACC) and the shift lever in P or N.
- The engine switch is turned from off to on (IG) or on (ACC) with the shift lever in P or N and the driver seat belt unfastened.
CHECK SEAT POSITION MEMORY AND RESTORING FUNCTION
HINT:
- The SET, M1, M2 and M3 seat memory switches are shown in the illustration.
-
The seat position will not be stored if the SET switch and 2 or more of the seat memory switches (for example, M1 switch and M2 switch) are pressed simultaneously.
If a memorizing operation has failed, release all of the switches. The seat memory function will not operate unless the switches are released.
-
The seat will not return to the memorized position if 2 or more of the seat memory switches (for example, M1 switch and M2 switch) are pressed simultaneously.
If a restoring operation has failed, release all of the switches. The seat memory restoring function will not operate unless the switches are released.
(a) Turn the engine switch on (IG) and check that the P position indicator is illuminated.
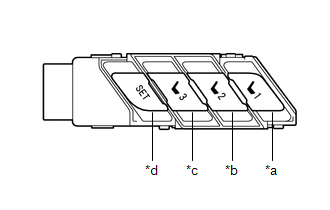
| *a | M1 Switch |
| *b | M2 Switch |
| *c | M3 Switch |
| *d | SET Switch |
(b) Move the seat to the foremost and uppermost positions using the position control ECU and switch assembly LH.
(c) Check that a buzzer sounds for 0.5 seconds and the seat position is memorized when the M1 switch is pressed within 3 seconds of the SET switch being pressed or the M1 switch is pressed while the SET switch is being pressed.
(d) Move the seat out of the foremost and uppermost positions using the position control ECU and switch assembly LH.
(e) Check that the buzzer sounds for 0.5 seconds and the seat position is memorized when the M2 switch is pressed within 3 seconds of the SET switch being pressed or the M2 switch is pressed while the SET switch is being pressed.
(f) Move the seat to the rearmost and lowermost positions using the position control ECU and switch assembly LH.
(g) Check that the buzzer sounds for 0.5 seconds and the seat position is memorized when the M3 switch is pressed within 3 seconds of the SET switch being pressed or the M3 switch is pressed while the SET switch is being pressed.
(h) Check that the buzzer sounds for 0.1 seconds and the seat automatically moves into the foremost and uppermost positions (memorized positions) when the M1 switch is pressed.
(i) Check that the buzzer sounds for 0.1 seconds and the seat automatically moves out of the foremost and uppermost positions (memorized positions) when the M2 switch is pressed.
(j) Check that the buzzer sounds for 0.1 seconds and the seat automatically moves into the rearmost and lowermost positions (memorized positions) when the M3 switch is pressed.
(k) Turn the engine switch off and open the driver door. Check that the buzzer sounds for 0.1 seconds and the seat automatically moves to the memorized position by pressing the M1, M2 or M3 switch within 180 seconds after the engine switch is turned off.
(l) Turn the engine switch off and close the driver door. Check that the buzzer sounds for 0.1 seconds and the seat automatically moves to the memorized position by pressing the M1, M2 or M3 switch within 60 seconds after the engine switch is turned off.
(m) Operate the front vertical function of the position control ECU and switch assembly LH to tilt the seat down 3 times.
Within 10 seconds after operating the front vertical function of the position control ECU and switch assembly LH, operate the lifter function of the position control ECU and switch assembly LH and the reclining function of the position control ECU and switch assembly LH to raise and recline the seat simultaneously. Hold both switches for 10 seconds to clear the memory.
HINT:
The buzzer sounds for 0.5 seconds when the memory is cleared.
CHECK MEMORY CALL FUNCTION
(a) Automatic memory call function
(1) Prepare 2 electrical key transmitter sub-assemblies and label them electrical key transmitter sub-assembly A and electrical key transmitter sub-assembly B.
NOTICE:
Prepare 2 electrical key transmitter sub-assemblies which have already been registered to the vehicle and can be used to lock and unlock the doors normally.
HINT:
- Refer to Registration for the electrical key transmitter sub-assembly registration procedure.
- Use tags to identify each electrical key transmitter sub-assembly.
(2) Register a seat position to the seat memory switch LH (M1) and the electrical key transmitter sub-assembly A.
HINT:
Refer to Memory Call Registration.
Click here
(3) While carrying the electrical key transmitter sub-assembly A, unlock the driver door using the entry unlock function or wireless unlock operation. Open the driver door and check that a buzzer sounds for 0.1 seconds and the driver seat moves to the memorized position.
HINT:
When the customize function "Seat Move Distance" is set to "Standard", the seat slides backward to a position 50 mm (1.97 in) from the memorized position.
Click here
(4) Register a seat position to the seat memory switch LH (M2) and the electrical key transmitter sub-assembly B.
HINT:
Refer to Memory Call Registration.
(5) While carrying the electrical key transmitter sub-assembly B, unlock the driver door using the entry unlock function or wireless unlock operation. Open the driver door and check that a buzzer sounds for 0.1 seconds and the driver seat moves to the memorized position.
HINT:
When the customize function "Seat Move Distance" is set to "Standard", the seat slides backward to a position 50 mm (1.97 in) from the memorized position.
Click here
CHECK MEMORY CALL EMERGENCY STOP FUNCTION
(a) While a memory call function is operating, check that performing one of the following will stop the memory call operation: 1) press the SET switch, M1 switch, M2 switch or M3 switch or 2) press the position control ECU and switch assembly LH.
 How To Proceed With Troubleshooting
CAUTION / NOTICE / HINT HINT:
Use the following procedure to troubleshoot the front power seat control system (w/ Memory).
*: Use the Techstream.
PROCEDURE 1. VEHICLE BROUGHT TO WORKSHOP ...
 Registration
REGISTRATION PROCEDURE 1. MEMORY CALL REGISTRATION (a) Memory registration when not using the Techstream NOTICE:
Do not bring 2 or more electrical key transmitter sub-assemblies into the cabin.
D ...
Other materials:
Lexus RX (RX 350L, RX450h) 2016-2026 Repair Manual > Camshaft Position Sensor: Removal
REMOVAL CAUTION / NOTICE / HINT The necessary procedures (adjustment, calibration, initialization or registration) that must be performed after parts are removed and installed, or replaced during camshaft position sensor removal/installation are shown below. Necessary Procedures After Parts Removed/ ...
Lexus RX (RX 350L, RX450h) 2016-2026 Repair Manual > Windshield Deicer System: System Description
SYSTEM DESCRIPTION GENERAL The windshield deicer system uses thin heater wires attached to the inside of the windshield glass to help deice the window surface more quickly. An indicator light illuminates while the system is operating. This system automatically turns off after approximately 15 minute ...
Lexus RX (RX 350L, RX450h) 2016-{YEAR} Owners Manual
- For your information
- Pictorial index
- For safety and security
- Instrument cluster
- Operation of each component
- Driving
- Lexus Display Audio system
- Interior features
- Maintenance and care
- When trouble arises
- Vehicle specifications
- For owners
Lexus RX (RX 350L, RX450h) 2016-{YEAR} Repair Manual

0.0126