Lexus RX (RX 350L, RX450h) 2016-2026 Repair Manual: Operation Check
OPERATION CHECK
Self-diagnosis System
(a) When a malfunction occurs in the intuitive parking assist system or the system cannot be used, a warning is displayed on the multi-information display, each indicator blinks or is illuminated, and the meter buzzer sounds to inform the driver that the system is unavailable.
| Warning Item | Multi-information Display | Indicator/Meter Buzzer Condition |
|---|---|---|
| Static objects function malfunction | Parking Assist Malfunction Visit Your Dealer |
|
| Ultrasonic sensor dirty, frozen or open circuit | Parking Assist Unavailable Clean Parking Assist Sensor |
|
| Parking support alert communication malfunction | Parking Assist Unavailable |
|
DETECTION RANGE MEASUREMENT
NOTICE:
Perform the following measurement and inspection with the shift lever in a position other than P. Be sure to apply the parking brake and depress the brake pedal firmly to prevent the vehicle from moving.
(a) Turn the engine switch on (IG).
(b) Turn the intuitive parking assist system on.
(c) Detection range measurement:
(1) Move the shift lever according to the table below.
| Measurement Area | Shift Lever Position |
| Front Corner | In any position other than P |
| Front Center | In any position other than P or R |
| Rear Corner | R |
| Rear Center |
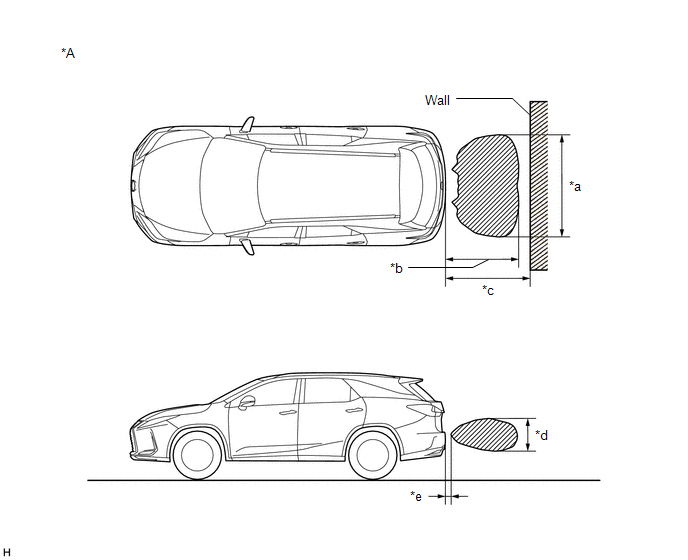
(2) Move a 60 mm (2.4 in.) diameter pole near each sensor to measure its detection range. When measuring the longest-range detection of the front center sonar and the rear center sonar, use a wall or equivalent.
NOTICE:
These detection ranges are applicable when positioning the 60 mm (2.4 in.) diameter pole parallel or perpendicular to the ground. The detection range varies depending on the measuring method and type of obstacle (such as walls).
HINT:
Have an assistant move the pole.
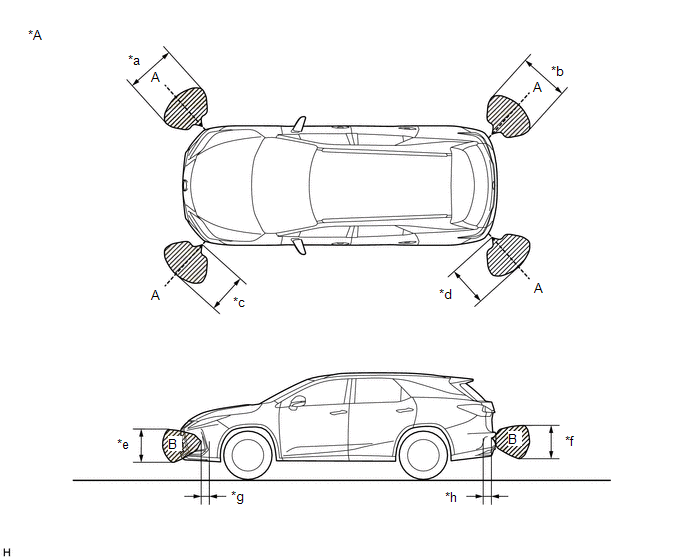
Corner Sonar Detection Range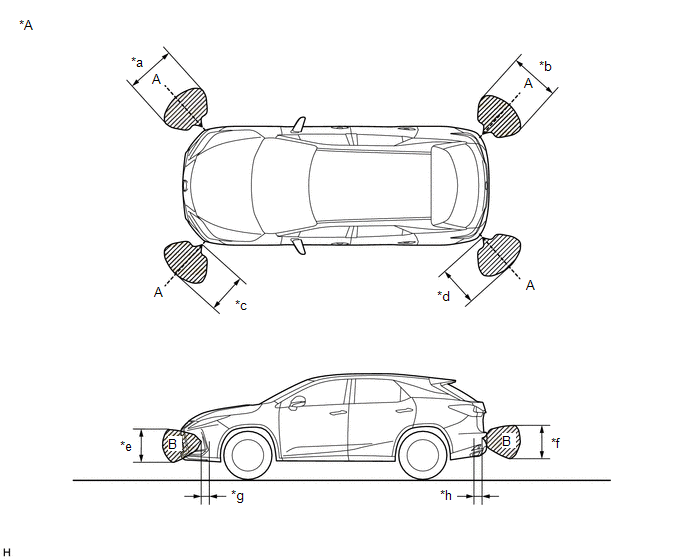
| *A | w/o Rear No. 2 Seat | - | - |
| *a | Approximately 1000 mm (39.4 in.) | *b | Approximately 900 mm (35.4 in.) |
| *c | Approximately 400 mm (15.7 in.) | *d | Approximately 400 mm (15.7 in.) |
| *e | Approximately 400 mm (15.7 in.) | *f | Approximately 400 mm (15.7 in.) |
| *g | Approximately 200 mm (7.9 in.) | *h | Approximately 200 mm (7.9 in.) |
| *A | w/ Rear No. 2 Seat | - | - |
| *a | Approximately 1000 mm (39.4 in.) | *b | Approximately 900 mm (35.4 in.) |
| *c | Approximately 400 mm (15.7 in.) | *d | Approximately 400 mm (15.7 in.) |
| *e | Approximately 400 mm (15.7 in.) | *f | Approximately 400 mm (15.7 in.) |
| *g | Approximately 200 mm (7.9 in.) | *h | Approximately 200 mm (7.9 in.) |
NOTICE:
The ultrasonic sensor side view detection range (hatched area labeled (B)) represents the cross section of the top view detection range (A). The hatched area (B) does not represent the entire side view detection range.
Front Center Sonar Detection Range
| *A | w/o Rear No. 2 Seat | - | - |
| *a | Approximately 2000 mm (78.7 in.) | *b | Approximately 1000 mm (39.4 in.) |
| *c | Approximately 200 mm (7.9 in.) | *d | Approximately 500 mm (19.7 in.) |
| *e | Approximately 200 mm (7.9 in.) | - | - |
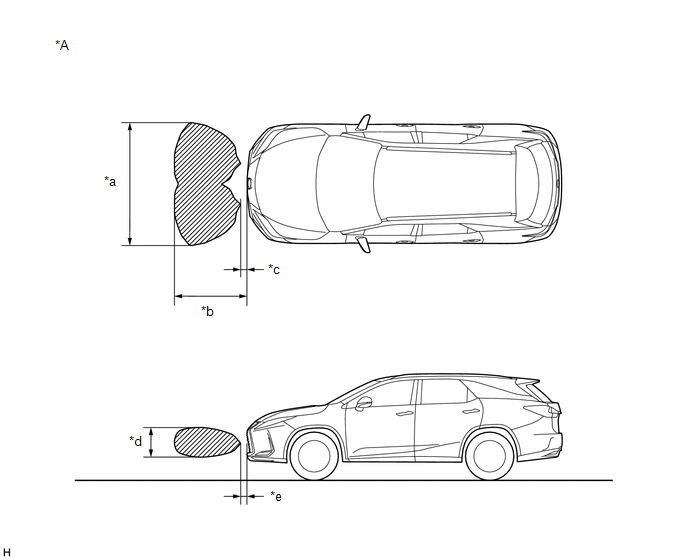
| *A | w/ Rear No. 2 Seat | - | - |
| *a | Approximately 2000 mm (78.7 in.) | *b | Approximately 1000 mm (39.4 in.) |
| *c | Approximately 200 mm (7.9 in.) | *d | Approximately 500 mm (19.7 in.) |
| *e | Approximately 200 mm (7.9 in.) | - | - |
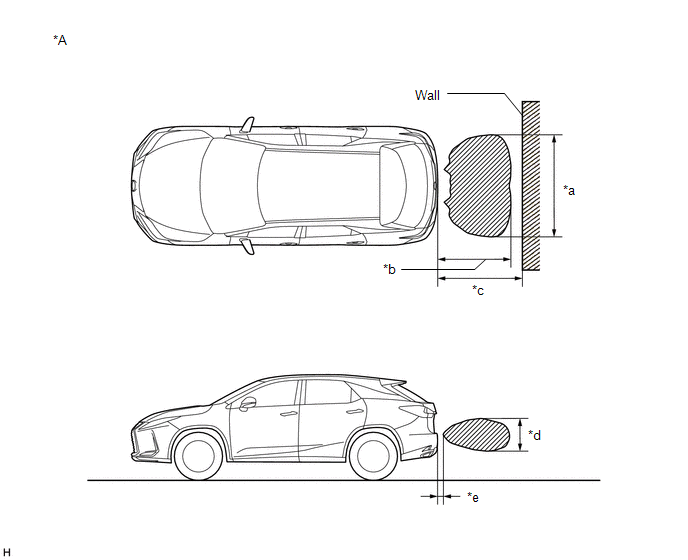
| *A | w/o Rear No. 2 Seat | - | - |
| *a | Approximately 1900 mm (74.8 in.) | *b | Approximately 1300 mm (51.2 in.) |
| *c | Approximately 1500 mm (59.1 in.) | *d | Approximately 500 mm (19.7 in.) |
| *e | Approximately 200 mm (7.9 in.) | - | - |
| *A | w/ Rear No. 2 Seat | - | - |
| *a | Approximately 1900 mm (74.8 in.) | *b | Approximately 1300 mm (51.2 in.) |
| *c | Approximately 1500 mm (59.1 in.) | *d | Approximately 500 mm (19.7 in.) |
| *e | Approximately 200 mm (7.9 in.) | - | - |
 How To Proceed With Troubleshooting
CAUTION / NOTICE / HINT HINT:
Use the following procedure to troubleshoot the intuitive parking assist system.
*: Use the Techstream.
PROCEDURE 1. VEHICLE BROUGHT TO WORKSHOP
NE ...
 Customize Parameters
CUSTOMIZE PARAMETERS CUSTOMIZE INTUITIVE PARKING ASSIST SYSTEM (a) Customizing with the Techstream. NOTICE:
When the customer requests a change in a function, first make sure that the function can ...
Other materials:
Lexus RX (RX 350L, RX450h) 2016-2026 Repair Manual > Back Door Glass: Removal
REMOVAL PROCEDURE 1. REMOVE BACK DOOR OUTSIDE GARNISH SUB-ASSEMBLY Click here 2. REMOVE REAR SPOILER Click here 3. REMOVE POWER BACK DOOR SENSOR ASSEMBLY LH Click here 4. REMOVE POWER BACK DOOR SENSOR ASSEMBLY RH HINT: Use the same procedure as for the LH side. 5. REMOVE REAR WIPER ARM AND BL ...
Lexus RX (RX 350L, RX450h) 2016-2026 Owners Manual > Operating the lights and
wipers: Windshield wipers and
washer
Operating the wiper lever
Operating the lever operates the
wipers or washer as follows.
When "AUTO" is selected, the wipers will operate automatically when the sensor
detects falling rain. The system automatically adjusts wiper timing in
accordance
with rain volume and vehicle speed.
Th ...
Lexus RX (RX 350L, RX450h) 2016-{YEAR} Owners Manual
- For your information
- Pictorial index
- For safety and security
- Instrument cluster
- Operation of each component
- Driving
- Lexus Display Audio system
- Interior features
- Maintenance and care
- When trouble arises
- Vehicle specifications
- For owners
Lexus RX (RX 350L, RX450h) 2016-{YEAR} Repair Manual

0.011