Lexus RX (RX 350L, RX450h) 2016-2026 Repair Manual: Removal
REMOVAL
PROCEDURE
1. REMOVE NO. 2 ENGINE UNDER COVER
Click here .gif)
2. REMOVE FRONT FLOOR COVER LH
Click here
3. REMOVE FRONT CENTER FLOOR COVER
for TMC Made:
Click here
for TMMC Made:
Click here
4. REMOVE WIRING HARNESS CLAMP BRACKET
| (a) Disengage the 2 clamps. |
|
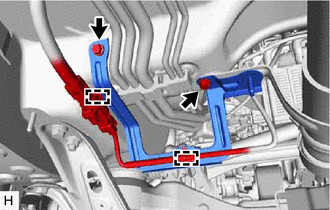
(b) Remove the 2 bolts and wiring harness clamp bracket.
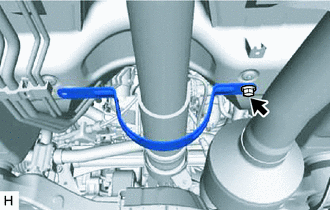
5. REMOVE PROPELLER SHAFT GUARD (for Front Side)
(a) for TMC Made:
| (1) Remove the nut and propeller shaft guard. |
|

(b) for TMMC Made:
| (1) Remove the bolt and propeller shaft guard. |
|
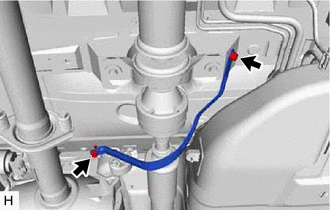
6. REMOVE PROPELLER SHAFT GUARD (for Rear Side)
(a) for Type A:
| (1) Remove the 2 bolts and propeller shaft guard. |
|
(b) for Type B:
(1) Remove the bolt, nut and propeller shaft guard.
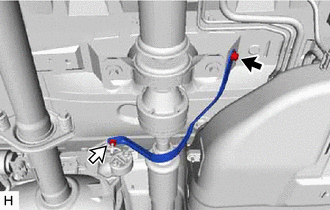
.png) | Bolt |
.png) | Nut |
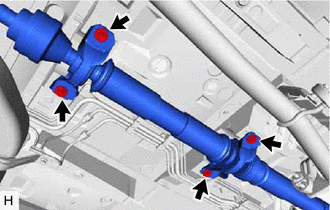
7. REMOVE PROPELLER WITH CENTER BEARING SHAFT ASSEMBLY
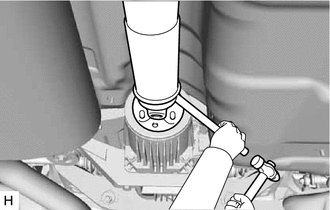
| (a) Using a 6 mm hexagon socket wrench, loosen the 6 cross groove joint set bolts 180°. NOTICE:
|
|
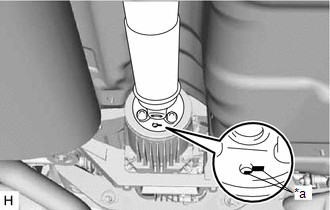
| (b) Put matchmarks on the electro magnetic control coupling sub-assembly and propeller with center bearing shaft assembly. |
|
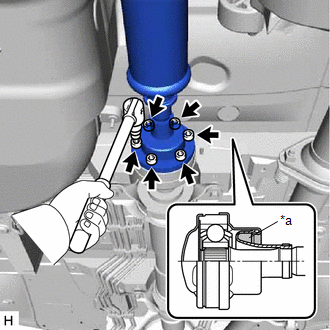
| (c) Remove the 4 nuts and 4 washers. |
|
| (d) Using a brass bar and a hammer, separate the propeller with center bearing shaft assembly. NOTICE: Use wire or an equivalent tool to keep the propeller with center bearing shaft assembly. |
|
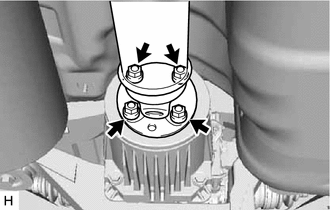
| (e) Remove the 4 bolts and 4 center No. 2 support bearing washers. NOTICE: When removing the bolts and center No. 2 support bearing washers, do not apply excessive force to the universal joint. |
|
(f) Pull out the propeller with center bearing shaft assembly from the transfer assembly.
NOTICE:
- When removing the propeller with center bearing shaft assembly, do not apply excessive force to the universal joint.
- During and after the removal of the propeller with center bearing shaft assembly, keep the universal joint angle straight (within 15 degrees).
- Be careful not to damage the transfer extension housing type T oil seal.
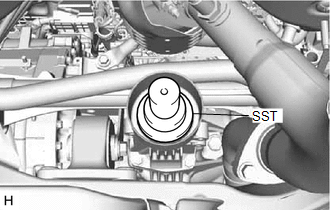
| (g) Insert SST into the transfer assembly to prevent oil leakage. SST: 09325-20010 NOTICE: Be careful not to damage the transfer extension housing type T oil seal. |
|
 Disassembly
DISASSEMBLY CAUTION / NOTICE / HINT NOTICE:
When using a vise, place aluminum plates between the part and vise.
When using a vise, do not overtighten it.
PROCEDURE 1. REMOVE PROPELLER SHAFT AS ...
 Inspection
INSPECTION PROCEDURE 1. INSPECT SPIDER BEARING (a) Check that the spider bearing rotates smoothly. (b) Check that there is no play in the spider bearing. If necessary, replace the pr ...
Other materials:
Lexus RX (RX 350L, RX450h) 2016-2026 Repair Manual > Airbag System: Curtain Shield Airbag Sensor Initialization Error (LH) (B1638)
DESCRIPTION The side collision sensor LH circuit (bus 1) consists of the airbag sensor assembly, door side airbag sensor LH and rear airbag sensor LH. The door side airbag sensor LH and rear airbag sensor LH detect impacts to the vehicle and send signals to the airbag sensor assembly to determine if ...
Lexus RX (RX 350L, RX450h) 2016-2026 Repair Manual > Sfi System: Engine Coolant Temperature / Intake Air Temperature Signal Compare Failure (P011B62)
DESCRIPTION The engine has two temperature sensors, an engine coolant temperature sensor and an intake air temperature sensor (for mass air flow meter sub-assembly), to detect temperature while the engine is operating. A thermistor, whose resistance value varies according to the temperature, is buil ...
Lexus RX (RX 350L, RX450h) 2016-{YEAR} Owners Manual
- For your information
- Pictorial index
- For safety and security
- Instrument cluster
- Operation of each component
- Driving
- Lexus Display Audio system
- Interior features
- Maintenance and care
- When trouble arises
- Vehicle specifications
- For owners
Lexus RX (RX 350L, RX450h) 2016-{YEAR} Repair Manual

0.0144