Lexus RX (RX 350L, RX450h) 2016-2026 Repair Manual: Installation
INSTALLATION
PROCEDURE
1. TEMPORARILY TIGHTEN PROPELLER WITH CENTER BEARING SHAFT ASSEMBLY
| (a) Remove SST from the transfer assembly. |
|
.png)
(b) Insert the propeller with center bearing shaft assembly into the transfer assembly.
NOTICE:
- Be careful not to damage the transfer extension housing type T oil seal.
- Be careful not to damage the universal joint boot when installing the propeller with center bearing shaft assembly.
| (c) Align the matchmarks on the electro magnetic control coupling sub-assembly and propeller with center bearing shaft assembly. |
|
.png)
| (d) Temporarily install the 4 nuts and 4 washers. NOTICE: Do not apply grease to the 4 bolts, 4 nuts or 4 washers. |
|
.png)
| (e) Temporarily install the propeller with center bearing shaft assembly with the 4 bolts, and 4 center No. 2 support bearing washers. NOTICE:
|
|
.png)
| (f) Fully tighten the 4 nuts. Torque: 73.5 N·m {749 kgf·cm, 54 ft·lbf} |
|
2. FULLY TIGHTEN PROPELLER WITH CENTER BEARING SHAFT ASSEMBLY
| (a) Remove the piece of cloth or equivalent from the universal joint flange. |
|
.png)
(b) Using a 6 mm hexagon socket wrench, fully tighten the 6 cross groove joint set bolts.
Torque:
26 N·m {265 kgf·cm, 19 ft·lbf}
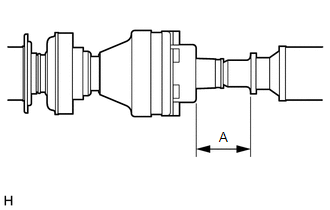
| (c) With the vehicle unloaded, adjust the distance (A) between the rear side of the cover and shaft as shown in the illustration. Distance (A): 65.5 to 70.5 mm (2.58 to 2.78 in.) |
|
(d) With the vehicle unloaded, adjust the front and rear distance (A) between the edge surface of the center No. 2 support bearing assembly and the edge surface of the cushion respectively as shown in the illustration, and then tighten the bolts.

| *a | Center No. 2 Support Bearing Assembly (for Front Side) | *b | Center No. 2 Support Bearing Assembly (for Rear Side) |
Distance (A):
11.5 to 13.5 mm (0.453 to 0.531 in.)
| (e) Fully tighten the 4 bolts. Torque: 36.8 N·m {375 kgf·cm, 27 ft·lbf} |
|
(f) Check that the center line of the bracket is at a right angle to the shaft axial direction.
3. INSPECT AND ADJUST TRANSFER OIL
Click here .gif)
4. INSPECT AND ADJUST JOINT ANGLE
NOTICE:
Measure the joint angle when the vehicle is raised using a four-post lift or when using a pit.
HINT:
If any vibration or noise occurs, perform the joint angle check as follows and replace the center No. 2 support bearing washers with ones of the correct thickness.
(a) Stabilize the propeller shaft and differential.
(1) Turn the propeller shaft several times by hand to stabilize the center support bearings.
(2) Using a jack, raise and lower the differential to stabilize the differential mounting cushion.
(b) Check the No. 1 and No. 4 joint angles.
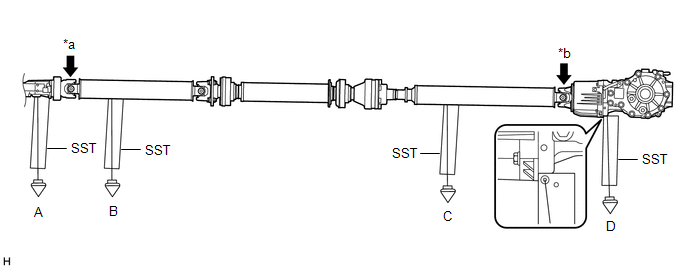
| *a | No. 1 Joint Angle | *b | No. 4 Joint Angle |
(1) Using SST, measure the transfer assembly installation angle (A) and propeller shaft assembly installation angle (B).
SST: 09370-50010
No. 1 Joint Angle:
| Measurement Position | No. 1 Joint Angle |
|---|---|
| A-B | -3.02° to -1.02° |
(2) Using SST, measure the rear propeller shaft assembly installation angle (C) and rear differential carrier assembly installation angle (D).
SST: 09370-50010
No. 4 Joint Angle:
| Measurement Position | No. 4 Joint Angle |
|---|---|
| C-D | 0.85° to 2.85° |
If the measured angle is not within the specified range, adjust it with center No. 2 support bearing washers.
(c) Adjust the No. 1 joint angle and No. 4 joint angle.
(1) Select center No. 2 support bearing washers for adjustment.
Center No. 2 Support Bearing Washer Thickness:
| Part No. | Thickness mm (in.) |
|---|---|
| 90201-10095 | 3.2 mm (0.126 in.) |
| 90201-10081 | 4.5 mm (0.177 in.) |
| 90201-10083 | 6.5 mm (0.256 in.) |
| 90201-10084 | 9.0 mm (0.354 in.) |
| 90201-10085 | 11.0 mm (0.433 in.) |
| 90201-10086 | 13.5 mm (0.531 in.) |
| 90201-10134 | 15.5 mm (0.610 in.) |
| 90201-10135 | 17.5 mm (0.689 in.) |
NOTICE:
- Make sure to use center No. 2 support bearing washers of the same thickness on both the right and left sides.
- Do not use more than 1 adjusting washer per bolt.
5. INSTALL PROPELLER SHAFT GUARD (for Front Side)
(a) for TMC Made:
(1) Install the propeller shaft guard with the nut.
Torque:
8.5 N·m {87 kgf·cm, 75 in·lbf}
(b) for TMMC Made:
(1) Install the propeller shaft guard with the bolt.
Torque:
8.5 N·m {87 kgf·cm, 75 in·lbf}
6. INSTALL PROPELLER SHAFT GUARD (for Rear Side)
(a) for Type A:
(1) Install the propeller shaft guard with the 2 bolts.
Torque:
32 N·m {326 kgf·cm, 24 ft·lbf}
(b) for Type B:
(1) Install the propeller shaft guard with the bolt and nut.
Torque:
Bolt :
32 N·m {326 kgf·cm, 24 ft·lbf}
Nut :
10 N·m {102 kgf·cm, 7 ft·lbf}
7. INSTALL WIRING HARNESS CLAMP BRACKET
(a) Install the wiring harness clamp bracket with the 2 bolts.
Torque:
8.5 N·m {87 kgf·cm, 75 in·lbf}
(b) Engage the 2 clamps.
8. INSTALL FRONT CENTER FLOOR COVER
for TMC Made:
Click here
for TMMC Made:
Click here
9. INSTALL FRONT FLOOR COVER LH
Click here
10. INSTALL NO. 2 ENGINE UNDER COVER
Click here
 Inspection
INSPECTION PROCEDURE 1. INSPECT SPIDER BEARING (a) Check that the spider bearing rotates smoothly. (b) Check that there is no play in the spider bearing. If necessary, replace the pr ...
 Reassembly
REASSEMBLY CAUTION / NOTICE / HINT NOTICE:
When using a vise, place aluminum plates between the part and vise.
When using a vise, do not overtighten it.
PROCEDURE 1. INSTALL CENTER NO. 2 SUPPO ...
Other materials:
Lexus RX (RX 350L, RX450h) 2016-2026 Repair Manual > Panoramic View Monitor System: Front Camera Response Malfunction (C2A6D)
DESCRIPTION During self diagnosis of the parking assist ECU, the parking assist ECU sends display mode ID signals to the front television camera assembly. This DTC is stored when the output of the front television camera assembly does not match the expected output. DTC No. Detection Item DTC ...
Lexus RX (RX 350L, RX450h) 2016-2026 Repair Manual > Ambient Light (for Instrument Panel): Installation
INSTALLATION PROCEDURE 1. INSTALL INTERIOR ILLUMINATION LIGHT SUB-ASSEMBLY (a) Engage the 3 claws to install the interior illumination light sub-assembly as shown in the illustration. Install in this Direction 2. INSTALL NO. 2 INSTRUMENT CLUSTER MOULDING Click here 3. INSTALL INSTRUMEN ...
Lexus RX (RX 350L, RX450h) 2016-{YEAR} Owners Manual
- For your information
- Pictorial index
- For safety and security
- Instrument cluster
- Operation of each component
- Driving
- Lexus Display Audio system
- Interior features
- Maintenance and care
- When trouble arises
- Vehicle specifications
- For owners
Lexus RX (RX 350L, RX450h) 2016-{YEAR} Repair Manual

0.0112