Lexus RX (RX 350L, RX450h) 2016-2026 Repair Manual: Disassembly
DISASSEMBLY
PROCEDURE
1. INSPECT FRONT OIL PUMP BODY SUB-ASSEMBLY
Click here .gif)
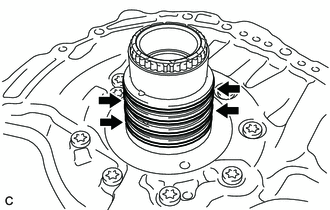
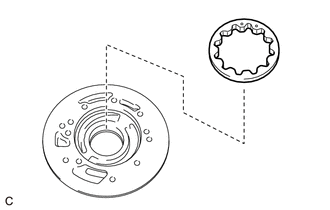
2. REMOVE CLUTCH DRUM OIL SEAL RING
| (a) Remove the 4 clutch drum oil seal rings from the stator shaft assembly. |
|
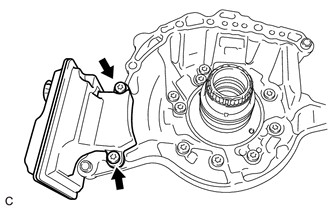
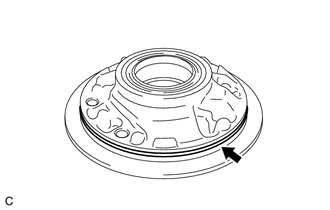
3. REMOVE VALVE BODY OIL STRAINER ASSEMBLY
| (a) Using a T30 "TORX" socket wrench, remove the 2 bolts and valve body oil strainer assembly from the stator shaft assembly. |
|
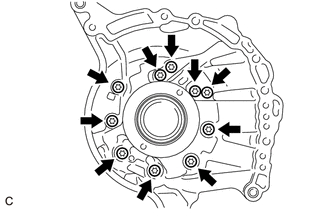
4. REMOVE STATOR SHAFT ASSEMBLY
| (a) Using a T30 "TORX" socket wrench, remove the 10 bolts and stator shaft assembly from the front oil pump body and gear sub-assembly. NOTICE: Keep the gears in the order they were removed. |
|
5. INSPECT CLEARANCE OF FRONT OIL PUMP BODY AND GEAR SUB-ASSEMBLY
Click here
6. REMOVE FRONT OIL PUMP DRIVE GEAR
| (a) Remove the front oil pump drive gear from the front oil pump body sub-assembly. |
|
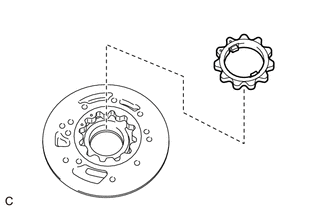
7. REMOVE FRONT OIL PUMP DRIVEN GEAR
| (a) Remove the front oil pump driven gear from the front oil pump body sub-assembly. |
|
8. REMOVE FRONT OIL PUMP BODY O-RING
| (a) Remove the front oil pump body O-ring from the front oil pump body sub-assembly. |
|
9. REMOVE FRONT OIL PUMP OIL SEAL
| (a) Secure the front oil pump body sub-assembly in a soft jaw vise. |
|
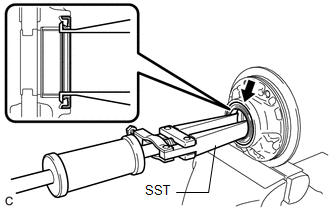
(b) Using SST, remove the front oil pump oil seal from the front oil pump body sub-assembly.
SST: 09308-00010
 Components
COMPONENTS ILLUSTRATION *1 FRONT OIL PUMP OIL SEAL *2 FRONT OIL PUMP BODY O-RING *3 FRONT OIL PUMP BODY SUB-ASSEMBLY *4 FRONT OIL PUMP DRIVEN GEAR *5 FRONT OIL PUMP DRIVE GEA ...
 Inspection
INSPECTION PROCEDURE 1. INSPECT FRONT OIL PUMP BODY SUB-ASSEMBLY (a) Turn the front oil pump drive gear with 2 screwdrivers and check that it rotates smoothly. NOTICE: Be careful not to damage the ...
Other materials:
Lexus RX (RX 350L, RX450h) 2016-2026 Repair Manual > Power Window Control System: Front Passenger Side Power Window does not Operate with Front Passenger Side Power Window Switch
DESCRIPTION When the engine switch is on (IG), the power window regulator motor assembly (for front passenger door) is operated by the power window regulator switch assembly. The power window regulator motor assembly (for front passenger door) has motor, regulator, and ECU functions. WIRING DIAGRAM ...
Lexus RX (RX 350L, RX450h) 2016-2026 Repair Manual > Fuel Sender Gauge Assembly: Components
COMPONENTS ILLUSTRATION *A for TMC Made - - *1 FUEL SENDER GAUGE ASSEMBLY *2 FUEL SUCTION TUBE WITH PUMP AND GAUGE ASSEMBLY ILLUSTRATION *A for TMMC Made - - *1 FUEL SENDER GAUGE ASSEMBLY *2 FUEL SUCTION TUBE WITH PUMP AND GAUGE ASSEMBLY ...
Lexus RX (RX 350L, RX450h) 2016-{YEAR} Owners Manual
- For your information
- Pictorial index
- For safety and security
- Instrument cluster
- Operation of each component
- Driving
- Lexus Display Audio system
- Interior features
- Maintenance and care
- When trouble arises
- Vehicle specifications
- For owners
Lexus RX (RX 350L, RX450h) 2016-{YEAR} Repair Manual

0.0099